| CATEGORII DOCUMENTE |
| Bulgara | Ceha slovaca | Croata | Engleza | Estona | Finlandeza | Franceza |
| Germana | Italiana | Letona | Lituaniana | Maghiara | Olandeza | Poloneza |
| Sarba | Slovena | Spaniola | Suedeza | Turca | Ucraineana |
SOFTWARE INSTALLATION
**WDM driver does not support this application software.**
This chapter will show you the installation steps of TViewer software.
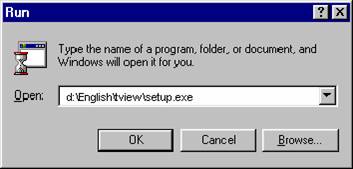
1ĀĀĀĀĀĀĀĀĀ Installation for Windows 95/98
1.ĀĀ Insert the application software CD-ROM into your CD-ROM driver.
2.ĀĀ Click 'Start', 'Run'.
3. Type in 'd:Englishtviewsetup.exe', then click 'OK'.
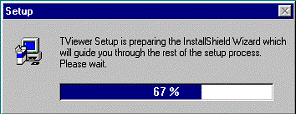
TViewer setup will prepare the InstallShield Wizard to guide you through the rest of the setup process.
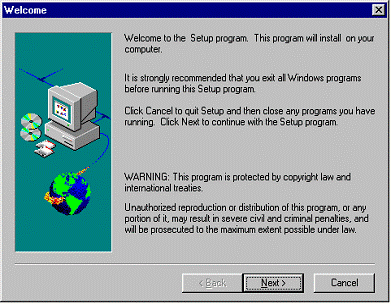
5. Click 'Next>' to continue.
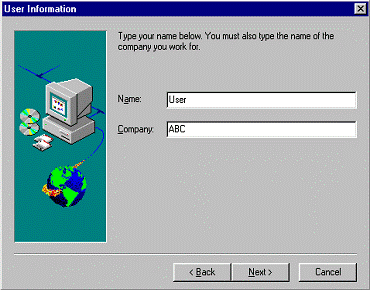
6.ĀĀĀĀĀĀĀĀ Type in user information, then click 'Next>'.
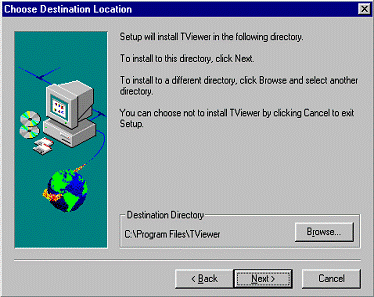
7.ĀĀ To install to default directory, click 'Next>'. Otherwise click 'Browse' and select another directory, then click 'Next>'.
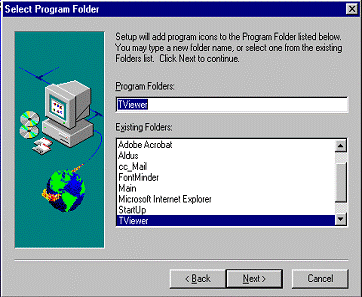
8.ĀĀ Using the default Program Folder, or select existing folder, then click 'Next>'.
9.ĀĀĀĀ Click 'Next>' to start copying files into the harddisk.

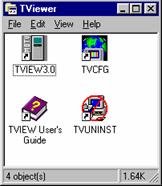
10.ĀĀ The InstallShield Wizard will create 4 icons.
11.ĀĀ Before running the TView, you should select the country you located and then click OK.
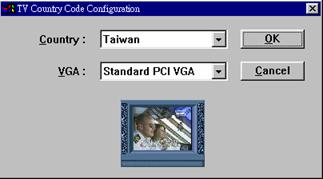
** To let the TV capture card match with your TV system signal, you can click TVCFG icon to choice the country you located.
2ĀĀ Using the TViewer Software
2.1ĀĀ Input Source Selection and Video Mode
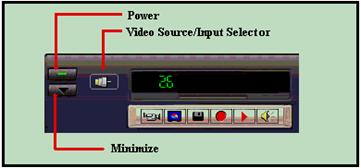
![]() Click to exit the TV application.
Click to exit the TV application.
![]() Click to exit the TV application.
Click to exit the TV application.
Video Source
Click ![]() or
or
![]() to select the video source.
to select the video source.
When ![]() is shown on the control panel, the cable input
is selected.
is shown on the control panel, the cable input
is selected.
When ![]() is shown on the control panel, the antenna
input is selected.
is shown on the control panel, the antenna
input is selected.
When ![]() is shown on the control panel, the composite
input is selected.
is shown on the control panel, the composite
input is selected.
When ![]() ĀĀis shown on the control panel, the S-VHS
input is selected.
ĀĀis shown on the control panel, the S-VHS
input is selected.
When ![]() is shown on the control panel, the camera
input (optional) is selected.
is shown on the control panel, the camera
input (optional) is selected.
Video Display Mode
Click![]() to set low resolution display and updated 15 frames per second or less.
to set low resolution display and updated 15 frames per second or less.
Click ![]() to set high resolution and updated screen
quickly with VGA chipset specific Direct Draw driver.
to set high resolution and updated screen
quickly with VGA chipset specific Direct Draw driver.
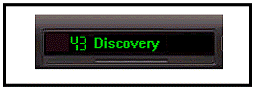
Shows the TV channel number and push button message.
The Message LCD show the hint of the push buttons that mouse located.
2.2ĀĀĀĀĀĀ TV Channel Function
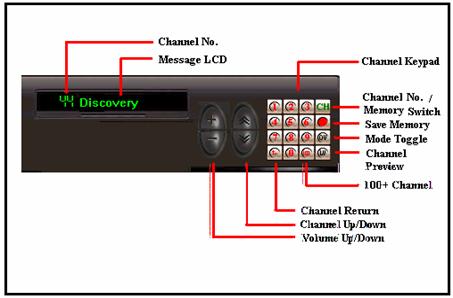
For channel setting, please use fast channel selector, which consists of buttons that let the user to select a two-digit channel.
To select channel 38, clickĀ ![]() then
then ![]() .
.
To select channel 07, click ![]() then
then ![]() or click
or click ![]() then
then ![]() to accept the channel input.
to accept the channel input.
Click ![]() to return previous channel.
to return previous channel.
Click ![]() to accept the channel input.
to accept the channel input.
Click ![]() to channel up.
to channel up.
Click ![]() to channel down.
to channel down.
Click ![]() to increase the volume.
to increase the volume.
Click ![]() to decrease the volume.
to decrease the volume.
Favorite channels
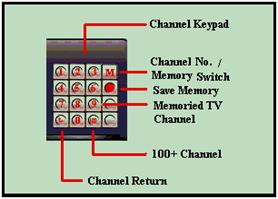
Memory Favorite channels
Click ![]() to select memory channel.
to select memory channel.
Click ![]() and
and ![]() to memory current channel as favorite.
to memory current channel as favorite.
Recall Favorite channels
To switch to the memoried favorite channel, click the buttons below :
Click ![]() to set the keypad as ordinary channel
selector.
to set the keypad as ordinary channel
selector.
Click ![]() ĀĀto set the keypad as favorite channel
selector.
ĀĀto set the keypad as favorite channel
selector.
Click ![]() to select the first favorite channel.
to select the first favorite channel.
Click ![]() to select the last favorite channel.
to select the last favorite channel.
2.3 TV Channel Information
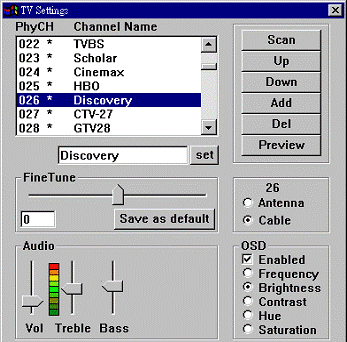
TV Advanced Functions
TV setup dialog consists many advanced functions that make the capture card to be fully controlled by the experienced user.
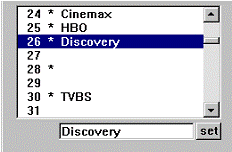
TV Information Block
Please drag the list bar to sleect the channel by clicking on the left mouse button. The channel name will be copied to the edit text box. Edit and the click SET button to update the channel name.
To enable or disable the channel, please double click on the left mouse button. An asterisk (*) will be shown if the channel is enabled. a disabled channel will be skipped when channel up or down key is clicked.
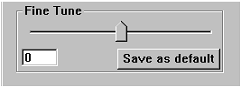
TV Channel Frequency Fine Tune(Optional)
This function is used to adjust the receiver frequency in a range from -128 to +127 for better video quality. Please click the 'SAVE AS DEFAULT' button to write to default channel table. Please click the left or right side of the track bar to get smaller step to increse or decrese. The tracked value will be shown in the value box. Be sure to click and save the value for the next time.
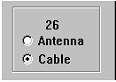
TV Input Source Select
Click to select the Cable CATV or the Air antenna input is selected.
The selected channel number and the fine tune number will be shown too.
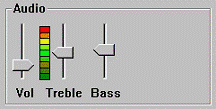
Audio Mixer
To adjust the volume of the audio output, please drag the equalizer.
OSD interface
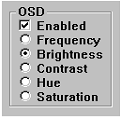
Check to enhance on screen display interface.

You can fine tune the channel frequency or change the brightness, contrast, saturation and hue by keyboard or optional remote controller. Please refer to Video Display Window for feature description.
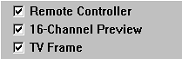
Remote Controller
Click to enable/disable external remote controller.
TV Frame
Click to add/remove TV frame on video display window.
Please refer to Video Display Window section for customized TV Frame.
16-Channel Preview
Click to enable 16-channel preview, unchecked to preview 4 channels (640 * 480 mode) or 9 channels (1024 * 768 mode) only.
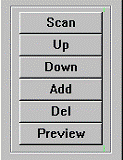
Channel Scan
Channel scan is for the new system connected to the capture card. Please scan when a new capture card is newly installed. The channel scanned with be shown with an asterisk (*). To modifie the channel information, please refer to described aboved to edit the name.
Channel up
Click to reach the previous channel. The selected bar and channel information will be updated synchronously.
Channel down
Click to reach the next channel. The selected bar and channel information will be updated as well.
Add Channel
Click to add current displayed channel.
Del Channel
Click to erase current displayed channel.
Channel Preview
Channel preview is for the user to pick up some favorite channels and show them in a full screen display window. Click the right mouse button to one of the display windows, a mini numberic remote controller will be prompted for selecting the channel. The channel selected will be shown on the top left corner with white background. The channel will be shown in next scanning cycle.
2.4ĀĀĀĀĀĀ Advanced function
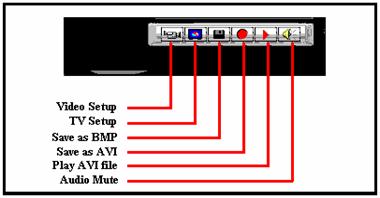
![]() Click to exit the TV application.
Click to exit the TV application.
![]() Click to minimize the control panel.
Click to minimize the control panel.
![]() Click to enable online help.
Click to enable online help.
![]() Click to mute audio.
Click to mute audio.
![]() Click to enable audio.
Click to enable audio.
![]() Click to set the TV parameters, please refer
to TV Channel information.
Click to set the TV parameters, please refer
to TV Channel information.
![]() Click to set the video parameters, please
refer to Video For Windows function.
Click to set the video parameters, please
refer to Video For Windows function.
Video Capture FunctionĀ
Click on the control panel to invoke capture functions :
![]() Click to copy the image to clipboard for other
DDE application.
Click to copy the image to clipboard for other
DDE application.
![]() or
or ![]() Click to save the still image as the Windows
BMP or JPEG file.
Click to save the still image as the Windows
BMP or JPEG file.
![]() or
or ![]() Click to save sequence image as the Microsoft
AVI file.
Click to save sequence image as the Microsoft
AVI file.
![]() or
or ![]() Click to play captured AVI file, default AVI
file is selected.
Click to play captured AVI file, default AVI
file is selected.
![]() or
or ![]()
TV Channel PreviewĀ
Channel preview is for the user to pick up some favorite channels and show them in a full screen display. Click the right mouse button on any of the display windows, a channel selector will be prompted for selecting the channel. The channel selected will be shown on the top left corner with white background. The channel will be shown in next scanning cycle.
![]()
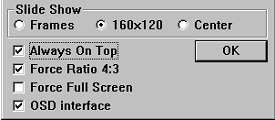
Slide Show FunctionĀ
Slide shows each 160 * 120 video image at 15 frames per second in a full screen display. 16 windows shown in a screen with 640 * 480 resolution and up to 100 windows shown in a screen with 1600 * 1280 resolution. To exit, double click the left mouse button. The full screen is saved to the CLIPBOARD when exit. The captured image is ready for other DDE available applications.
There are three types of slide :
FRAMES shows sequence frames in 160 * 120 display window size.
160 * 120 shows the same frame in 160 * 120 display window size.
CENTER shows the same frame with a center enlarged display window.
![]() or
or ![]()
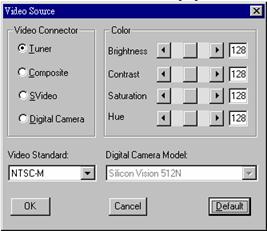
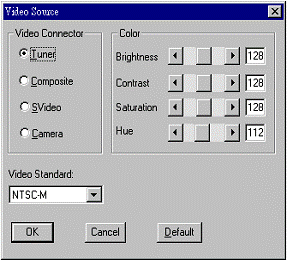
Video SourceĀ
Click to select the video input source. You can change the brightness, contrast, saturation and hue by scroll bar and see the effect in the video display window.
![]()
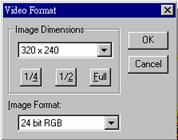
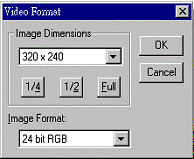
Video FormatĀ
Click to set the display image size and format.
 Ā
Ā
![]()
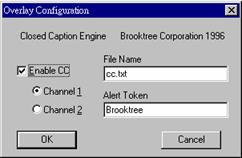
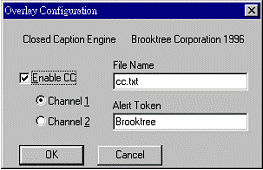
Video Display (Optional)
Click to set the closed caption (NTSC only).
2.5Ā Video Display Window
The video display window is shown initially in a 320 * 240 scaleable and movable window size. Double click on the video display window set it to be full screen, and double click again to restore orginal video window size.
Drag and Drop
To move the video display window, just click the left mouse button and move the window anywhere and release the left mouse.
Dynamic Sizing
To resize the video display window, just move the mouse to the corner of the display window and resize as gereral windows program and the video display window will be dynamic resized as 4:3 ratio.
Capture Video
To capture video, simply click the right mouse button on the video display window and a popup menue will shown, please refer to 2.6 Capture to clipboard, BMP and AVI.
Customize TV Frame
To add the TV frame, check the TV Frame.

To remove the TV frame, uncheck the TV Frame from the Popup menu.

OSD interface
You can fine tune the channel frequency or change the brightness, contrast, saturation and hue by keyboard or optional remote controller.
Click ![]() to change the mode to be adjusted.
to change the mode to be adjusted.
Click ![]() ĀĀto reset the default value.
ĀĀto reset the default value.
Click![]() to fine tune backward.
to fine tune backward.
Click![]() to fine tune forward.
to fine tune forward.

2.6ĀĀĀĀĀĀ Capture to clipboard, BMP and AVI
With video capture functions, you can grab sensational PC still image or AVI movie from any TV, VCR or camera. It is just as simple as to view and capture video right at your fingertip.
Simply click the right mouse button on the video display window and a pop-up menu will shown.
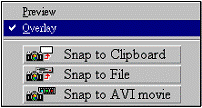
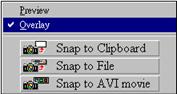 Ā
Ā
Click ![]() to copy the image to clipboard for other DDE
application.
to copy the image to clipboard for other DDE
application.
Click ![]() to save the image as BMP or JPEG file.
to save the image as BMP or JPEG file.
Click ![]() to save sequence video as AVI file.
to save sequence video as AVI file.
Video Capture FunctionĀ
Click on the control panel to invoke capture functions :
![]() Click to copy the image to clipboard for other
DDE application.
Click to copy the image to clipboard for other
DDE application.
![]() or
or ![]() Click to save the still image as the Windows
BMP or JPEG file.
Click to save the still image as the Windows
BMP or JPEG file.
![]() or
or ![]() Click to save sequence image as the Microsoft
AVI file.
Click to save sequence image as the Microsoft
AVI file.
![]() or
or ![]() Click to play captured AVI file, default AVI
file is selected.
Click to play captured AVI file, default AVI
file is selected.
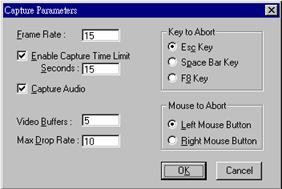
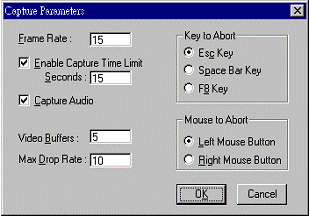
Capture ParametersĀ
To set capture parameters such as frame rate, recording timer, exit method and memory usage.
2.7ĀĀĀĀĀĀ Video For Windows function
Video Source
Click to select the video input source. You can change the brightness, contrast, saturation and hue by scroll bar and see the effect in the video display window.
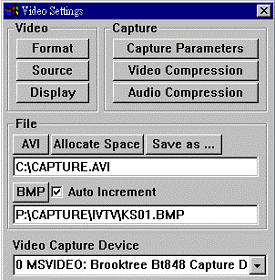
Video Format
Click to set the display image size and format.
Video Display(Optional)
Click to set the closed caption.
Capture Parameters
To set capture parameters such as frame rate, recording timer, exit method and memory usage.
Audio Compression
To select the AVI audio compression driver that installed in the system. This will reduce some quality but save more file space and take shorter time to send the video via mail to others.
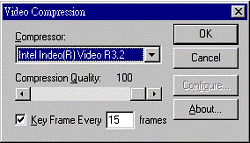
Video Compression
To select the AVI video compression driver that installed in the system. This will reduce some quality but save more file space and take shorter time to send the video via mail to others.
AVI Filename
Press the AVI button to set the filename to save the captured video file. The filename will be shown in the dialog box; default is capture.avi. The captured AVI file will be overwritten by the next captured AVI file.
Allocate File Space
Click to set the capturing file size in MB.
Save as
Click to save AVI file with different filename that set previously.
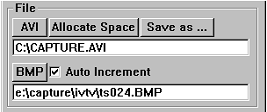
BMP Filename
Press the BMP button to set the filename to save the still image. The filename will be shown in the dialog box; default is capture.bmp.
BMP Auto Increment
Click to enable the increment to file number automatically after BMP file is captured. If this parameter is disable, the captured BMP file will be overwritten by the next captured BMP file.
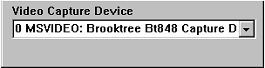
Video Capture Device
Show the video capture devices that installed in the system. Please drop down to select another one if more than one video capture device are installed in the system. It will take one or two seconds to connect the capture device.
Slide Show Function
Slide shows each 160 * 120 video image at 15 frams per second in a full screen display. 16 windows shown in a screen with 640 * 480 resolution and up to 100 windows shown in a screen with 1600 * 1280 resolution. To exit, double click the left mouse button. The full screen is saved to the CLIPBOARD when exit. The captured image is available for other DDE available applications.
![]()
There are three types of slide :
FRAMES shows sequence frame in 160 * 120 display window size.
CENTER shows same frame with a center enlarged display window.
160 * 120 shows same frame in 160 * 120 display window size.
Extended video parameters
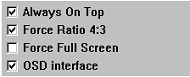
Always On TopĀ
Check to put the control panel and the video screen on the top of the others.
Uncheck to disable the control panel and the video screen on the top of the others.
Force Ratio 4:3
Check to put the video window in 4:3 ratio mode, default is enabled.
Force Full Screen
Check to enhance full screen function for some incompatible VGA, default is disabled.
OSD interface
Check to enhance on screen display interface. The TV channel number, name and configuration parameter are displayed in the video display window.

2.8ĀĀĀĀĀĀ Hot Keys
To control the application, please use mouse, optional remote controller or keyboard.
Here are function keys :
User's guideĀ
![]() Click to enable online help.
Click to enable online help.
Video Display ModeĀ
![]() Click to set video as overlay mode.
Click to set video as overlay mode.
![]() Click to set video as preview mode.
Click to set video as preview mode.
![]() Click to put video on top most of the others.
Click to put video on top most of the others.
![]() Click to freeze the video display window.
Click to freeze the video display window.
Video For Windows Function
![]() Click to copy the image to clipboard for other
DDE application.
Click to copy the image to clipboard for other
DDE application.
![]() Click to save the still image as the Windows
BMP file.
Click to save the still image as the Windows
BMP file.
![]() Click to save sequence image as the Microsoft
AVI file.
Click to save sequence image as the Microsoft
AVI file.
![]() Click to play the captured AVI file.
Click to play the captured AVI file.
![]() Click to select the video source.
Click to select the video source.
![]() Click to set the display image size and
format.
Click to set the display image size and
format.
![]() Click to set the capture parameters.
Click to set the capture parameters.
![]() Click to select the video source.
Click to select the video source.
Slide Show Function
![]() Click to preview the favorite channels.
Click to preview the favorite channels.
![]() Click to run the slide show video.
Click to run the slide show video.
OSD InterfaceĀ
![]() Click to change the mode to be adjusted.
Click to change the mode to be adjusted.
![]() Click to reset the default value.
Click to reset the default value.
![]() Click to fine tune backward.
Click to fine tune backward.
![]() Click to fine tune forward.
Click to fine tune forward.
Audio ModeĀ
![]() Click to toggle mute and enable audio.
Click to toggle mute and enable audio.
![]() Click to increase the volume.
Click to increase the volume.
![]() Click to decrease the volume.
Click to decrease the volume.
TV Channel Function
![]() Click to scan TV channel.
Click to scan TV channel.
![]() Click to channel up.
Click to channel up.
![]() Click to channel down.
Click to channel down.
![]() Click to add current displayed channel.
Click to add current displayed channel.
![]() Click to erase current displayed channel.
Click to erase current displayed channel.
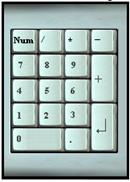
Please click two-digit numeric keys to select TV channel.
|
Politica de confidentialitate | Termeni si conditii de utilizare |

Vizualizari: 381
Importanta: ![]()
Termeni si conditii de utilizare | Contact
© SCRIGROUP 2025 . All rights reserved