| CATEGORII DOCUMENTE |
| Bulgara | Ceha slovaca | Croata | Engleza | Estona | Finlandeza | Franceza |
| Germana | Italiana | Letona | Lituaniana | Maghiara | Olandeza | Poloneza |
| Sarba | Slovena | Spaniola | Suedeza | Turca | Ucraineana |
Visual Basic for Kids
5. Labels, Text Boxes, Variables
Review and Preview
We continue our look at the Visual Basic environment and learn some new controls and new BASIC statements. As you work through this class, remember the three steps for building a Visual Basic project: (1) place controls on form, (2) assign properties to controls, and (3) write event procedures. In this class, you will examine how to find and eliminate errors in your projects, learn about the label and text box controls, and about BASIC variables. You will build a project that helps you plan your savings.
Debugging a Visual Basic Project
No matter how well you plan your project and no matter how careful you are in implementing your ideas in the controls and event procedures, you will make mistakes. Errors, or what computer programmers call bugs, do creep into your project. You, as a programmer, need to have a strategy for finding and eliminating those bugs. The process of eliminating bugs in a project is called debugging. Unfortunately, there are not a lot of hard, fast rules for finding bugs in a program. Each programmer has his or her own way of attacking bugs. You will develop your ways. We can come up with some general strategies, though, and thatÆs what weÆll give you here.
Project errors, or bugs, can be divided into three types:
Syntax errors
Run-time errors
Logic errors
Syntax errors occur when you make an error setting a property in design mode or when typing a line of BASIC code. Something is misspelled or something is left out that needs to be there. Your project wonÆt run if there are any syntax errors. Run-time errors occur when you try to run your project. It will stop abruptly because something has happened beyond its control. Logic errors are the toughest to find. Your project will run OK, but the results it gives are not what you expected. LetÆs examine each error type and address possible debugging methods.
Syntax Errors
Syntax errors are the easiest to identify and eliminate. The Visual Basic program is a big help in finding syntax errors. Syntax errors will most likely occur as youÆre setting properties for the controls or writing BASIC code for event procedures.
Start a new project in Visual Basic. Go to the project window and try to set the form Left property to the word Junk. What happened? You should see a little window like this (this is the VB4 window, others are similar):
Press <F1> for on-line help and you will see an explanation of the problem. Remember that property values must be the proper type. Assigning an improper type to a property is a syntax error. But, we see Visual Basic wonÆt let us make that mistake. Click OK and the Left value will return to what it was before you tried to change it.
What happens if you cause a syntax error while writing code. LetÆs try it. Open the code window for the Form_Load procedure. Under the header line, type this line, then press <Enter>:
Form1.BackColor 0 vbRed
This would happen if you typed 0 instead of = in the assignment statement. What happened? This window will appear (again, this is the VB4 window):
Pressing <F1> will give you some help. Visual Basic has recognized that something is wrong with this statement. You should be able to see what.
So, if you make a syntax error, Visual Basic will usually know youÆve done something wrong and make you aware of your mistake. The on-line help system is a good resource for debugging your syntax errors. Note that syntax errors usually result because of incorrect typing - another great reason to improve your typing skills, if they need it.
Run-Time Errors
Once you successfully set control properties and written event procedures, eliminating all identified syntax errors, you try to run your project. If the project runs, great! But, many times, your project may stop and tell you it found an error - this is a run-time error. You need to figure out why it stopped and fix the problem. Again, Visual Basic and on-line help will usually give you enough information to eliminate run-time errors. LetÆs look at examples.
Working with the same example as above, change the line of code in the Form_Load procedure to:
Form1.BackColor vbRed
or, pretend we forgot to type the = sign in setting the formÆs background color. Notice Visual Basic let you type in this incorrect line. Visual Basic canÆt find all syntax errors in design mode. Try to run the project (no need to save any files here).
After you click the Start button on the toolbar, the following window (VB4 version shown) should appear:
and the word BackColor will be highlighted in the code window. Visual Basic is telling you that there is something wrong with how you used this particular property. Click <F1> if you need more help. Visual Basic is usually pretty good at pointing out mistakes to you.
LetÆs say we corrected our error by adding the = sign, but we accidentally left out the letter ækÆ in the BackColor property name, or we typed:
Form1.BacColor = vbRed
Try running the project and youÆll see a window (VB4 version shown) like this:
and the word BacColor will be highlighted. Press <F1> if you need help. Visual Basic is telling you it canÆt find this property for the particular control. You should note the misspelling and correct it.
Now, letÆs say you correct the property name, but mess up again and type For1 instead of Form1 for the form name:
For1.BackColor = vbRed
Run the project. A new kind of window will appear:
This message window is not as helpful as the others. Pressing <F1> or clicking Help will explain the error, but not show you where it is. The key message here is æObject required.Æ This usually appears when you have misspelled the assigned name of a control in BASIC code. Visual Basic is trying to assign a property to something using the ædot notationÆ:
ControlName.PropertyName = Value
But, it canÆt find a control with the given name (For1 in this case). How do we know where the error is? A clue can be obtained by clicking the Debug button in this window. Visual Basic will mark the line of code it stopped at. Try it and youÆll see the bad line of code with a box around it. You need to figure out you misspelled the form name - Visual Basic canÆt do that for you. When you clicked the Debug button, Visual Basic switched into its other possible mode - break mode (you have seen the design and run modes). To leave break mode and return to design mode, so you can correct your code, you need to stop the project.
The errors weÆve caused here are three of the most common run-time errors: misspelling an assigned Name property, misspelling a property name, or leaving something out of an assignment statement. There are others and youÆll see lots of them as you start building projects. But, youÆve seen that Visual Basic is pretty helpful in pointing out where errors are and on-line help is always available to explain them. One last thing about run-time errors. Visual Basic will not find all errors at once. It will stop at the first run-time error it encounters. After you fix that error, there may be more. You have to fix run-time errors one at a time.
Logic Errors
Logic errors are the most difficult to find and eliminate. These are errors that donÆt keep your project from running, but cause incorrect or unexpected results. The only thing you can do at this point, if you suspect logic errors exist, is to dive into your project (primarily, the event procedures) and make sure everything is coded exactly as you want it. Finding logic errors is a time-consuming art, not a science. There are no general rules for finding logic errors. Each programmer has his or her own particular way of searching for logic errors.
With the example we have been using, a logic error would be setting the form background color to blue, when you expected red. You would then go into the code to see why this is happening. You would see the symbolic constant vbBlue instead of the desired constant vbRed. Making the change would eliminate the logic error and the form will be red.
Unfortunately, eliminating logic errors is not as easy as this example. But, there is help. Visual Basic has something called a debugger that helps you in the identification of logic errors. Using the debugger (it operates in the break mode we saw), you can print out properties and other values, stop your code wherever and whenever you want, and run your project line-by-line. Use of the debugger is an advanced topic and will not be talked about in this course. If you want to improve your Visual Basic skills, you are encouraged to eventually learn how to use the debugger.
Now, letÆs improve your skills regarding Visual Basic controls. WeÆll look at two new controls: the label and the text box.
Label Control
A label is a control that displays information the user cannot edit directly. It is often used to provide titles for other controls. Or, it is used to display the results of some computer operation. The label control is selected from the toolbox. It appears as:
In Toolbox On Form (default properties):

![]()
Properties
A few useful properties for the label are:
Property Description
NameĀĀĀĀĀĀĀĀĀĀĀĀĀĀĀĀĀĀĀ Name used to identify label. Three letter prefix for label names is lbl.
Caption Text (string type) that appears in the label.
Font Sets style, size, and type of Caption text.
Alignment Sets whether Caption text is left-justified, right-justified, or centered in label.
BackColor Sets label background color.
ForeColor Sets color of Caption text.
BorderStyle Determines type of label border.
Left Distance from left side of form to left side of label.
Top Distance from top side of form to top side of label.
Width Width of the label in twips.
Height Height of label in twips.
Visible Determines whether the label appears on the form (in run mode).
Example
Make sure Visual Basic is running and start a new project. Put a label on the form. Resize it and move it, if desired. Set the Caption property. Try different Fonts. Try different values of the Alignment property. Notice Alignment only centers the Caption horizontally - there is no vertical alignment. See the difference between the two BorderStyle possibilities. Notice the default value (0-None) makes the label fit into the form, where the other value (1-Fixed Single) gives the label a three-dimensional inset look. Change the BackColor and ForeColor properties. You may find certain color combinations that donÆt do a very good job of displaying the Caption when in color. Make sure you are aware of combinations that do and donÆt work. You want your user to be able to read what is displayed.
The most used label property is Caption. It holds the information that is displayed in the label control. There are two things you need to be aware of. First, make sure your label is big enough to hold any Caption you might provide for it. Second, note the Caption is a string type property. It can only hold string values. When setting the Caption property in run mode, the Caption information must be in quotes. For example, if you have a label control named lblExample and you want to set the Caption property to My Label Box, you would use the BASIC code (note the dot notation):
lblExample.Caption = ōMy Label Boxö
You donÆt have to worry about the quotes when setting the Caption in design mode. Visual Basic knows this is a string value.
Events
There is only one label event of interest:
Event Description
ClickĀĀĀĀĀĀĀĀĀĀĀĀĀĀĀĀĀĀĀĀĀ Event executed when user clicks on the label with the mouse.
With this event, you could allow your user to choose among a set of displayed label boxes. Why would you want to do this? Example applications include multiple choice answers in a test or color choices.
Text Box Control
The text box control is used to display information entered in design mode, by a user in run mode, or assigned within an event procedure. Just think of a text box as a label whose contents your user can change. The text box is selected from the Visual Basic toolbox. It appears as:
In Toolbox On Form (default properties):

![]()
Properties
The text box has a wealth of useful properties:
Property Description
NameĀĀĀĀĀĀĀĀĀĀĀĀĀĀĀĀĀĀĀ Name used to identify text box. Three letter prefix for text box names is txt.
TextĀĀĀĀĀĀĀĀĀĀĀĀĀĀĀĀĀĀĀĀĀĀ Text (string value) that appears in text box.
Font Sets style, size, and type of Text.
Alignment Sets whether Text is left-justified, right-justified, or centered in text box (only works when MultiLine property is True).
MultiLine Specifies whether text box displays one line or multiple lines.
ScrollBars Specifies type of displayed scroll bar(s).
MaxLength Maximum length of displayed Text. If 0, length is unlimited.
BackColor Sets text box background color.
ForeColor Sets color of Text.
BorderStyle Determines type of text box border.
Left Distance from left side of form to left side of text box.
Top Distance from top side of form to top side of text box.
Width Width of the text box in twips.
Height Height of text box in twips.
Locked If True, user canÆt change contents of text box (run mode only).
Visible Determines whether the text box appears on the form (in run mode).
Example
Start a new Visual Basic project. Put a text box on the form. Resize it and move it, if desired. Set the Text property. Try different Fonts. Try different values of the Alignment property. Notice you canÆt center or right justify text unless the MultiLine property is True. See the difference between the two BorderStyle possibilities. The label box used None as default, the text box uses Fixed Single. Change the BackColor and ForeColor properties. Set MultiLine to True and try different ScrollBars values. I think you can see the text box is very flexible in how it appears on your form.
Like the Caption property of the label control, the Text property of a text box is a string value. So, when setting the Text property in run mode, we must enclose the value in quotes (ō) to provide a proper assignment. Setting the Text property in design mode does not require (and you shouldnÆt use) quotes.
Events
The most important property of the text box is the Text property. As a programmer, you need to know when this property has changed in order to make use of the new value. There are two events you can use to do this:
Event Description
Change Event executed whenever Text changes.
LostFocus Event executed when the user leaves the text box and causes an event on another control.
The Change event is executed a lot - every time a user presses a key while typing in the text box, the Change event procedure is called. Looking at the Text property in this event procedure will give you its current value.
The LostFocus event is the more useful event for examining Text. Remember in placing controls on the form in design mode, you can make one control æactiveÆ by clicking on it. There is a similar concept while an application is in run mode. A user can have interaction with only one control at a time. The control the user is interacting with (causing events) is said to have focus. While a user is typing in a text box, that box has focus. The LostFocus event is executed when another control gets focus. At that point, we know the user is done typing in the text box and is done changing the Text property. ThatÆs why this event procedure is a good place to find the value of the Text property.
BASIC - The Second Lesson
In this class, you will learn some new BASIC concepts. We will discuss variables (name, type, declaring), arithmetic operations, and some functions and techniques for working with strings.
Variables
All computer programs work with information of one kind or another. Numbers, text, colors and pictures are typical types of information they work with. Computer programs need places to store this information while working with it. We have seen one type of storage used by Visual Basic projects - control properties. Control properties store information like control size, control appearance, control position on the form, and control colors.
But, control properties are not sufficient to store all information a project might need. What if we need to know how much ten bananas cost if they are 25 cents each? We would need a place to store the number of bananas, the cost of each banana, and the result of multiplying these two numbers together. To store information other than control properties in Visual Basic projects, we use something called variables. They are called variables because the information stored there can change, or vary, during program execution. Variables are the primary method for moving information around in a Visual Basic project. And, certain rules must be followed in the use of variables. These rules are very similar to those we have already established for control properties.
Variable Names
You must name every variable you use in your project. Rules for naming variables are:
No more than 40 characters.
Can only use letters, numbers, and the underscore (_) character.
The first character must be a letter.
You cannot use a word reserved by Visual Basic (for example, you canÆt have a variable named Form or one named Beep).
The most important rule is to use variable names that are meaningful. You should be able to identify the information stored in a variable by looking at its name. As an example, in our banana buying example, good names would be:
Quantity Variable Name
Cost of each bananaĀĀĀĀĀĀĀĀĀĀĀĀĀĀĀĀĀĀĀĀĀĀĀĀĀĀĀĀĀ BananaCost
Number of bananas purchasedĀĀĀĀĀĀĀĀĀĀĀĀ Bananas
Cost of all bananasĀĀĀĀĀĀĀĀĀĀĀĀĀĀĀĀĀĀĀĀĀĀĀĀĀĀĀĀĀĀĀĀ TotalBananaCost
Variable Types
We need to know the type of information stored by each variable. The same types used for properties can be applied to variables: integer, long integer, Boolean and string. There are other types too - consult on-line help for types you might want to use.
Here, we look at one more type we will use with variables: the single type. Up to now, all the projects weÆve worked with have used integer (or whole number) values. But, we know most æreal-worldÆ mathematics involves decimal numbers. The single type is just that - a number that has a decimal point. In computer language, we call it a floating point number. The æpointÆ that is floating (moving around) is the decimal. Examples of single type numbers are:
2.00 -1.2 3.14159
Variables can appear in assignment statements:
VariableName = NewValue
Only a single variable can be on the left side of the assignment operator (=) while any legal BASIC expression, using any number of variables, can be on the right side of the operator. Recall that, in this statement, NewValue is evaluated first, then assigned to VariableName. The major thing we need to be concerned with is that NewValue is the same type as VariableName. That is, we must assign a properly typed value to the variable. This is the same thing we had to do with property values.
Declaring Variables
Once we have named a variable and determined what type we want it to be, we must relay this information to our Visual Basic project. We need to declare our variables. (We donÆt have to declare control properties since Visual Basic already knows about them.) The statement used to declare a variable named VariableName as type Type is:
Dim VariableName As Type
We need a declaration statement like this for every variable in our project. This may seem like a lot of work, but it is worth it. Proper variable declaration makes programming easier, minimizes the possibility of program errors, and makes later program modification easier.
So, where do we put these variable declarations. Start a new Visual Basic project and bring up the code window. Click the objects list and you should see two things listed: (General) and Form. Choose (General). The code window will look like this:
VB4:
VB5, VB6:
The displayed area in the code window is called the general declarations area. This is where you put variable declaration statements. Any variable declared in general declarations can be used (the value can be accessed and/or changed) in any of the formÆs event procedures.
Your general declarations area might have the words Option Explicit at the top. This is a line of BASIC code that tells Visual Basic we will be declaring every variable we use. A little secret: itÆs not really necessary to declare every variable you want to use, itÆs just a very good idea. ThatÆs why we are doing it. If the words Option Explicit do not appear in your general declarations area, do this:
VB4: Click Tools, then Options. Choose the Environment tab and put a check in the box next to Require Variable Declaration.
VB5, VB6: Click Tools, then Options. Choose the Editor tab and put a check in the box next to Require Variable Declaration.
From now on, for every project you build, all variables must be declared. (The option will take effect the next time you start a project.) We will see how this helps in making our programming tasks easier as we build the project in this class.
Try typing some variable declarations in the code window. Here are some examples to try (note we have added the Option Explicit line):
VB4:
VB5, VB6:
Arithmetic Operators
One thing computer programs are very good at is doing arithmetic. They can add, subtract, multiply, and divide numbers very quickly. We need to know how to make our Visual Basic projects do arithmetic. There are seven arithmetic operators in the BASIC language.
Addition is done using the plus (+) sign and subtraction is done using the minus (-) sign. Simple examples are:
OperationĀĀĀĀĀĀĀĀĀĀĀĀĀĀĀĀĀĀ Example Result
AdditionĀĀĀĀĀĀĀĀĀĀĀĀĀĀĀĀĀĀĀĀ 7 + 2 9
AdditionĀĀĀĀĀĀĀĀĀĀĀĀĀĀĀĀĀĀĀĀ 3 + 8 11
Subtraction 6 - 4 2
Subtraction 11 - 7 4
Multiplication is done using the asterisk (*) and division is done using the slash (/). Simple examples are:
OperationĀĀĀĀĀĀĀĀĀĀĀĀĀĀĀĀĀĀ Example Result
Multiplication 8 * 4 32
Multiplication 2 * 12 24
DivisionĀĀĀĀĀĀĀĀĀĀĀĀĀĀĀĀĀĀĀĀĀĀ 12 / 2 6
DivisionĀĀĀĀĀĀĀĀĀĀĀĀĀĀĀĀĀĀĀĀĀĀ 42 / 6 7
IÆm sure youÆve done addition, subtraction, multiplication, and division before and understand how each operation works. The three other BASIC arithmetic operators may not familiar to you, though.
The next operator is the exponentiation operator, represented by a carat symbol (^) or sometimes called a æhat.Æ The carat is typed when you hold down <Shift> while typing a 6. Exponentiation is used when you want to multiply a number times itself a certain number of times. YouÆve probably æsquaredÆ numbers before, or multiplied a number times itself - this is an example of an exponentiation. If you have an integer variable named A and one named B, A ^ B means you would multiply A times itself B times. Some examples:
ExampleĀĀĀĀĀĀĀĀĀĀĀĀĀĀĀĀĀĀĀĀĀ Result
5 ^ 2ĀĀĀĀĀĀĀĀĀĀĀĀĀĀĀĀĀĀĀĀĀĀĀĀĀĀĀ 25
2 ^ 4 ĀĀĀĀĀĀĀĀĀĀĀĀĀĀĀĀĀĀĀĀĀĀĀĀĀĀ 16
3 ^ 3 ĀĀĀĀĀĀĀĀĀĀĀĀĀĀĀĀĀĀĀĀĀĀĀĀĀĀ 27
The other arithmetic operators are concerned with dividing integer numbers. The integer division operator is a backslash character (). This works just like normal division except only integer (whole number) answers are possible - any remainder from the division is ignored. Conversely, the modulus operator, represented by the BASIC keyword Mod, divides two integer numbers, ignores the main part of the answer, and just gives you the remainder! It may not be obvious now, but the modulus operator is used a lot in computer programming. Examples of both of these operators are:
OperationĀĀĀĀĀĀĀĀĀĀĀĀĀ Example Division Result Operation Result
Integer divisionĀĀĀĀĀ 7 2 3 Remainder 1 3
Integer divisionĀĀĀĀĀ 23 10 2 Remainder 3 2
Integer divisionĀĀĀĀĀ 18 3 6 Remainder 0 6
Modulus 7 Mod 4 1 Remainder 3 3
Modulus 14 Mod 3 4 Remainder 2 2
Modulus 25 Mod 5 5 Remainder 0 0
Study these examples so you understand how integer division works in BASIC.
What happens if an assignment statement contains more than one arithmetic operator? Does it make any difference? Look at this example:
7 + 3 * 4
WhatÆs the answer? Well, it depends. If you work left to right and add 7 and 3 first, then multiply by 4, the answer is 40. If you multiply 3 times 4 first, then add 7, the answer is 19. Confusing? Well, yes. But, BASIC takes away the possibility of such confusion by having rules of precedence. This means there is a specific order in which arithmetic operations will be performed. That order is:
1. Exponentiation (^)
2. Multiplication (*) and division (/)
3. Integer division ()
4. Modulus (Mod)
5. Addition (+) and subtraction (-)
So, in an assignment statement, all exponentiations are done first, then multiplications and divisions, then integer divisions, then modulus operations, and lastly, additions and subtractions. In our example (7 + 3 * 4), we see the multiplication will be done before the addition, so the answer provided by BASIC would be 19.
If two operators have the same precedence level, for example, multiplication and division, the operations are done left to right in the assignment statement. For example:
24 / 2 * 3
The division (24 / 2) is done first yielding a 12, then the multiplication (12 * 3), so the answer is 360. But what if we want to do the multiplication before the division - can that be done? Yes - using the BASIC grouping operators - parentheses (). By using parentheses in an assignment statement, you force operations within the parentheses to be done first. So, if we rewrite our example as:
24 / (2 * 3)
the multiplication (2 * 3) will be done first yielding 6, then the division (24 / 6), yielding the desired result of 4. You can use as many parentheses as you want, but make sure they are always in pairs - every left parenthesis needs a right parenthesis. If you type an assignment statement in the Visual Basic code window with unmatched parentheses, an error message will be displayed (youÆve caused a syntax error) when you try to move the cursor off the line you typed. If you nest parentheses, that is have one set inside another, evaluation will start with the innermost set of parentheses and move outward. For example, look at:
((2 + 4) * 6) + 7
The addition of 2 and 4 is done first, yielding a 6, which is multiplied by 6, yielding 36. This result is then added to 7, with the final answer being 43. You might also want to use parentheses even if they donÆt change precedence. Many times, they are used just to clarify what is going on in an assignment statement.
As you improve your programming skills, make sure you know how each of the arithmetic operators work, what the precedence order is, and how to use parentheses. Always double-check your assignment statements to make sure they are providing the results you want.
Val and Str Functions
A common task in any Visual Basic project is to take numbers input by the user, do some arithmetic operations on those numbers, and output the results of those operations. How do you do this? With the Visual Basic knowledge you have up to this point, you probably see you could use text box controls to allow the user to input numbers. Then you could use the arithmetic operators to do the math and label controls to display the results of the math. And, thatÆs just what you would do. But, there are two problems:
Problem One: Arithmetic operators can only work with numbers (for example, integer variables and integer properties), but the value provided by a text box control (the Text property) is a string. You canÆt add and multiply string type variables and properties!
Problem Two: The result of arithmetic operations is a number. But the Caption property of a label control (where we want to display these results) is a string type. You canÆt store numerical data in string quantity!
We need solutions to these two problems. The solutions lie in the BASIC built-in functions. We need ways to convert strings to numbers and, conversely, numbers to strings. With this ability, we could take the Text property from a text box, convert it to a number, do some math, and convert that numerical result to a string that could be used as a Caption property in a label box. This is a very common task in BASIC and BASIC has a large set of functions that help us do such common tasks. The two functions that will solve our current problems are the Val function and the Str function. We will look at these in a bit, but first letÆs define just what a function is.
A BASIC function is a built-in procedure that, given some information by us, computes some desired value. The format for using a function is:
FunctionValue = FunctionName(ArgumentList)
FunctionName is the name of the function and ArgumentList is a list of values (separated by commas) provided to the function so it can do its work. In this assignment statement, FunctionName uses the values in ArgumentList to compute a result and assign that result to the variable we have named FunctionValue. We must insure the variable FunctionValue has the same type as the value computed by FunctionName. How do we know what BASIC functions exist, what type of information they provide, and what type of arguments they require? Use the Visual Basic on-line help system and search for Functions. YouÆll see that there are lots of them. WeÆll cover some of them in this class, but youÆll have to do a little studying on your own to learn about most of them. Now, letÆs look at our first two BASIC functions: Val and Str. Maybe look them up in the on-line help system to do a little æget-aheadÆ reading.
The BASIC Val function will convert a string type variable (or control property) to a numerical value. The format for using this function is:
YourNumber = Val(YourString)
The Val function takes the YourString variable (remember this is called an argument of the function), converts it to a numerical value, and assigns it to the variable YourNumber. We could then use YourNumber in any arithmetic statement. Recall strings must be enclosed in quotes. An example using Val:
YourNumber = Val(ō23ö)
Following this assignment statement, the variable YourNumber has a numerical value of 23.
The BASIC Str function will convert a numerical variable (or control property) to a string. The format for using this function is:
YourString = Str(YourNumber)
The Str function takes the YourNumber argument, converts it to a string type value, and assigns it to the variable named YourString. In the example:
YourString = Str(23)
the variable YourString has a string value of ō23ö.
You should be comfortable with converting numbers to strings and strings to numbers using the Val and Str functions. As mentioned, this is one of the more common tasks you will use when developing Visual Basic projects.
String Concatenation
A confession - in the above discussion, you were told a little lie. The statement was made that you couldnÆt add and multiply strings. Well, you canÆt multiply them, but you can do something similar to addition. Many times in Visual Basic projects, you want to take a string variable from one place and ætack it on the endÆ of another string. The fancy word for this is string concatenation. The concatenation operator is an ampersand (&) and it is easy to use. As an example:
NewString = ōVisual ō & ōBasicö
After this statement, the string variable NewString will have the value ōVisual Basicö. In some books about BASIC and Visual Basic, you may also see the plus sign (+) used as a concatenation operator and it will work. We will only use the ampersand here to distinguish string concatenation from the arithmetic operation of addition.
As youÆve seen, string variables are a big part of Visual Basic. As you develop as a programmer, you need to become comfortable with strings and working with them. YouÆre now ready to attack a new project.
Project - Savings Account
Project Design
In this project, we will build a savings account calculator. We will input how much money we can put into an account each week and the number of weeks we put money in the account. The project will then compute how much we saved. We will use text boxes as the input controls and a label box for output information. A command button will be used to do the computation.
Place Controls on Form
Start a new project in Visual Basic. Place two text box controls, four label controls, and two command buttons on the form. Your form should resemble this:
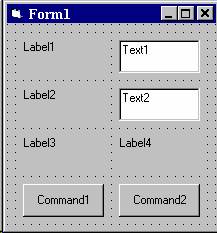
Again, even though there are lots of similar controls on this form, donÆt use copy and paste. Place each control on the form individually.
Set Control Properties
Set the control properties using the properties window (remember, controls are listed by their default name):
Form1 Form:
Property Name Property Value
NameĀĀĀĀĀĀĀĀĀĀĀĀĀĀĀĀĀĀĀĀĀĀĀĀĀĀĀĀĀĀĀ frmSavings
CaptionĀĀĀĀĀĀĀĀĀĀĀĀĀĀĀĀĀĀĀĀĀĀĀĀĀĀĀĀ Savings Account
BorderStyleĀĀĀĀĀĀĀĀĀĀĀĀĀĀĀĀĀĀĀĀĀĀ 1-Fixed Single
Text1 Text Box:
Property Name Property Value
NameĀĀĀĀĀĀĀĀĀĀĀĀĀĀĀĀĀĀĀĀĀĀĀĀĀĀĀĀĀĀĀ txtDeposit
TextĀĀĀĀĀĀĀĀĀĀĀĀĀĀĀĀĀĀĀĀĀĀĀĀĀĀĀĀĀĀĀĀĀĀ [Blank]
FontĀĀĀĀĀĀĀĀĀĀĀĀĀĀĀĀĀĀĀĀĀĀĀĀĀĀĀĀĀĀĀĀĀ Arial
Font SizeĀĀĀĀĀĀĀĀĀĀĀĀĀĀĀĀĀĀĀĀĀĀĀĀĀĀ 10
Text2 Text Box:
Property Name Property Value
NameĀĀĀĀĀĀĀĀĀĀĀĀĀĀĀĀĀĀĀĀĀĀĀĀĀĀĀĀĀĀĀ txtWeeks
TextĀĀĀĀĀĀĀĀĀĀĀĀĀĀĀĀĀĀĀĀĀĀĀĀĀĀĀĀĀĀĀĀĀĀ [Blank]
FontĀĀĀĀĀĀĀĀĀĀĀĀĀĀĀĀĀĀĀĀĀĀĀĀĀĀĀĀĀĀĀĀĀ Arial
Font SizeĀĀĀĀĀĀĀĀĀĀĀĀĀĀĀĀĀĀĀĀĀĀĀĀĀĀ 10
Label1 Label:
Property Name Property Value
NameĀĀĀĀĀĀĀĀĀĀĀĀĀĀĀĀĀĀĀĀĀĀĀĀĀĀĀĀĀĀĀ lblDepositHeading
CaptionĀĀĀĀĀĀĀĀĀĀĀĀĀĀĀĀĀĀĀĀĀĀĀĀĀĀĀĀ Weekly Deposit
FontĀĀĀĀĀĀĀĀĀĀĀĀĀĀĀĀĀĀĀĀĀĀĀĀĀĀĀĀĀĀĀĀĀ Arial
Font SizeĀĀĀĀĀĀĀĀĀĀĀĀĀĀĀĀĀĀĀĀĀĀĀĀĀĀ 10
Label2 Label:
Property Name Property Value
NameĀĀĀĀĀĀĀĀĀĀĀĀĀĀĀĀĀĀĀĀĀĀĀĀĀĀĀĀĀĀĀ lblWeeksHeading
CaptionĀĀĀĀĀĀĀĀĀĀĀĀĀĀĀĀĀĀĀĀĀĀĀĀĀĀĀĀ Number of Weeks
FontĀĀĀĀĀĀĀĀĀĀĀĀĀĀĀĀĀĀĀĀĀĀĀĀĀĀĀĀĀĀĀĀĀ Arial
Font SizeĀĀĀĀĀĀĀĀĀĀĀĀĀĀĀĀĀĀĀĀĀĀĀĀĀĀ 10
Label3 Label:
Property Name Property Value
NameĀĀĀĀĀĀĀĀĀĀĀĀĀĀĀĀĀĀĀĀĀĀĀĀĀĀĀĀĀĀĀ lblTotalHeading
CaptionĀĀĀĀĀĀĀĀĀĀĀĀĀĀĀĀĀĀĀĀĀĀĀĀĀĀĀĀ Total Savings
FontĀĀĀĀĀĀĀĀĀĀĀĀĀĀĀĀĀĀĀĀĀĀĀĀĀĀĀĀĀĀĀĀĀ Arial
Font SizeĀĀĀĀĀĀĀĀĀĀĀĀĀĀĀĀĀĀĀĀĀĀĀĀĀĀ 10
Label4 Label:
Property Name Property Value
NameĀĀĀĀĀĀĀĀĀĀĀĀĀĀĀĀĀĀĀĀĀĀĀĀĀĀĀĀĀĀĀ lblTotal
CaptionĀĀĀĀĀĀĀĀĀĀĀĀĀĀĀĀĀĀĀĀĀĀĀĀĀĀĀĀ [Blank]
FontĀĀĀĀĀĀĀĀĀĀĀĀĀĀĀĀĀĀĀĀĀĀĀĀĀĀĀĀĀĀĀĀĀ Arial
Font SizeĀĀĀĀĀĀĀĀĀĀĀĀĀĀĀĀĀĀĀĀĀĀĀĀĀĀ 10
BackColorĀĀĀĀĀĀĀĀĀĀĀĀĀĀĀĀĀĀĀĀĀĀĀĀ White
BorderStyleĀĀĀĀĀĀĀĀĀĀĀĀĀĀĀĀĀĀĀĀĀĀ 1-Fixed Single
(Using this choice of BackColor and BorderStyle makes this label match the appearance of the two text boxes.)
Command1 Command Button:
Property Name Property Value
NameĀĀĀĀĀĀĀĀĀĀĀĀĀĀĀĀĀĀĀĀĀĀĀĀĀĀĀĀĀĀĀ cmdCompute
CaptionĀĀĀĀĀĀĀĀĀĀĀĀĀĀĀĀĀĀĀĀĀĀĀĀĀĀĀĀ Compute Savings
Command2 Command Button:
Property Name Property Value
NameĀĀĀĀĀĀĀĀĀĀĀĀĀĀĀĀĀĀĀĀĀĀĀĀĀĀĀĀĀĀĀ cmdExit
CaptionĀĀĀĀĀĀĀĀĀĀĀĀĀĀĀĀĀĀĀĀĀĀĀĀĀĀĀĀ Exit
frmSavings
Note, for the text boxes
Text property and one of the label boxes Caption property, we used
[Blank]. This does not mean type [Blank]
as the property, it means æblank outÆ that property - delete the default
value. Also, note this is the first time
you have been asked to change Font properties. Review the procedure for doing this (Class 4 under Command Button
Control), if necessary. Change any other
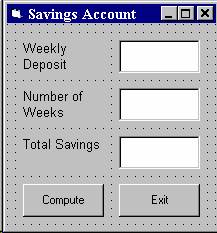
properties, like colors, if you would like. When you are done, your form should resemble this:
![]()
cmdExit lblTotal txtWeeks txtDeposit cmdCompute lblTotalHeading lblWeeksHeading lblDepositHeading
![]()
![]()
![]()
![]()
![]()
![]()
![]()
![]()
Write Event Procedures
In this project, the user types an amount in the Weekly Deposit text box. Then, the user types a value in the Number of Weeks text box. Following this, the user clicks the Compute button. The project determines the total amount in the savings account and displays it in the lower label control. Hence, the primary event in this project is the Click event on the Compute command button. The only other event is the Click event on the Exit command button. ItÆs always good to have an obvious way for the user to exit a project.
We need three variables in this project (we will use integer types), one to hold the weekly deposit amount (Deposit), one to store the number of weeks (Weeks), and one to store the total savings (Total). Open the code window and find the general declarations area. Declare these three variables - the general declarations should appear as (the Option Explicit line should already be there):
Option Explicit
Dim Deposit As Integer
Dim Weeks As Integer
Dim Total As Integer
The cmdCompute_Click event implements the following steps:
1. Convert input deposit value (txtDeposit.Text) to a number and store it in the variable Deposit.
2. Convert input number of weeks (txtWeeks.Text) to a number and store it in the variable Weeks.
3. Multiply Deposit times Weeks and store the result in the variable Total.
4. Convert the numerical value Total to a string, concatenate it with a dollar sign ($), and store it in Caption property of lblTotal.
In code, these steps are:
Private Sub cmdCompute_Click()
'Get deposit amount
Deposit = Val(txtDeposit.Text)
'Get number of weeks
Weeks = Val(txtWeeks.Text)
'Compute total savings
Total = Deposit * Weeks
'Display Total
lblTotal.Caption = '$' + Str(Total)
End Sub
Notice how is easy it is to translate the listed steps to actual BASIC code. It is just paying attention to details. In particular, look at the use of Str and Val for string-number conversion.
The cmdExit_Click procedure is simply one line of code (End) that stops the program:
Private Sub cmdExit_Click()
End
End Sub
Save your project.
Run the Project
Run the project. Click in the Weekly Deposit text box and type some value. Do the same with Number of Weeks. Click the Compute button. Your answer should appear in the Total label control. Make sure the answer is correct. Remember, a big step in project design is making sure your project works correctly! If you say you want to save 10 dollars a week for 10 weeks and your computer project says you will have a million dollars by that time, you should know something is wrong somewhere! Click Exit to make sure it works. Save your project if you changed anything.
This project may not seem all that complicated. And it isnÆt. After all, we only multiplied two numbers together. But, the project demonstrates steps that are used in every Visual Basic project. Valuable experience has been gained in recognizing how to read input values, convert them to the proper type, do the math to obtain desired results, and output those results to the user.
Other Things to Try
Most savings accounts yield interest, that is the bank actually pays you for letting them use your money. This savings account project has ignored interest. But, it is fairly easy to make the needed modifications to account for interest - the math is just a little more complicated. We will give you the steps, but not show you how, to change your project. Give it a try if youÆd like:
Define a variable Interest to store the yearly savings interest rate. Interest rates are decimal numbers, so use the Single type for this variable (itÆs the first time weÆve used decimals!).
Add another text box to allow the user to input this interest rate. Name it txtInterest.
Add a label control to identify the new text box (set the Caption to Interest Rate).
Modify the code to use Interest in computing Total. Interest is found using:
Interest = Val(txtInterest.Text)
Then, Total (get ready - itÆs messy looking) is computed using:
Total = 5200 * ( Deposit * ((1 + Interest / 5200) ^ Weeks - 1) / Interest )
Make sure you type this all on one line - the word processor has made it look like it is on three. As we said, this is a pretty messy expression, but itÆs good practice in using parentheses and some other arithmetic operators.
Now, run the modified project. Type in values for Deposit, Weeks, and Interest. Click Compute. Make sure you get reasonable answers. (As a check, if you use a Deposit value of 10, a Weeks value of 20, and an Interest value of 6.5, the Total answer should be $202 - note youÆd have $200 without interest, so this makes sense). The project automatically converts Total to an integer (since it is declared that type) even though there is probably a decimal (some cents) involved in the answer. Save your project.
Before leaving this project, letÆs look at one more thing. Remember we said that, even though we donÆt have to, we will declare every variable we use in our projects? LetÆs demonstrate a good reason why we do this. Open the unmodified Savings Account project (the one without interest). Go to the cmdCompute_Click event procedure and purposely misspell the variable Deposit. For example, change the line:
Deposit = Val(txtDeposit.Text)
to:
Depsit = Val(txtDeposit.Text)
Run the project. What happened once you clicked Compute? A window like this (VB4 version shown) should have appeared:
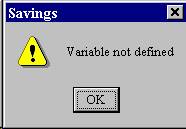
and the misspelled variable Depsit should be highlighted in the code window. Visual Basic is telling you there is no declared variable with that name. It is pointing out your misspelling. It has shown you your mistake. Stop the project.
Now, go to the general declarations area and delete the Option Explicit line. You have now removed the requirement that we declare all variables in your project. Run the project now. Type in some numbers. Click Compute. Notice the program seems to run OK, but the answer is wrong. Visual Basic thinks Depsit and Deposit are variables in your project. Since Deposit is never evaluated, it is assumed to be zero. So, no matter what values you input, the computed Total will always be zero. You have a logic error in your code. You know something is wrong, but you would have to look into your code to figure out what. Visual Basic gives you no help in identifying your mistake in this case. Hence, by declaring all of our variables, we make the process of writing error-free event procedures a little easier. Stop the project.
Summary
In this class, you have learned a lot of new material. You learned about the label and text box controls. You learned about variables: naming them, their types and how to declare them properly. And, you learned functions that allow you to change from string variables to numbers and from number to strings. You learned how to do arithmetic in BASIC. Like we said, a lot of new material. In subsequent classes, we will stress new controls and new BASIC statements more than new features about the Visual Basic environment. You should be fairly comfortable in that environment, by now.
This page intentionally not left blank.
|
Politica de confidentialitate | Termeni si conditii de utilizare |

Vizualizari: 323
Importanta: ![]()
Termeni si conditii de utilizare | Contact
© SCRIGROUP 2025 . All rights reserved