| CATEGORII DOCUMENTE |
| Bulgara | Ceha slovaca | Croata | Engleza | Estona | Finlandeza | Franceza |
| Germana | Italiana | Letona | Lituaniana | Maghiara | Olandeza | Poloneza |
| Sarba | Slovena | Spaniola | Suedeza | Turca | Ucraineana |
Introduction
The Linkwitz transform circuit is a hugely flexible way to equalise the bottom end of a sealed loudspeaker enclosure. Unlike the 'EAS' (Electronically Assisted Subwoofer) project or the ELFTM systems, a speaker that is corrected using this method is flat from below resonance to the upper limit of the selected driver. The low frequency rolloff point is determined by the parameters of the transform circuit. Should the enclosure size be too small and cause a lump in the response before rolloff, this is also corrected. A conventional active crossover network is then used to divide the subwoofer signal from the main channel signals.
For a detailed look at how the circuit works, please click here to see the article that describes the operation of the circuit.
The original Linkwitz Transform spreadsheet was presented by TrueAudio (2), and is reproduced here with their permission. One of my readers added an extremely useful extra page that calculates the driver response in the box, and I added the ability to use litres instead of cubic feet if desired. The transform circuit was invented by Siegfried Linkwitz (1), and is another of his gifts to the audio world (the other is the Linkwitz-Riley crossover).
The Linkwitz Transform spreadsheet can be downloaded here, or from the Downloads page.
Driver Selection
A quick word is warranted here, to allow you to determine if the speaker you have will actually work in a small sealed enclosure. The Linkwitz transform circuit (or EAS principle) will allow any driver to extend to 20 Hz or even lower. A good quick test is to stick the speaker in a box, and drive it to 50 or 100W or so at 20 Hz - you should see a lot of cone movement, a few things will rattle, but you shouldn't actually hear a tone. A 'bad' speaker will generate 60 Hz (third harmonic) - if you don't hear anything, the speaker will work in an equalised sub.
If a tone is audible, or the speaker shows any signs of distress (such as the cone breaking up with appropriate awful noises), then the driver cannot be used in this manner. Either find a different driver, or use a vented enclosure.
Description
The schematic for a complete equaliser is shown in Figures 1 and 2, and considering the flexibility of the circuit, it is not at all complicated. The complex part would normally be determining the component values based on the speaker driver's response in a given enclosure. This is simplified by the spreadsheet, which requires only a small amount of input from you to be able to calculate the box response, and the equalisation needed to achieve the desired response.
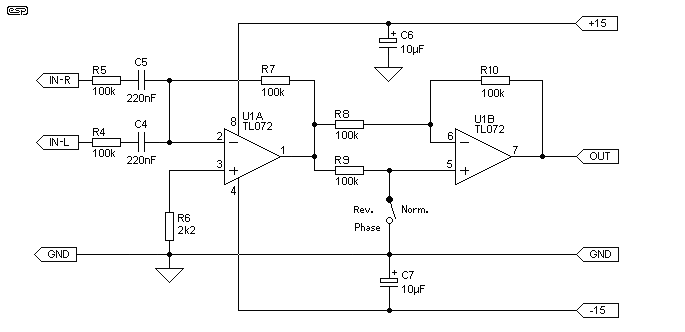
Figure 1 - Input Mixer and
Phase Switch
A simple mixer circuit is shown in Figure 1, and this is simply be added to the front end of the circuit in Figure 2. The mixer stage completely isolates each channel from the other, since the summing point is a 'virtual earth' because of the feedback. The second opamp is used only as an inverter, so the polarity of the signal may be switched to find the optimum setting. When the switch is open, the phase setting of the equaliser is non-inverting (both the input and Linkwitz transformer are inverting). Closing the switch reverses the phase.
Figure 2 shows the circuit of the Linkwitz 'transformer' (for a single channel). The values of the unmarked components are determined using the Linkwitz Transform calculator spreadsheet (see below for more information). This circuit must be driven from a low impedance, such as the output from an opamp (as shown in Figure 1). The output capacitor as shown is a bipolar electrolytic, but a conventional polarised electro can be used if you prefer. The polarity will be different with different opamps, so measure the DC output voltage (it will only be a few millivolts) to determine the correct polarity.
If you don't want to use the mixer of Figure 1, to create a mono signal from a stereo source, a simple resistive mixer may be used. A resistive mixer requires that the source impedance from each preamp output is quite low to prevent crosstalk. If you are using a typical valve preamp, I suggest the use of buffer amplifiers prior to mixing, as the output impedance of most valve preamps is too high to allow resistive mixing without introducing crosstalk. This is not a problem if the summing inputs are used. In any case, the Linkwitz transform circuit will need to be driven from an opamp to ensure low source impedance.
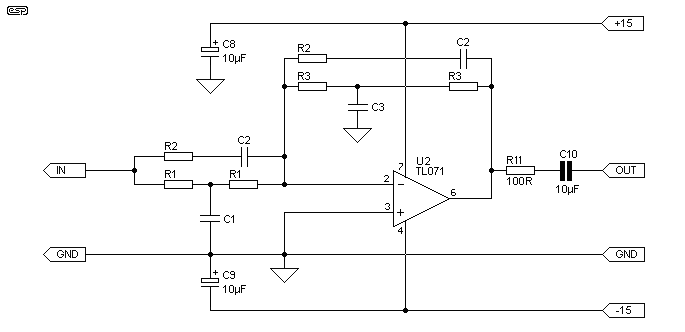
Figure 2 - Linkwitz
Transform Circuit
When designing the circuit from the spreadsheet, the dire warnings about DC gains above 20dB may be ignored, as the circuit shown has zero gain at DC. The input circuit has been designed to roll off (i.e. is 3dB down) at 7Hz, with a 6dB/Octave slope. The spreadsheet does not show this, but it must be considered regardless.
I will instead issue my own dire warnings about excessive (greater than 20dB) gain at any frequency. Not allowing for the reduced radiating efficiency of any driver at very low frequencies, this is a simple case of determining the power requirements to obtain a flat response down to (say) 20Hz.
Let's assume that the power needed at 100Hz is 25W to keep up with the main system. if a given design shows that there is a 3dB gain at 50Hz, this means that 50W is needed for this frequency. As frequency reduces, the gain increases, and each 3dB of additional gain demands double the power. A mere 6dB of gain requires 100W, 9dB means 200W, and 12dB of gain means that 400W will be needed. For a gain of 15dB, we are now into serious power requirements, with a system power of 800W.
If you make the box as large as practicable, the amount of boost is reduced considerably - as always, there is a tradeoff between the allowable size of the enclosure, and how much power you are willing (or can afford) to use. The power limits of the driver itself must also be considered, and although most loudspeakers can tolerate transient signals higher than their rated power, they will have excessive distortion if excursion limits are exceeded.
Fortunately and perhaps surprisingly, the very low bass signals typically recorded are not that loud, so you will never need the full amount determined from the estimations above. One thing that is essential is to use a speaker with high efficiency - the higher the better.
Loudspeaker Driver Selection
Selecting a high efficiency driver with a low free air resonance and a relatively small equivalent volume (Vas) means that the minimum amount of equalisation can be used. Again, each 3dB increase in efficiency means half the power is needed for the same SPL, so a speaker with 92dB/W/m is preferred over one with 89dB/W/m (all other things being equal), as only half the power is needed for any given SPL with the more efficient driver.
I will not suggest drivers, and it is entirely up to you to find suitable components based on manufacturer's details. I suggest that you look at loudspeakers intended for car sound systems, as these usually have a reasonable efficiency and low Vas. The range is enormous, and there are many excellent drivers that will not cost the earth. There are also many other excellent drivers that will cost the earth - your choice.
Apart from efficiency, Vas, resonance (etc), also consider the excursion limits of the driver. A speaker that has Xmax of 20mm will perform much better (and with a lot less distortion) than another similar driver with an Xmax of 10mm. In much the same way, a 380mm (15') speaker will produce more SPL with less excursion than a 300mm (12') speaker can. Also consider using multiple smaller drivers - two 300mm drivers have more cone area than a single 380mm speaker, and can move more air.
A simple test for drivers is to apply a signal at 20Hz from a clean audio oscillator. Using an amp of about 100W or so, and with the driver mounted in an enclosure of no less than about 28 litres (1 cubic foot), increase the level until the amp starts to clip - this will be immediately audible! Just below the clipping level, listen carefully for any audible frequency that is not 20Hz (which itself is virtually inaudible). In particular, if you hear 40Hz or (more likely) 60Hz, the speaker is distorting, and generating harmonics. With a good driver, you should be able to see the cone rushing back and forth, but should only feel the air movement - no audible harmonics should be heard.
An Example Calculation
Let's look at a hypothetical driver with the following
characteristics (these are inserted in the 'Box' page)
|
Measurement |
Symbol |
Value |
|
Free air resonance |
fo |
24 Hz |
|
Total Q |
Qts | |
|
Equivalent volume |
Vas |
134 litres |
|
Box volume |
Vb |
28 litres |
We would like to get to 20Hz (-3dB), so insert these values into the spreadsheet. For Q(p) (total Q of transformed' system) of 0.8, we get a very small rise before the rolloff starts, which extends bass response marginally.
Now, select a value for C2 - this will determine the values for the remaining components, and is a compromise. As its value is increased, the resistances needed are reduced (this is good), but the value of C1 increases (sometimes to rather large values - this is bad).
I have been asked for definitions of 'good' and 'bad' in this context, so here they are 'good' is resistance in the range of about 2.2k up to around 220k or so. Lower resistance loads the opamp, and higher resistance may increase noise levels. 'Bad' capacitance values are those that are big and expensive, and if possible, I suggest that you keep the maximum capacitance below 2.2uF or so. Higher values will not hurt anything, but are bulky and expensive, or (in the case of non-polarised electros) may be small and cheap, but have a wide tolerance so accuracy will be compromised.
In the end, you will have to settle on values that are probably outside these goals, and in the end, noise is not really a big problem at low frequencies. The primary aim is to get values that are available - designing the perfect circuit is pointless if it won't do the job.>/p>
With the selected value of 56nF for C2, the following
values are calculated for the remaining components
|
Component |
Calculated Value |
Use |
Actual Value |
Error |
|
R1 |
8.44 k |
8k2 + 220R |
8.42 k |
|
|
R2 |
36.98 k |
33k + 3k9 |
36.9 k | |
|
R3 |
70.32 k |
68k + 2k2 |
70.2 k | |
|
C1 |
1.905uF |
1uF + 1uF |
2 uF | |
|
C2 |
56 nF |
56 nF | ||
|
C3 |
228 nF</SMALL< td> |
220 nF | ||
|
Maximum gain |
18.41 dB |
It will be necessary to use resistors / capacitors in series (or parallel) to obtain the required values - this can often be quite irksome, but only needs to be done once. A final error of up to 5% is almost certainly going to be OK, as the speaker characteristics will usually vary much more than this, and our hearing is incapable of resolving such small errors - especially when the room acoustics interact with the total system!
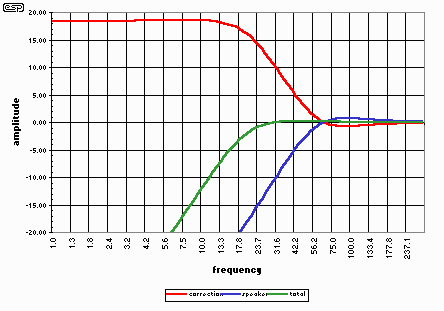
Figure 3 - Response Curves
Note that the maximum gain is over 18dB - this is rather high, but the energy levels at such low frequencies are actually very low as well, so although it may seem that an enormous amount of power will be needed, this is probably not really true in reality.
To work this out, let's have a look at the speaker sensitivity. We will make an assumption that it remains constant, although this is rarely true as the frequency falls, due to the radiating efficiency of the driver itself. The assumption will work out well enough in practice (he says from experience).
Assume a quoted efficiency of 90dB/W/m as a starting point. For 'normal' high level listening, an SPL in the listening room might be around 100dB, which represents a power of 10W. Remember, this is worst case, and assumes that the LF energy level is the same as at upper frequencies. For all practical purposes, the lowest frequency is about 25Hz - our ears respond very poorly to anything lower.
For what it is worth, a good source of a 25Hz signal is the heartbeat at the beginning of Pink Floyd's 'Dark Side of the Moon'. This should rattle windows, and be felt as much as heard.
So, 10W to get 100dB (which is pretty loud), and we have a 15dB boost at the 25Hz point. Since each 3dB increase involves doubling the power, we get the following
First, the power needed to get to 100dB
|
Power |
1W |
2W |
4W |
8W |
10W |
|
SPL |
90dB |
93dB |
96dB |
99dB |
100dB |
Now, the power to maintain 100dB as the speaker rolls off and the equalisation compensates
|
Power |
10W |
20W |
40W |
80W |
160W |
320W |
640W |
|
Boost |
0dB |
3dB |
6dB |
9dB |
12dB |
15dB |
18dB |
This is not entirely correct with music signals, because the above figures are for steady state signals, and music is transient in nature (well, most of it, anyway :-). Peak power levels may be much higher at some frequencies, typically around 70-80Hz where kick drums make most of their noise, but the amp has copious reserve power at these frequencies. The underground railway rumble in that otherwise wonderful orchestral recording will be at a very low level, and most music has very little below 30Hz. If you enjoy pipe organ music, I suggest two to four 380mm drivers in a reasonable sized box (around 50 litres per loudspeaker), and equalised as described here. To get realistic response to 16Hz will require about 300W per speaker, for a quoted sensitivity of 90dB (actual figures will vary depending on the drivers selected, of course). This will be truly awesome, and if your dwelling survives, you may be able to defray some of the system costs by acquiring adjoining properties at an advantageous price :-)
The biggest benefit of a subwoofer that goes to such depths is that you will find yourself listening at lower levels than before, since the 'feel' that used to require an SPL of perhaps 110dB or more, is now attainable at maybe 95dB SPL. There is no loss of realism - indeed it is enhanced - and your ears will love you for it, and for all the right reasons.
PCB Version Of Circuit
The PCB for this circuit is available. It has been simplified from the circuits shown above, and retains a rudimentary phase switch but no mixer. Mixing can easily be done using a pair of (say) 22k resistors from each channel to the input, provided the impedance is low enough from the preamp to prevent crosstalk.
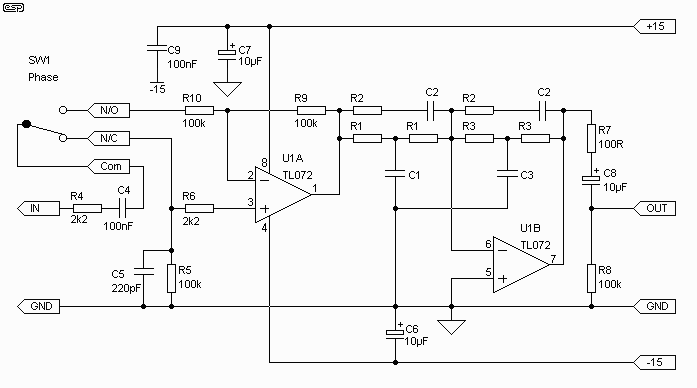
Figure 4 - PCB Version,
Complete Circuit
If you don't want to use the phase switch, the Com and N/O (Common and Normally Open) pins can be linked on board to give a non-inverting configuration (note there are two inversions in the circuit). Link Com and N/C for inverting operation.
Because of the DC gain in the circuit, you may find that C8 is incorectly polarised when the circuit is powered on. I suggest that you either use a non-polarised cap, or measure the DC, and determine the correct polarity before this cap is installed. Because of the different way opamp inputs are configured, the output will be positive or negative, and I cannot predict which way it will go, since constructors will want to use different opamps in many cases. The polarity is correct for the TL072, but will be reversed if (for example) an LM1558 were to be used, since the latter has a bipolar input instead of FETs. The exact offset voltage is also difficult to predict, but using the TL072, should be less than 300mV. Other opamps can be expected to be similar.
This circuit was devised to be as cheap as possible to build, but provides for parallel connection of caps for C1 and C3, and series resistances for R1, R2 and R3, since these will usually be odd values (as shown above).
References
|
Politica de confidentialitate | Termeni si conditii de utilizare |

Vizualizari: 2036
Importanta: ![]()
Termeni si conditii de utilizare | Contact
© SCRIGROUP 2025 . All rights reserved