| CATEGORII DOCUMENTE |
| Asp | Autocad | C | Dot net | Excel | Fox pro | Html | Java |
| Linux | Mathcad | Photoshop | Php | Sql | Visual studio | Windows | Xml |
Filtering is another way of finding specific data. It's useful when you have a large amount of data and want to see only specific records within it.
For example, suppose you have a mailing list stored in Excel, and you have a field called Category. Each record is categorized as either Business or Personal. Sometimes you want to work only with the Business contacts, and you can use a filter to show only the desired records.
An AutoFilter enables you to filter the list to show only records with a specific value in a specific field.
To use an AutoFilter, follow these steps:
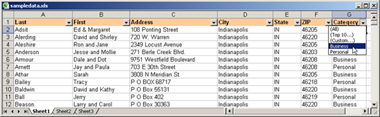
Figure 6-9: Use an AutoFilter to narrow down the
list of records to those matching certain values in certain fields.
View a larger version of this image.
The Advanced Filter feature is not easy to use, but it does offer some powerful capability. With it you can write formulas that represent what you want to find.
To use Advanced Filter you must insert some blank rows above your data range, to serve as a criteria range. There must be enough blank rows that there is an extra blank row between the last entry in your criteria range and the start of your data range. For most people, four or five blank rows are sufficient.
The field names must be repeated in the criteria range. You don't have to include every field name -- just the ones that you plan on using in your filter.
Figure 6-10 shows an example of a worksheet set up with a criteria range for filtering by Category and ZIP.

Figure 6-10: Before using Advanced Filter, you
must set up a criteria range.
View a larger version of this image.
Next, in your criteria range, enter the criteria to use.
Items on the same row are AND statements, so both must be met in order for a record to be
included. Items on different rows are OR statements; either
may be met for a record to be included. In Figure 6-11, for example, records
will be included that are BOTH in the Business Category AND with a ZIP Code
that begins with 462.

Figure 6-11: This criteria range specifies that
both conditions must be met.
View a larger version of this image.
TIP
You can use the standard * and ? wildcards.
An asterisk stands for any number of characters; a question mark stands for a
single character. Should you ever have to find a string that actually contains a ? or an *, you can precede the
character by a tilde (~) to make it a literal value.
After setting up your criteria range, you're ready to perform the filter:
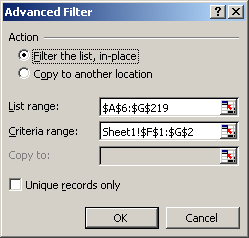
Figure 6-12: The Advanced Filter dialog box.
|
Politica de confidentialitate | Termeni si conditii de utilizare |

Vizualizari: 1285
Importanta: ![]()
Termeni si conditii de utilizare | Contact
© SCRIGROUP 2025 . All rights reserved