| CATEGORII DOCUMENTE |
| Asp | Autocad | C | Dot net | Excel | Fox pro | Html | Java |
| Linux | Mathcad | Photoshop | Php | Sql | Visual studio | Windows | Xml |
Creating Programs
Because an application, in its barest form, is just a program, it's appropriate to begin by creating programs. In this chapter, I'll discuss the Visual FoxPro editor, how to create and run a program, and how to customize the editing environment to suit your particular preferences.
A Visual FoxPro program is a text file that consists of one or more VFP commands or functions. You can create this text file in any word processor or text editor that can produce an ASCII text file. In previous versions of FoxPro, many developers did this in order to take advantage of features that weren't then available in the Fox editor. Starting with Visual FoxPro
5.0 and continuing today, the VFP editor has been enhanced to the extent that there's no reason not to use it, and a number of good reasons to do so.
First, you need to be in the VFP IDE anyway to run and compile your program. Second, the editor is integrated into the environment; even with Windows, it's awkward to switch between an external editor during editing and Visual FoxPro to run, test, debug, and compile the file. Third, a proper VFP application typically has very little program code-most of the application will be found in forms and classes, and the code in these components must be edited in the VFP environment.
I'd like to emphasize this last point. Although this chapter will concentrate on programs, this is merely to make you comfortable with the editor and the process of writing blocks of code. While applications in the pre-GUI environment relied largely on program files, you'll primarily be using the visual tools, with blocks of code contained in components built with those tools, to build your applications.
Creating a program with the editor
The Visual FoxPro editor produces a text file that automatically has an extension of .PRG. This file is compiled into pseudocode, and the resulting file, having the same name as the .PRG file but an .FXP extension, is interpreted by the Visual FoxPro engine. If you run this program from within VFP, the development environment has the interpreter automatically available. If you create a stand-alone executable, you'll need to have the VFP runtime files available to the executable so that the engine can interpret the executable.
To create a program file, issue this command in the Command window:
modify command
Or open the File menu and select New, Program, New File. An empty text-editing window will appear with the title PROGRAM1. If you like, you can specify the name of the file by entering this command in the Command window:
modify command XXX
An empty text window with the title XXX.PRG will display, where XXX.PRG is the name of the program.
After typing something in the window, you can save the program by opening the File menu and clicking Save, or by pressing Ctrl+S. If you've not already named the file, the Save As dialog will appear, prompting you for a file name. Note that the file will be given a .PRG extension automatically. You can override this extension, but Visual FoxPro will not recognize the file as a program and you will have to include the extension as part of the file name each time you want to edit or run it, so it's a good idea to use Visual FoxPro's .PRG default.
The file will be saved in the default directory. You can determine the default drive and directory with the SYS(5) and SYS(2003) functions, or determine just the default directory with the CURDIR() function or CD() command. You can change the default directory for the current FoxPro session with the SET DEFAULT TO <dir name> or CD <dir name> commands. Note that the File/Open dialog box displays the last directory that the file open dialog pointed to-not necessarily the default directory.
? 'The default drive
and directory are: ' + sys(5) + sys(2003)
? 'The default directory is.'
cd
To create a Visual FoxPro program, type the Visual FoxPro commands in the text file, each on a separate line. You can separate commands with blank lines and indent commands using either spaces or tabs for better readability. Lengthy commands can be continued on succeeding lines by ending the line to be continued with a semicolon. Comment lines are created by placing an asterisk as the first character of the line. You can include comments on the same line as non-continued commands by preceding the comment text with double ampersands. And here's a point that catches most everyone sooner or later: The Visual FoxPro continuation character- the semicolon-also works on comment lines and lines that end in an && style comment. Here's an example:
* Program : XXX.PRG
* Author : Whil Hentzen
* Description: Sample program to show types of comments
* : This program increments a number in one of two ways
* : according to whether the number is even or odd
x = 1 && initialize counter for j = 1 to 1
* increment x differently according to
* whether it is odd or even *
x = x + ;
iif( x/2 - int(x/2) = , ;
x + j, ;
x + 2 * j )
* display the results of x to the screen*
? x endfor
* warning: the next line is regarded as part of this comment ;return
* many older programs use the next line to visually indicate
* the end of the program file
* <EOF>
The last line-the comment that marks the end of the file-is strictly an aid to the programmer. It is not needed by Visual FoxPro, and indeed is regarded by many as an anachronism. In the old days, some Xbase variants couldn't handle files past a certain length, but instead of prohibiting you from creating a file that long, the file would simply be truncated when saved. As a result, developers used defense mechanisms like a visual End of File marker. Some still use it today for ease of determining the end of a program in printed output, but the choice is up to you.
Running a program
All C programming books start out with the same program that displays the phrase "Hello World" on the screen, and we can do something similar for our first program here. First, open a new program file named HELLO.PRG:
modify command HELLO
If you want to use a file name that contains spaces, you need to enclose the file name in quotes, like you would elsewhere in Windows:
modify command 'HELLO WORLD'
Next, type the following code into the window:
* Program : HELLO.PRG
* Author : Whil Hentzen
* Description: Hello World sample program
messagebox('Hello World. Press Any Key to Continue', 0 , 'My First VFPProgram')
return
* <EOF>
Once you have typed in your program and saved it, you can compile and run it in one step. You can right-click in the text-editing window and select the DO HELLO.PRG menu command. If the text-editing window that you typed your program in is the active window, the last menu option in the Program menu will contain the command DO, together with your program name. You could also just press Ctrl+E. After you perform one of these actions, Visual FoxPro will compile the text file into p-code, give the resulting file the name of the .PRG file but with an .FXP extension, and then run the resulting file. A third method is to save the program and then enter the DO XXX command in the Command window, where XXX is the file name. Note that you do not have to include the extension if you saved the file with a .PRG extension. If you haven't saved your program yet, you will be prompted to do so before the program is compiled and run. Go ahead and run your program now if you haven't already.
You'll see a standard Windows message box containing the message "Hello World. Press Any Key to Continue .". You'll also notice that the Command window will have disappeared. The message box command is being executed and has halted program execution until you respond to the message box. To continue, close the message box by clicking OK or clicking the close box in the title bar. The message box will go away and you'll be returned to interactive Visual FoxPro.
Compiling a program
When you execute a program from within the VFP IDE, Fox will automatically compile the .PRG to an .FXP. You can perform this operation manually by opening the Program menu and selecting Compile to create the .FXP file, and then selecting the Do menu option from the same menu.
As long as you are using the Visual FoxPro editor, each time you make changes to a program, Visual FoxPro will automatically compare the date and time of the .FXP file of the same name and, if the .PRG file is newer, recompile the program before running.
You can also create three other types of "compiled" files: an .APP file, an .EXE file, and a COM .DLL file. An .EXE is a file that can include one or more .PRGs (as well as other components, such as forms and reports) that can be run both within and without the VFP interactive environment. For example, you can attach a Windows desktop shortcut to a VFP-created .EXE, and run the application just like any other program. You can also use the Start/Run command, or call it from another program as you would any other .EXE. The only constraint is that the VFP runtime files (plus any other files required by the application) must be in the path searched by the .EXE file.
An .APP file is halfway between an .FXP and an .EXE. Like an .EXE it can include one or more components, but it can't run independently of the IDE. However, you can create an .EXE that then calls an .APP file; this technique is often used to distribute modules of an application without redistributing the entire system.
A .DLL file is a COM component, or, as it used to be known, an automation server. VFP
5.0 introduced the ability to create stand-alone COM components that could be called by other applications, similar to (but not exactly like) COM components built in Visual Basic or C++.
To produce any of these, you need to use the Visual FoxPro Project Manager, which I'll discuss in Chapter 6.
Up close with the VFP editor
Before Visual FoxPro 5.0, about all the flexibility you had with the editor was the ability to change the size of the editing window. Not terribly robust, but things have changed significantly since then. Because some of you are coming from FoxPro 2.x or VFP 3.0 environments, it's time to discuss the new features. If you've already used the editor in 5.0 or later, you can skim this section quickly.
The Visual FoxPro editor behaves just like all other Windows editing programs. It offers complete cut, copy, and paste functionality between multiple Visual FoxPro editing windows as well as other Windows programs.
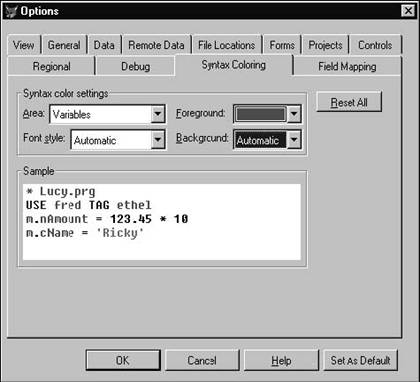
As you begin typing commands into a program file, you'll see that the various pieces are color coded, just as they are in the Command window. You can control which colors are used for which components by opening the Tools, Options dialog and selecting them from the Syntax Coloring tab. See Figure 5.1.
You can control coloring for the following types of components:
|
Comments |
Any line that begins with an asterisk or the NOTE keyword, or the rest of |
|
the line, starting with the "&&" comment designator. |
|
|
Keywords |
All Visual FoxPro keywords. I've found this useful to make sure I'm not using little-used keywords as names for files, classes, field names, or indexes. |
|
Literals |
A value like a number, such as 3.14159. |
|
|
All text entered into a file that is not a program, form, or class-for |
|
example, if you just created a text file or were viewing a directory listing |
|
|
that had been output to a file. |
|
|
Operators |
Characters such as addition and subtraction signs, equal signs, and periods when used to delineate memory variables or objects' properties and methods. |
|
Strings |
Text strings enclosed in single or double quotes, or square brackets. |
|
Variables |
Standard memory variables as well as method and property names. |
If you click the Set as Default button, these settings are saved in the Windows registry.
If you right-click in an open text-editing window, you'll see a variety of available options. The first three-Cut, Copy and Paste-are also available through other means. The Build Expression option brings forward the Visual FoxPro Expression Builder or the expression builder you've specified in the File Locations tab in the Tools, Options dialog.
You can highlight one or more lines of code in a program file, and then select the Execute Selection menu option and VFP will execute each line of code sequentially. This is particularly handy to do from within the Command window, since it saves time having to copy several lines of code to a temp file and then run that temp file. However, it also saves time copying a block of code out of a program file to that annoying little temp file that will end up cluttering your hard disk.
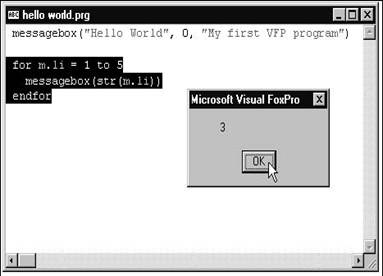
A little-known trick is that you can execute code in a loop by using the Execute Selection command. For example, enter the following code in a program file:
for m.li = 1 to 5
messagebox(str(m.li))endfor
Then highlight the entire block and select Execute Selection from the context menu. You'll be greeted with a series of five message boxes, as shown in Figure 5.2. This is definitely a lot easier than having to run the code in a separate program.
You can also run the program by opening the Program menu and selecting DO Hello World.PRG.
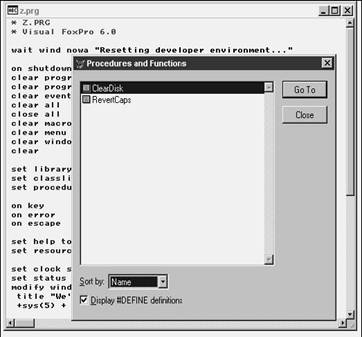
The next menu option in the context menu is Procedure/Function list as shown in Figure 5.3. This function can be used to navigate through a program file and locate a specific procedure or function. This was useful in pre-OOP versions of FoxPro where developers would create a program file that contained a large number of functions, and you found yourself paging through thousands of lines of code to find the one procedure you wanted. With Visual FoxPro, that function library often takes the form of a class library, and each procedure or function is contained in its own class.
Set Breakpoint is used in debugging, and I'll cover that in Chapter 19, "Using the Debugger."
The Font menu option opens the Font dialog so you can change the font of the file. Note that this doesn't work like a word processor where you can highlight part of a file and change the font attributes of just that section. It's an all-or-nothing choice for a program file. This ability is provided so that you can change the characteristics in order to see the file better. I often change the font of a program file or class method to FoxFont, 7 point, so that I can see 100 lines or more of program code in a single window. Just temporarily, of course-doing so permanently would probably cause blindness.
The Find and Go To menu commands allow you to navigate through a program file in two more ways. The first command opens a standard Windows Find dialog. The Go To command allows you to enter a line number to navigate to. This is particularly handy if you've run into a program error "on line 295"-instead of hitting "Page Down" multiple times, you can go straight to the line in question. Given its usefulness, why a keyboard shortcut wasn't provided for this operation is beyond me.
The Beautify menu option allows you to specify how the contents of an editing window will be capitalized and indented. You can control how keywords and symbols, independently, are capitalized. Keywords can be converted to uppercase, lowercase, mixed case, or left alone. Symbols can be converted to uppercase, lowercase, left alone, or converted to the same use as the first occurrence (in the current editing window). You can also choose to indent using tabs or spaces, or to leave the indenting alone. You can choose how many spaces, if you want to use spaces, and you can specify what type of text to be indented: comments and/or continuation lines. You can also choose to indent lines following the beginning of procedures and within DO structures.
Many developers tend not to use Beautify on their own code because they have trained themselves to use a certain style. However, this tool is quite useful if you've inherited someone else's code, or if you are trying to bring the work of several developers into sync.
The Indent and Unindent commands can be used on a block of code. The Indent command indents the highlighted block of code using a tab equivalent to four spaces; the Unindent command will remove four characters (or a tab character) at the beginning of each highlighted line. Note that you don't have to have used the Indent command (or even used the Tab key) on a line in order to take advantage of Unindent. This can also be done by pressing the Tab key or Shift+Tab.
The Comment command will insert a character string of "*!*" and then a tab before each highlighted line as shown in Figure 5.4. It's hard to tell that the separator is a tab because VFP's default tab character takes up four spaces, but you can verify this by deleting part of the comment string-the commented text will stay indented at the fifth position.
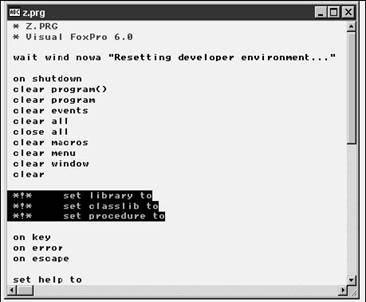
You can change the character string that VFP uses as the default comment string by spelunking in the Windows registry, but I've found it useful to use my own set of comment characters for various purposes, and then use the VFP Comment command to identify a block of code that I want to comment out temporarily. Seeing "*!*" in my code is a visual reminder that I performed the programming equivalent of leaving a sponge inside the patient. You can use the Uncomment command to remove the "*!*" string from the beginning of a line of code, and, like the Unindent command, you don't have to have used the Comment command first. In fact, if you've just typed "*!*", VFP will remove those characters with Uncomment. If you've typed "*!*", VFP will leave the space, just removing the first three characters. I'm sure this is more than you ever wanted to know about VFP's commenting and uncommenting features.
The last option on the context menu is Properties, and it opens a dialog that allows you to determine a variety of properties for the current text-editing window as well as for all files. See Figure 5.5.
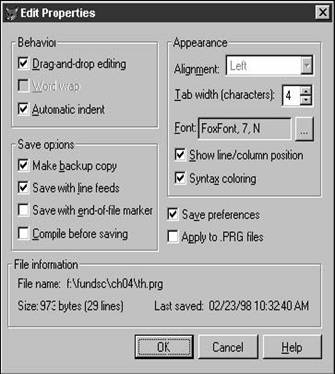
If you're used to other Windows word processing or editing programs, you're probably familiar with drag-and-drop text editing. This feature is known as "drag and drop" because you "drag" the selected block to a new location, and then, by releasing the mouse button, you "drop" the selected block in its new location. Note that this operation "moves" text; it does not copy it. If you're uncomfortable with this capability, you can turn it off by removing the check from the Drag-and-Drop Text Editing check box.
For non-.PRG files, you can choose to wrap text when your typing extends past the edge of the editing window (for .PRG files, you probably don't want your program code to wrap).
Each time you press the Enter key in the editor, Visual FoxPro will insert a carriage return and line feed key combination, and it will start the next line at the same column as the previous line started. If the previous line was indented several characters, the new line will also be automatically indented the same number of characters. This feature is handy when you are typing a block of code inside a logical structure and want the entire block to be indented the same amount. If you want to turn this behavior off, remove the check from the Auto Indent check box.
These three options are all specific to the current window.
You can set a variety of options for saving a file, including whether or not to make a backup copy of it (a file with the same name but a .BAK extension), and so on. For .PRG and .TXT files, I just keep the default settings. Automatically compiling your programs before saving is a good idea because it doesn't take any noticeable time, and you'll be alerted to any errors the compiler catches before attempting to run the program. You can also specify whether or not line feeds and an end-of-file CTRL+Z character are saved with the text. Visual FoxPro's defaults can be changed if you need a specific behavior when manipulating a specific file.
The Appearance options control how the file will display in the editing window, including font attributes, whether or not to show line/column positions in the status bar, and whether to use syntax coloring. When you press the Tab key in the editor, the cursor is advanced the number of spaces specified by the number in the Tab Size spinner. The default tab value is 4. If you want to have a different indent for the Tab, change it here.
![]() My personal preference is
to use the spacebar instead of the Tab key for indenting. Different editors and
printers react differently to the Tab character, and nicely formatted text with
specific tab spacing will look garbled if different tab spacing is accidentally
selected. Other developers have just the opposite preference. As with many
things, your mileage may vary. Do what is most comfortable for you, but be
consistent about it!
My personal preference is
to use the spacebar instead of the Tab key for indenting. Different editors and
printers react differently to the Tab character, and nicely formatted text with
specific tab spacing will look garbled if different tab spacing is accidentally
selected. Other developers have just the opposite preference. As with many
things, your mileage may vary. Do what is most comfortable for you, but be
consistent about it!
You can specify whether or not Visual FoxPro will display the current line/column position of the cursor in the Status Bar during editing by using the Show Line/Column Position check box. I always keep it on because it's handy to know what line I'm working on. Whether the line number appears is a function of whether Word Wrap is on, and that's yet another reason for keeping Word Wrap off for programs.
You might choose to turn
off syntax coloring if you're editing a file that has a .PRG
extension but that doesn't contain Visual FoxPro program code. For example, a
file that
contains #DEFINE constants could be difficult to read if syntax coloring was
turned on.
You can choose to save these preferences, and to apply these settings to all files of the type that you are currently editing. These settings are saved to the Visual FoxPro resource file, not the Windows registry!
Configuring Visual FoxPro program execution preferences
You can control the way Visual FoxPro works during program execution through options specified in the General tab of the Tools, Options dialog box. See Figure 5.6.
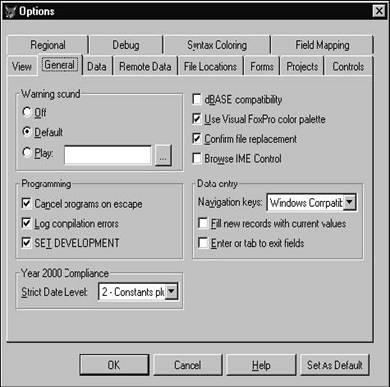
Normally, you can interrupt a Visual FoxPro program by pressing the Escape key. You can prevent this from happening by removing the check from the Cancel Programs on Escape check box. This is equivalent to using the SET ESCAPE OFF command.
If the Visual FoxPro compiler catches errors when it is compiling a program file, and if the Log Compilation Errors box is checked, a file with the same name as the program but with an .ERR extension is created. This text file will contain a list of all the errors the compiler caught, together with the offending lines of code and their line numbers. If you don't correct the program, the offending line of code will be highlighted and an error message will appear.
You can also turn the SET DEVELOPMENT setting (used to control recompilation when using third-party editors) on or off as desired. This is equivalent to using the SET DEVELOPMENT ON|OFF command.
|
Politica de confidentialitate | Termeni si conditii de utilizare |

Vizualizari: 1280
Importanta: ![]()
Termeni si conditii de utilizare | Contact
© SCRIGROUP 2025 . All rights reserved