| CATEGORII DOCUMENTE |
| Asp | Autocad | C | Dot net | Excel | Fox pro | Html | Java |
| Linux | Mathcad | Photoshop | Php | Sql | Visual studio | Windows | Xml |
The VFP Project Manager
The Project Manager is Visual FoxPro's mechanism for organizing all the files that make up an application. Because a complex application can be comprised of thousands of files-tables, classes, programs, forms, reports, menus, libraries, and so on-of a dozen or more types, and even a simple application can consist of several dozen files, it's a good idea to use the Project Manager for all of your applications. It's also the only way to create executables, so even if you avoid the Project Manager during your day-to-day work, you'll need to use it to produce your finished result.
The Project Manager enables you to view, in a variety of hierarchical structures, some or all of the files that make up an application. It allows you to automatically call up the associated editing tool for any of those files by clicking on the file name, and to create compiled .APP, .EXE, and .DLL files for easier and more secure distribution.
An application ordinarily consists of a main program file that in one way or another calls multiple programs, forms, reports, menus, and other files. Oftentimes, the main program will call a menu, and the rest of the application's functionality is accessed through menu options that call other programs, forms, and reports. Additionally, any of the files may reference other files such as graphics or icons, text files, help files, databases and tables, and so on.
You don't have to construct the entire application before using the Project Manager. In fact, one of its purposes is to help organize files as you add them to your application.
Using the VFP Project Manager to build an .APP or .EXE
The following steps show you how to use the Project Manager to create an executable program:
Open the File menu and select New, Project, New File, or type:
create project XXX
where XXX is the name of the project to create.
The Project Manager appears. The name of the project displays in the half-height title bar. This screen is used to perform most of the project management functions. When the Project Manager is the active window, the Project menu pad appears on the main menu.
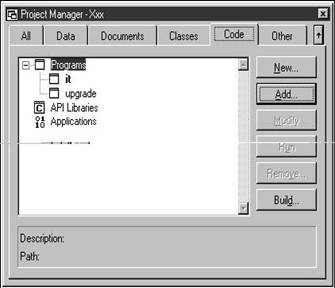
Select the Code tab and the Program outline level. See Figure 6.1.
Click the New or Add button to create or add the main program file. If it's the first file added to the project, the file name will automatically be displayed in boldface. This indicates that this file is the main (or calling) file in the application. If you add the main program file later (for instance, you had a project with a main file, but then later
Once you have a main program file, click the Build button. The Build Options dialog will appear. Select the Build Project option button. All files referenced by the main program, either directly or indirectly, will be brought into the project under the appropriate tab and outline level.
add another file that becomes the main file) and it doesn't automatically get marked as the main file, open the Project menu and click Set Main to do so.
Up close with the Project Manager
The Project Manager dialog
The Project Manager interface is powerful and flexible. While the functions of specific interface elements such as command buttons and the tabbed dialog work as they do in other Windows applications, some specific features of the Project Manager require explanation.
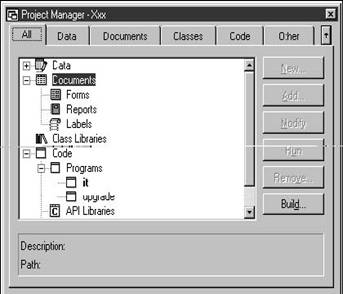
You can view all of the outline levels in one window by selecting the All tab. See Figure 6.2. If the Project Manager window isn't big enough, you can resize it vertically and horizontally as needed. You can also scroll through the list of outline levels and files by using the list box control.
Files that can't be included as part of an .APP or .EXE file are marked with a circle with a slash through it. A typical example is an API library. Such a file can be brought into the Project Manager and marked as "excluded" so you can see that it's part of the application but it still needs to be distributed as a separate file. All other files are defined as "included" by default. The main reason, then, for adding a file to a project when you're going to exclude it is to allow
easier access to the file for viewing or editing. While you wouldn't edit an API library, you might want to edit an INCLUDE (.H) file or the system specification in a Word document.
![]() If you include tables or
indices in a project, those files will be marked as read-only-generally not a
useful capability for a data entry and reporting system but useful for static
tables.
If you include tables or
indices in a project, those files will be marked as read-only-generally not a
useful capability for a data entry and reporting system but useful for static
tables.
Clicking the plus-sign icon next to an outline level (or the picture icon next to the plus sign) will expand that outline level and turn the icon into a minus sign. Clicking the minus icon (or the picture icon next to it) will contract the outline level and change the minus icon back into a plus icon. (A common mistake is to try to double-click the icon; it just requires a single click.)
This ability to expand an outline level allows you to "drill down" from level to level. This is particularly powerful in the Data level, where you can go from an entire database down to an individual field in a table. Because this drill-down list can get long, breaking out the various components of the project into their separate tabs comes in handy.
Once you've highlighted a file, the description and fully qualified path of that file will be displayed at the bottom of the Project Manager window. You can change the Description by right-clicking the file and selecting Edit Description.
Double-clicking the name of a file will open that file in the appropriate editing tool. For instance, double-clicking a menu file will open the Menu Designer with that menu loaded. Double-clicking an embedded .APP (which is marked with the excluded symbol) will open the project that built it if the project can be found in the path. Double-clicking a file that has another application associated with it through Windows, such as a .BMP (Paintbrush) or an .XLS (Excel), will load the file in that application.
The command buttons in the Project Manager allow you to:
Create a new file (the type depends on which outline level is highlighted in the list box)
Manually add or remove a file
Modify or view a highlighted file
Execute a program
Build (or rebuild) the project
Some of the command buttons change their label and/or purpose depending on the type of file highlighted. For example, the Run button changes to Open when the highlighted file is a database, to Browse when the highlighted file is a table, and to Preview when the highlighted file is a Report or Label. Be careful when using the Run button. If you are running a program on a lower level, menu, or form, it might not operate (or might operate incorrectly) if it relies on variables or data that are set up in a higher-level program.
The Remove button allows you to simply remove the file from the project. You can choose to just remove the file from the project or to also delete it from the disk.
The Build button allows you to build the project, or create an .APP file, an .EXE file, or a single-threaded or multi-threaded .DLL. Clicking Build opens the Build Options dialog as shown in Figure 6.3.
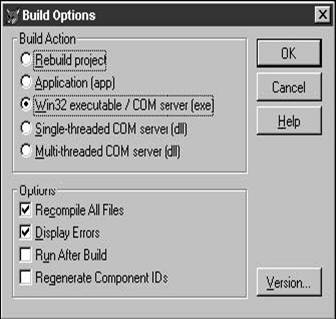
Programs will be recompiled to create new .FXPs, and menus will go through a generation process like they always have, but forms no longer go through a similar generation process. Instead, the object code is stored in the form itself, and will be recompiled if the program code in the form has been modified since the last project build.
You can force every file to be recompiled by checking the Recompile All Files check box. Because it is possible for object code in forms, class libraries, and reports to occasionally get out of sync with the program code, and timestamps of files can be inaccurate if you are moving components between machines, I usually keep this option selected to be sure that I've got the very latest changes, and that all of the object code in every form, class library, and report is compiled again.
If the Project Manager can't find a file during the rebuild process, it will display the Locate File dialog. You can choose to remove the file from the project, attempt to find the file, ignore the warning, or cancel the process. If the Project Manager comes up with errors during the rebuild process (syntax, missing files, or the like), the message in the status bar at the end of the build process will report on the number of errors found. You can display an error report automatically by opening the Project menu, selecting Build Options and then selecting the Display Errors check box. (If you forget to check the Display Errors check box, you can view errors by opening the Project menu and selecting Errors.) The Build Options dialog box allows you to control how your application is compiled.
Oftentimes, I will rip through the build process and select Ignore for all of the files, in order to get an idea of the number of errors. I've found it's a lot faster to fix a number of errors all at once than to stop and fix each one individually.
You can automatically run the application after the build process, which you may or may not choose to do based on your personal preferences.
The Regenerate Component IDs check box is used when building .EXEs and .DLLs. Selecting this check box will install and register any automation servers that are part of the project, and will generate new Globally Unique Identifiers (GUIDs) for any classes marked OLE Public.
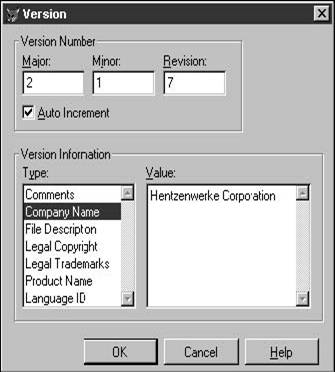
You can have the Project Manager maintain version information for the .EXE or .DLL you are creating, as shown in Figure 6.4.
You can choose to explicitly assign three levels of version numbers, or have the Project Manager automatically increment the number for you. You can also assign additional information for the file you are building.
The Project Manager context menu
Right-clicking any object in the Project Manager will open the Project Manager context menu, as shown in Figure 6.5. Various menu options are available depending on the type of object clicked.
The Expand All menu
option is enabled if you've selected a node that has items below it. Exclude
will mark the object so that it won't be included in the .APP, .EXE, or .DLL to
be built. Set
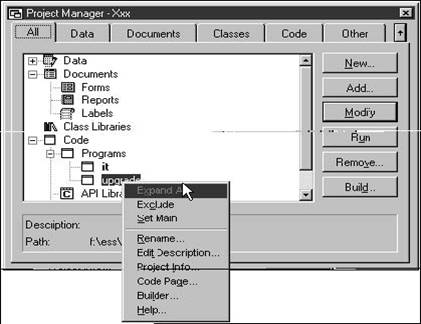
Rename allows you to rename a file instead of having to go to the operating system to do so. Visual FoxPro is well-behaved with this functionality in that if you change the name of a menu or a form, for example, both the .MNX and .MNT (or .SCX and .SCT) file names are changed. Note that the generated files (such as the .MPR and .MPX) don't have to be renamed because they will be re-created when the project is built again. (However, the old versions of the generated files will still be lying around and you'll have to delete them manually.) Remember that when a file is called from another file, it's automatically added to the project. For example, if you call SCREEN1 from PROGRAM7, SCREEN1 will automatically be added to the project. If you change the name of SCREEN1 to SCRN1, you need to go back to PROGRAM7 and change the reference from SCREEN1 to SCRN1. When this happens to me, I just recompile all files in the project, and let the Project Manager list all of the unresolved references for me.
Edit Description allows you to add a text description to an object in the project. This is particularly handy if you use cryptic file names for the various forms, classes, and reports in your application-or as you add more and more files to a project, some of which begin to sound the same regardless of how explicit you were in naming them. To edit a file description, right-click the file to which you wish to add a description, and then click Edit Description. Depending on the letters used in the description (you can fit more letters like "I" and "l" than "M" and "W" in the same amount of space), you can use about 60 characters. This is purely descriptive and doesn't affect anything else about the project. The full path of the file is also shown next to the Path prompt at the bottom of the Project Manager.
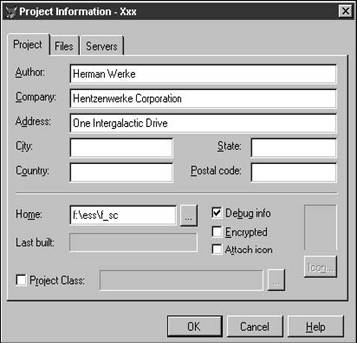
The Project Info menu command opens the Project Information dialog, as shown in Figure
. You can include contact information, identify the location of the project file, and see the last date and time the project was built. You can include debugging information with the compiled file-if you select the Debug Info check box, you can view program execution in the Trace window. You can also choose to encrypt the resulting compiled file. Available third-party products purport to decrypt an encrypted application, but I have not tested any of these personally.
You can attach an icon to an application by checking the Attach Icon check box and then clicking the Icon button to select an icon. If the icon file you select includes both a 32x32 and a 16x16 version, they will be used as the icon attached to the file in Windows Explorer as well as the icon used if you create a Windows shortcut for the file. (You can assign a file-name value to _Screen.icon in your application to change the icon in the title bar of your application.)
The Project Class area is used to specify a
default ProjectHook class as a template for new projects. Project Hooks are covered in Chapter 18.
The Files tab, as shown in Figure 6.7, lists every file in the project in a list box control. This list box shows an icon identifying what type of file it is, the file name and extension, the date and time the file was last modified, whether or not the file is included in the project, and what code page is used for the file. The file with a filled-in check box in the Included column is the main program in the application.
Note that the Name column does not list the path-if you've got files from various subdirectories, you won't be able to tell from here, but the Path area at the bottom of the Project Manager window will tell you.

The controls in the Included column are the only editable items in the list box-they operate just like standard check boxes.
You can resize the columns by positioning the mouse pointer on the separator bar between two column headings and dragging, and you can sort the list box on the values in a column by clicking the column header (you might have to hold the mouse button down for a second before releasing in order to get the column to sort). Holding down the Ctrl key while clicking will reverse the order of the sort.
The code page for .DBF files (other files use the .DBF format, such as .SCX files) is embedded into the file, but the code page for other types of files, such as text files, is not. You can use the Project Manager to keep track of the code page. For those files that don't have code pages, click the Update Native Code Pages button to update them with the current Windows code page.
The Servers tab will be discussed in the section on COM servers.
The Project menu
The Project menu appears in the main menu whenever the Project Manager is the active window. Many of its options duplicate functions available through command buttons in the Project Manager window or the Project Manager context menu. New options include Errors, Refresh, and Clean Up Project.
When errors are found during a project build, they are placed in a file with the same name as the project but with an .ERR extension. You can view this file by opening the Project menu and selecting the Errors menu option.
The Clean Up Project menu option is used to get rid of old data in the project. Just like every other design surface in Visual FoxPro, the Project Manager stores its information in a table. The table has a .PJX extension, while the associated memo file has a .PJT extension. When you remove files from a project, they are tagged as deleted in the project table but not actually removed-just like deleting records in any other table. The project table also contains a full copy of the object code for each program and menu file. Object code for other files is stored in the files themselves as of version 6.0 of Visual FoxPro 6.0-that's why .PJT files are so much smaller than in the past. An active project might have dozens to hundreds of deleted records, and performance can suffer as the number of deleted records grows. You can use the Clean Up Project menu option to remove deleted records and winnow down the size of bloated memo fields. Note that the Clean Up Project menu option does not warn you or ask for confirmation first.
Tips and tricks
I usually call the project and the main/calling program by the same name. I've found there are so many files around that using the same name for the project, program, and menu allows me to keep straight where the "starting gate" is. Otherwise, it's easy to forget the main name.
I call all of my projects by the same name, so the main program is also named the same. This way, when I'm bouncing around between various applications, I don't have to remember what clever acronym I used for a particular system.
If you have a file, such as a program, that is referenced indirectly, it will not be brought into the project automatically when you rebuild. For example, if your program specifically names a report in the code, like so:
report form MYREPORT to print
Visual FoxPro will pull MYREPORT.FRX into the project. However, you might have a situation where you pull the name of the report from a table based on the selection that the user made. In this case, you'd use indirect referencing to name the report, like so:
m.cReportName = 'MYREPORT.FRX'report form (cReportName) to print
In this situation, Visual FoxPro will not bring "MYREPORT.FRX" into the project. The same technique works for other types of files. You can manually include them in the project (using the Add button) so that they are included in the final compiled file during builds.
As you dive head first into development, you'll find screen real estate at a premium. It makes sense to discuss some of Visual FoxPro's interface options that are applicable to the Project Manager so that you can keep it from taking over your desktop. First, remember that you can dock the Project Manager like any other toolbar, although you can only dock on the top or bottom of the screen. Double-clicking the half-height title bar also docks the Project Manager on the top of the screen. You can minimize the Project Manager anywhere on the screen by clicking the Minimize button in the upper-right corner of the window.
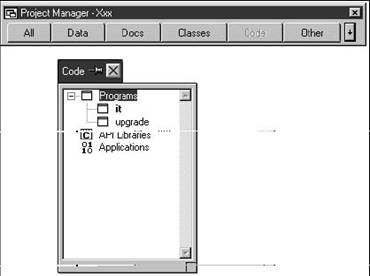
Suppose you often work with a specific type of file; you might want to have a list of those files open, but not the entire Project Manager window. You can "tear off" a single tab and keep it on the screen while the rest of the Project Manager stays minimized or docked. Click the box with the X to restore the tab to its rightful place in the Project Manager window. You can use the pushpin to keep the torn-off tab "on top" of all windows if you like. See Figure 6.8.
The Project Manager is a good repository not only for the files that make up the application, but also for the information related to the app. For example, you might have a to-do list, memos to the customer, outlines for an instruction manual, and so on. You can include these as part of the project by adding them to the project under the Other, Other Files outline. The type of file defaults to a picture (.BMP) but you can change it to a .TXT file (File) or list all files by opening the List Files drop-down list. Then, just double-clicking one of those files in the Project Manager will bring up the application that was used to create that file. For example, if you add a Microsoft Word .DOC file to a project, double-clicking that file will open Word and load that file automatically. This works for Microsoft Excel and other applications as well. How can life get any better?
|
Politica de confidentialitate | Termeni si conditii de utilizare |

Vizualizari: 1652
Importanta: ![]()
Termeni si conditii de utilizare | Contact
© SCRIGROUP 2025 . All rights reserved