| CATEGORII DOCUMENTE |
| Asp | Autocad | C | Dot net | Excel | Fox pro | Html | Java |
| Linux | Mathcad | Photoshop | Php | Sql | Visual studio | Windows | Xml |
Using Microsoft TransactionServer with Visual FoxPro
Unless you've been living in a cave for the past few years, you've heard of MTS- Microsoft Transaction Server-and usually in the same breath, how easy it is to integrate Visual FoxPro components with MTS. It's likely, though, that unless you've rolled up your sleeves and dug into it yourself, that you're probably a little fuzzy on the basics: What is MTS, where does it come from, and when and where would I use it in my applications? In this chapter, I'll answer these questions, and give you a foundation upon which you can explore further.
If you're building multi-tier applications, you're going to run into a number of issues that don't come up with traditional LAN or Client-Server applications. First, the specific architecture of n-tier applications dictates the use of components to handle business logic-and these components are placed between the presentation layer ( the user interface) and the back-end database. The physical management of these components is a non-trivial issue-installing and updating are more complex than simply copying an executable to a user's workstation.
Second, managing transactions-blocks of processes that may be distributed across more than one component-requires mechanisms that are beyond the scope of any single development tool, such as Visual FoxPro or Visual Basic. And, finally, one benefit of multi-tier applications can also turn into an Achilles heel-the deployment of an application across the Web implicitly offers availability to virtually an unknown number of users. Suddenly, scalability becomes a major issue, as the potential pool of users can't be controlled as easily as it could be for a LAN or Client-Server application.
Visual FoxPro and Microsoft Transaction Server are a great combination for dealing with these issues. Visual FoxPro, with the inclusion of new capabilities in Service Pack 3, allows you to create components that can be accessed by multiple users at the same time with little performance degradation. Microsoft Transaction Server allows you to combine components into "packages" that can act as a single transaction, and provides a friendly user interface to deploy those components. Together, they provide the mechanism for managing the middle tier of a multi-tier application.
What is MTS and where does it come from?
Microsoft Transaction Server is a component-based transaction processing system for building, deploying, and administering robust Internet and intranet server applications. Well, that's what the marketing literature says. To you and me, it's a piece of software that comes with the NT Option Pack for Windows NT Server, and is used for creating and administering groups ("packages") of components that are used in multi-tier applications. No big mystery after all, really.
In addition, MTS provides role-based security, connection pooling, and multi-database transaction support.
Role-based security provides another layer of security, in addition to the group and user levels available in Windows NT. Each interface-each component-can have a different level of security defined, which provides for great flexibility and power.
Connection pooling is the ability for multiple users to share a single connection. MTS automatically adjusts the number of connections open for users so as to balance demand. Without connection pooling, 500 simultaneous users would require 500 connections-and thus a box with about 5 terabytes of RAM (well, maybe not 5 terabytes, but an awful lot) in order to have enough resources for those connections. With connection pooling, those 500 users would only need, say, 25 or 50 connections-a considerably less expensive option.
Most databases provide for some sort of transaction handling these days. Thus, a series of processes, say, several adds and edits, can all be packaged into a single transaction, and the entire batch can be committed (or canceled: "rolled back") as a single unit. And, as I mentioned, MTS allows you to package multiple components into a single transaction as well. However, what about transactions that have to span more than one database? What if you have to manipulate data in more than one database, but want all of the manipulations to be committed or rolled back as a single unit? Most databases don't provide for this heightened level of transaction handling. MTS will allow you to do this-span transactions across multiple databases.
Installing and accessing MTS
You may very well have MTS already installed on your server without knowing it. When you install the NT Option Pack on an Windows NT Server machine, it will allow you to select a number of choices, including Microsoft Message Queue Server, Internet Connection Services for Microsoft Remote Access Server, Internet Information Server and Microsoft Transaction Server.
The NT Option Pack is available in many places. For example, it's included
![]() with the
with the
can be downloaded (all 27 MB of it) from the Microsoft Web site at
www.microsoft.com/windows/downloads/default.asp.
If you don't have it installed, just grab the Option Pack and run the installation like you would any other standard Windows setup-and be sure to select MTS as one of the components to install.
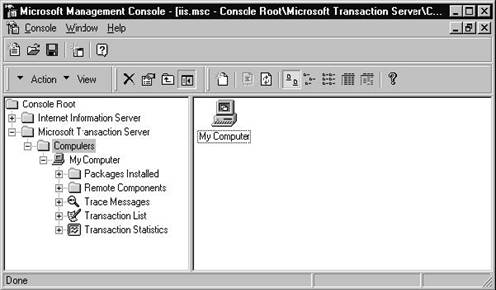
Once you've got it installed, you get to navigate through the maze of submenus to access it. From the Start menu, select Programs, Windows NT 4.0 Option Pack, Microsoft Transaction Server, Transaction Server Explorer, and you'll wind up with a dialog that looks something like Figure 29.1.
As you drill down through the tree view in the left pane of the explorer, you'll see several nodes of interest. The first is the My Computer node, which makes sense if you're running this from your own NT Server box.
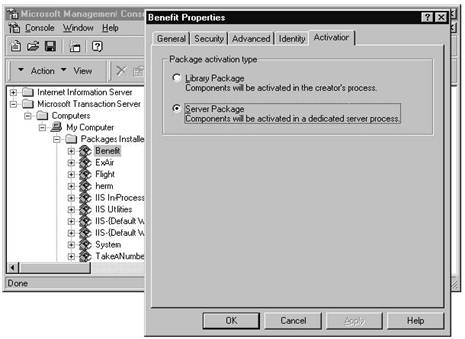
Underneath My Computer you'll see the Packages Installed node, which is shown in exploded view in Figure 29.2. Now examine what the node for a package looks like. You can right-click on a specific package to open a context menu for that package. Selecting the Properties menu option opens the Properties dialog for that specific package, as shown in Figure 29.2.
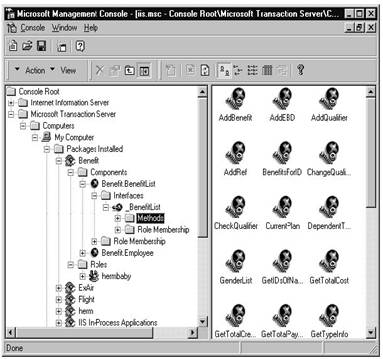
You can also examine the methods available in a specific component-remember, that's the whole point of a component, to provide functionality to other parts of the application through the exposure of public methods. Select the Methods node under a specific Interface node, as shown in Figure 29.3.
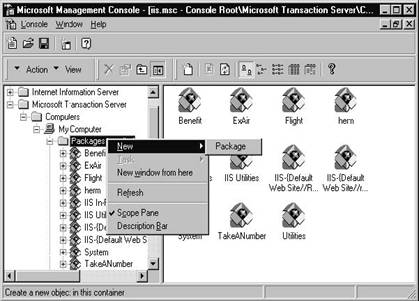
Creating a package
A package is a group of one or more components that you want to treat as a single cohesive unit. To create a package, right-click on the Packages Installed node and select the New, Package menu option from the resulting context menu, as shown in Figure 29.4.
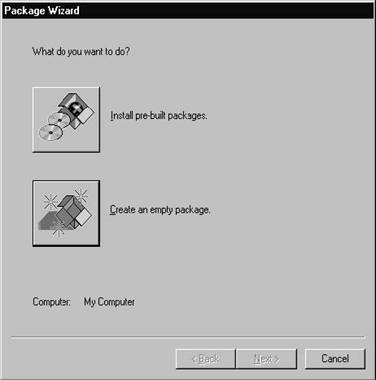
The Package Wizard will launch as shown in Figure 29.5, and will give you the option of installing a pre-built package into MTS, or creating an empty package. If you create an empty package, you'll need to add components to it.
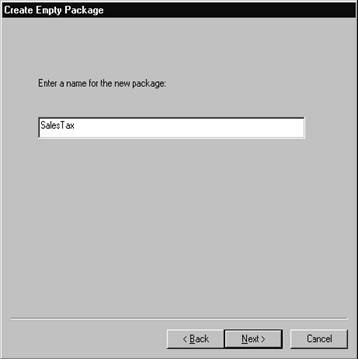
Since you probably don't already have pre-built packages while you're reading this chapter, I'll head down the "Create an empty package" route. The first step is to enter a name, as shown in Figure 29.6. As you can see, MTS is still in its infancy, as evidenced by the rudimentary dialogs.
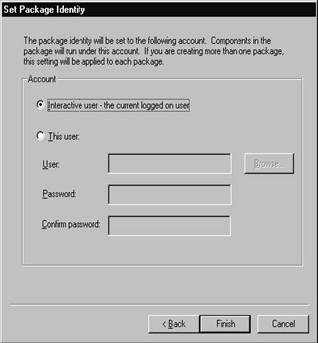
Next, you'll attach the package to a specific user account, as shown in Figure 29.7. If you're logged on as the user who will eventually be using the package, you can select the default; otherwise, click the "This user" option button and the Browse button to select another user. Typically you'll have a user on the server who is set up for access to this application.
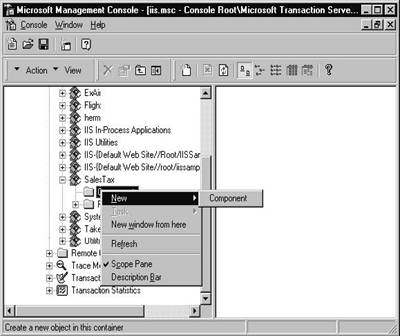
Once you're done creating your package, you've got an empty package. When you look in the MTS Explorer, you'll see your new package, with a pair of nodes-Components and Roles-underneath it. However, much like any other box without anything in it, your new package isn't much use until you put something in it. When you right-click on the component node under your package, you'll be able to select the New, Component menu option from the context menu, as shown in Figure 29.8.
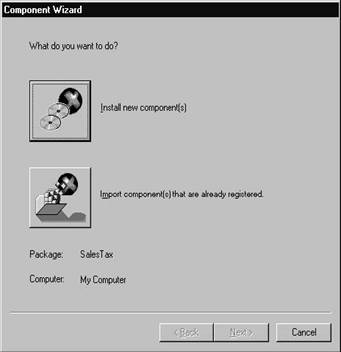
The New, Component menu option will launch the Component Wizard, as shown in Figure 29.9.
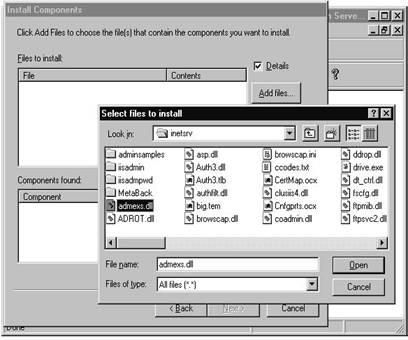
If you choose to install new components, you'll be presented with the Install Components dialog as shown in Figure 29.10. You can choose between .DLLs, .TLBs, and all files in the file filter.
Once you select the desired file (you do know which file contains your components, don't you?), the components contained in it will be listed in the Components found list box.
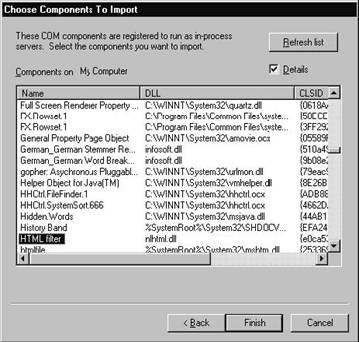
If you select the "Import components that are already registered" option, you'll get the screen displayed in Figure 29.11. This dialog is a perfect example of why we all have jobs, and will continue to have jobs even after programming is reduced to "assembling components into systems."
Once you're done with the Component Wizard, the components you installed will be listed in the Components node under your package.
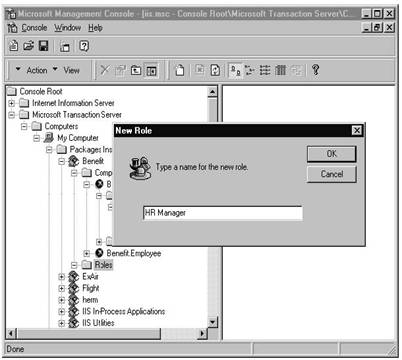
You can also add Roles to your Package by right-clicking on the Roles node and selecting the New, Roles menu option, as shown in Figure 29.12.
More information
So now that you have an idea about how to create a package and add components to it, it's time to talk about a couple of Visual FoxPro-specific issues, and where to go for more information. VFP 6.0 provided the ability to create COM components that work in MTS. However, until Service Pack 3, VFP COM components were somewhat limited in their utility, because they exhibited a behavior known as "method blocking."
In short, two requests to the same server would queue up in serial order, with the first request blocking the second one from executing while the first one was still executing. One of the nifty features of SP3 was a new multi-threaded runtime that eliminated this problem. If you examine the WINNTSYSTEM32 directory, you'll see two runtime files, VFP 6R.DLL and VFP6T.DLL. The first is the normal runtime that is distributed for most applications. The second is a special multi-threaded runtime that you'll use when creating in-process servers that require high scalability.
These issues are discussed in detail in the SP3 online help file, VFPSP3.CHM, found in the Program FilesMicrosoft Visual StudioVFP98 directory.
You'll also want to learn more about implementing security, and how to handle transactions and deploy packages. Randy Brown has written an excellent white paper for MTS and Visual FoxPro that covers these topics and more. It can be found at the Visual FoxPro Web site at msdn.microsoft.com/vfoxpro. Select the Technical Resources link on the left side of the page, then the Technical Articles link, and click on the COM and ActiveX Development topic. The name of the paper is, interestingly enough, "Microsoft Transaction Server for Visual FoxPro Developers."
|
Politica de confidentialitate | Termeni si conditii de utilizare |

Vizualizari: 1052
Importanta: ![]()
Termeni si conditii de utilizare | Contact
© SCRIGROUP 2025 . All rights reserved