| CATEGORII DOCUMENTE |
| Asp | Autocad | C | Dot net | Excel | Fox pro | Html | Java |
| Linux | Mathcad | Photoshop | Php | Sql | Visual studio | Windows | Xml |
Using the Debugger
FoxPro developers through version 3.0 were saddled with a fairly limited set of debugging tools: a two-pane window that displayed the values of variables, and a code tracing window. When Fox developers looked over the shoulder of a VB or Visual C developer, the usual feeling was one of envy-for a robust, full-featured debugger. One of the major improvements in version 5.0 was a tool similar to other debuggers. Pound for pound, the Visual FoxPro 6.0 Debugger has probably as many features and great capabilities as any component of Visual FoxPro. In this chapter, I'll take you through the entire tool. If you've not used a debugger seriously, fasten your seatbelts.
Debugging is one of those dirty secrets that all developers keep hidden from their users and customers. Furthermore, many developers don't want to admit how much they have to debug, and, thus, correlate a high level of debugging skill with a low level of programming skill. As a result, debugging techniques don't get as much airplay. Well, that's all nonsense.
I remember a story about a class of fifth graders that is taken to the racetrack for a day. At the end of the day, after watching practice laps, watching the pit crews, meeting the drivers and others involved in running the facility, the teacher asked who was the best driver they met. Various students offered their opinions, but the teacher corrected them all. "The bus driver who took us to the track and then returned us to school at the end of the day. He's a true professional-he drove safely and carefully, and got us where we wanted to go without any problems. While a driver who runs into problems and escapes by the skin of his teeth may be flashy, the driver who never gets into trouble in the first place is better."
Similarly, the programmer who knows that bugs are inevitable, and who can masterfully debug his application, is much more worthy of your praise than the guy who claims he hardly ever needs to use it.
In this chapter, I'm going to show you how to configure the Debugger to suit your style, and then walk through each of its components. While I'm doing so, I'll discuss some techniques-some that I use and others that my tech editor, Doug, relies on-that you can use in your day-to-day work. Finally, I'll wrap up with a lecture on the debugging process in general. Here, more than anywhere else, having the right mindset is critical to being a successful debugger.
You'll want to read this chapter at least twice because it's circular in nature. Debugging is kind of a Catch-22 situation-simply describing each component without putting its use in context is somewhat useless, so I provided a brief vignette as well. However, in doing so, I needed to refer to another component that I haven't discussed yet.
Configuring the Debugger
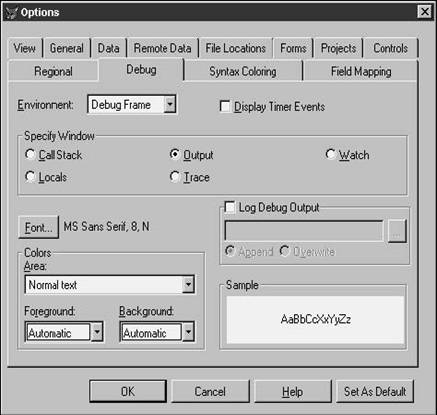
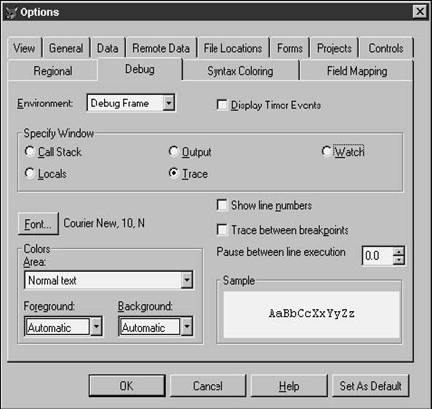
The Debugger consists of five windows: Call Stack, Output, Watch, Locals, and Trace. How these windows work-with each other as well as with Fox-is determined by configuration settings. The Options dialog (found by selecting Tools, Options) has an entire tab (Debug) devoted just to the Debugger configuration settings. See Figure 19.1.

Choosing a debugging frame
The first thing you're going to want to do is to choose how the Debugger window is opened. You can open the Debugger in two modes-one where the windows are all part of the Visual FoxPro desktop, just like the Command window and Data Session windows, or in a separate application that displays as a separate window as well as in a separate item in the task bar.
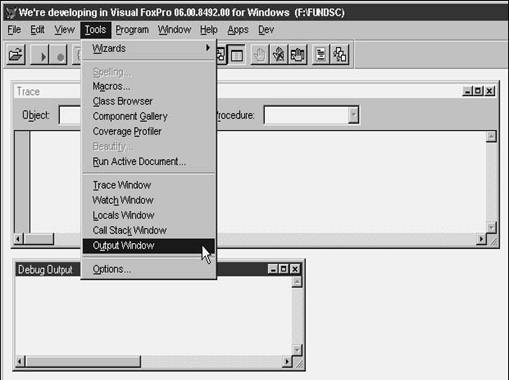
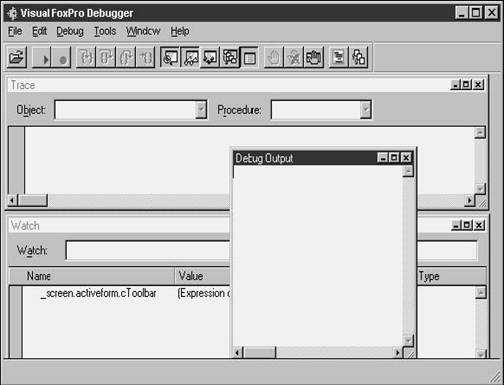
You choose which mode by selecting an item in the Environment combo box. If you choose the FoxPro Frame, debug windows will appear in the FoxPro desktop, and the Tools menu will have five menu options-one for each window. See Figure 19.2. Selecting the Debug Frame means there will be only one menu option on the Tools menu. Selecting this menu option will open a window separate from the VFP desktop in which debug windows will appear, as shown in Figure 19.3.
Note that if you have any debug windows open, or if the Debugger toolbar is open, you won't be able to change the value in the environment combo box.
Configuring windows
The interface in the bottom two-thirds of the Options dialog's Debug tab is a little tricky. First, you select one of the five windows through the Specify Window option group. Once you do so, the values of all controls underneath the option group relate to the selected window. The actual controls that display under the option group vary according to which window was selected.
Common settings
You can set the font and colors properties for each window. Clicking the Font button will open the Font dialog that you see everywhere in Windows-you can select a font, its style, and size.
You can also choose the color properties for
unselected ("
The choices you make appear in the Sample read-only text box (or is it a fancy label?).
Settings for Call Stack window
Three check boxes appear in the right side of the Debug tab when you select the Call Stack option button (see Figure 19.1):
. . Show call stack order: Checking this check box will display a number next to each program listed in the Call Stack window. The number 1 indicates the first program in the call stack; each subsequent number indicates the next program called; and the highest number indicates the currently executing program.
. . Show current line indicator: Checking this check box will display a right-pointing arrow in the Call Stack window next to the program that contains the currently executing line.
. . Show call stack indicator: Checking this check box will display a right-pointing arrow in the Call Stack window next to the program that is displayed in the Trace window. Well, that's what the documentation says. If I uncheck the current line indicator and then check the call stack indicator, I get an arrow in the Trace window but nothing in the Call Stack window. Either these controls are broken, or the doc is.
Settings for Output window
A check box, a file selection text box and ellipsis button, and an option group appear in the right side of the Debug tab when you select the Output option button. See Figure 19.4. Checking the Log Debug Output check box will enable the other controls. You can also check the Log Debug Output check box to send data that is sent to the output to a file. You can enter the name of a file in the text box or select an existing file by clicking the ellipsis button and using the Open dialog. You can choose to overwrite any existing information in that file or simply append the new data to the existing contents of the file.
This log file is a global log file-data from any application that is sent to the output window will be sent to this same log file. While it's handy to set this option once, you can also generate huge files if you're not paying attention. Choose Overwrite or Append carefully! You can also manually send Debug Output to a file by using the SET DEBUGOUT TO <file> command in your code.
Settings for Watch window
There are no controls specific to the Watch window.
Settings for Locals window
There are no controls specific to the Locals window.
Settings for Trace window
Two check boxes and a spinner appear in the right side of the Debug tab when you select the Trace option button. See Figure 19.5.
. . Show line numbers: Displays line numbers in the left margin of the code in the Trace window.
. . Trace between breakpoints: Executes code between breakpoints at throttle speed (see next item). For example, if you set the throttle to 1 second, you could watch your code execute (the executing line would be highlighted) in the Trace window by observing the highlight moving from line to line, one second per line.
. . Pause between line execution: Specifies the delay in seconds between the execution of each line of code-in other words, the throttle.
Other options
Checking the Display Timer Events check box will display, in the Trace window, timer events that occur while your program is running. For example, suppose you have a timer on a form and it is set to fire every five seconds. When it fires, a refresh command is executed. When you are running the form, you'll see the various code statements in the Trace window, and every five seconds you'll see a refresh statement as well-if you've checked this check box, that is. Unless you've got a very specific reason for having this on, you'll want to keep it off.
The five Debugger windows
The Visual FoxPro 6.0 Debugger consists of five independent windows, as well as a toolbar that allows you to get quick access to a variety of debugging functions. The Debug window that appears when you run the debugger in a Debug Frame also has a menu that gives you quick access to Debugger functions.
Trace window
The Trace window allows you to display the lines of code being executed, and to optionally set breakpoints at specific lines of code in your program. (I'll discuss breakpoints in a bit.) This can come in handy when your program crashes, or when you want to intentionally stop execution to look at a line or segment of code.
To use the Trace window, follow these steps as an example:
1. 1. Open the Trace window (in either frame).
2. 2. Create a program with a WAIT WINDOW that displays a bad expression, like so:
wait window m.lcNoSuchVariable
1. 3. Open the program in the Trace window, using the Open button in the debugging toolbar.
2. 4. Run the program and watch your program generate an error message with Cancel, Suspend, Ignore, and Help buttons:
Variable m.lcNoSuchVariable is not found
1. 5. Click the Suspend button.
2. 6. Switch over to the Trace window. You'll see the WAIT WINDOW line of code highlighted with a yellow arrow in the left margin.
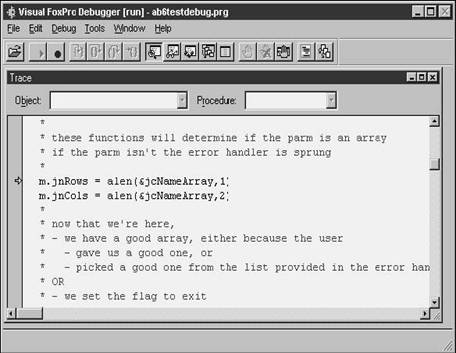
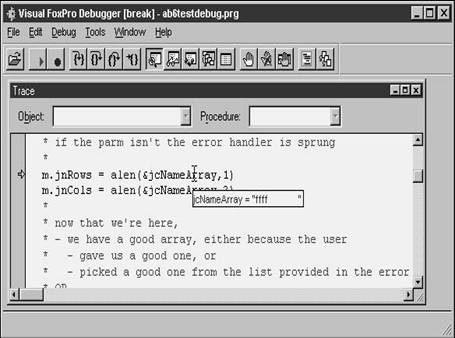
This particular error message is easy to see and resolve-perhaps a typo or some such problem. If, on the other hand, the variable exists but caused another problem, such as a "data type mismatch," you can hover your mouse cursor over the variable name in the Trace window and see what the actual value is, as shown in Figures 19.6 and 19.7. In Figure 19.6, the variable "jcNameArray" exists, but it is a character expression, thus causing an error. In Figure 19.7, the mouse screen tip shows that the variable is indeed a character string.
When you're done, you can continue running your program by clicking the Resume button in the debug toolbar or selecting Resume from the shortcut menu (described later).
Throttle
If you have the Trace window open and a complex routine is executing, you might be able to see the lines of code scrolling by with the yellow arrow blipping down the left margin of the window. You might be thinking that it would be handy to see the code go by a bit more slowly. You can do this by setting the throttle of the Trace window.
Select the Debug, Throttle command from the Debugger menu and enter a value, in seconds, that you want Visual FoxPro to wait in between executing commands. This is the same value that was called "Pause between line execution" in the Debug tab of the Tools, Options dialog. Usually a quarter-second to a half-second is plenty, although your mileage may vary depending on your personality, preferences, and the horsepower of your machine.
Then, when you run your routine with the Trace window open, the code will scroll by slowly, according to the time interval you specified.
Of course, this brings up another question, doesn't it? Once you see code go by, how do you get your program to stop at an interesting point? You could just press Escape, but that could be dangerous to the environment-what you'd like to do is temporarily suspend execution instead.
Many developers assign the SUSPEND command to a hotkey, like so:
ON KEY LABEL F12 SUSPEND
Then, as your program is executing and code is scrolling by in the Trace window, you can just press F12.
You might even embed this command in your program, instead of having to type it in the Command window. If you took this route, you'd probably want to bracket the code so it was activated only when the program was in development mode or when you had logged on.
Again, once you're done with whatever you wanted to do with your suspended program, you can continue execution by selecting Resume.
Stepping through code
So now that you've got the Trace window meandering through your code according to the Throttle value, and you can suspend your program at will, you might want to examine a particular routine and its values, one line at a time. Here's how.
First, set up your Trace window, Throttle, and Suspend hotkey as necessary. Run your program until it gets to the point of interest-say, a looping construct that is going bonkers on you. Suspend your program and use your mouse to hover over the values of interest. When you want to move to the next line, click the Step Into button on the Debug toolbar.
Breakpoints
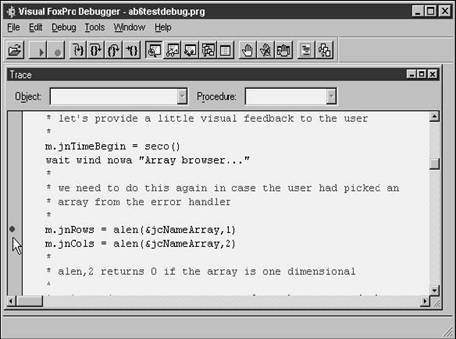
There might be times when you want to stop the execution of a program without an error causing it. You can set a breakpoint by double-clicking in the left margin of the Trace window on a line of code. When you do, you get a red dot in the margin, as shown in Figure 19.8.
Now, run your program (without any code that will cause it to generate an error). You'll see the program stop without warning, which is your cue to switch over to the Trace window. You'll see the yellow arrow in the left margin on the same line of code on which you set your breakpoint. You can now examine values or perform other operations, as you would have earlier. The difference is that you can control where the program breaks.
Breakpoints dialog
While setting a breakpoint or two in the Trace window is nice for occasionally debugging, you'll often want to set up a group of breakpoints in a long or complex routine. Instead of having to create one breakpoint after another while testing, and then repeat it the next time you test, you can set up a group of breakpoints and store that group for later recall.
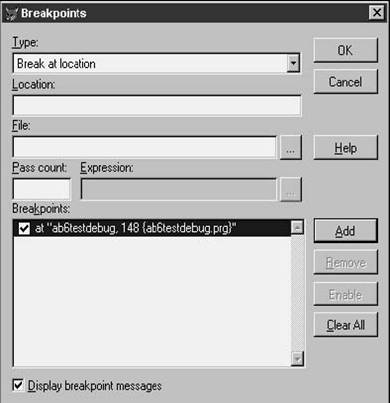
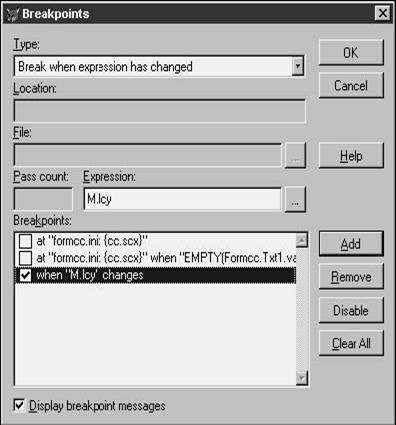
Even better-you're not limited to setting breakpoints at specific lines of code. You can also set breakpoints when an expression becomes true, or at a location only if an expression is true when that line of code is executed, or when an expression changes. And, of course, you can create a group of breakpoints that mix and match these different types of breakpoints. This is all done in the Breakpoints dialog, which is shown in Figure 19.9.
You can open the Breakpoints dialog by selecting the Tools, Breakpoints menu option in the Debug Frame menu, or by clicking the Breakpoints dialog button in the Debugger toolbar.
To create a breakpoint in the Breakpoints dialog, first select the Type. The steps you take next depend on which type of breakpoint you've chosen.
Break at location
If you select Break at location, the Location, File, and Pass Count text boxes become enabled. You can enter the name of a program, a procedure, or a specific method or event. You can optionally add a line number in the routine where you want the breakpoint to be set after the name of the routine, like so:
ab6testdebug, 148
If you just enter the name of the routine, the breakpoint will be set at the beginning of the routine. Enter the file name (or select a file using the ellipsis button) in the File text box.
If you are setting a breakpoint in a looping construct, you can set the breakpoint to fire only after a certain number of iterations by entering a value in the Pass count text box. For example, if you want your program to be suspended at the 13th time it's executed, enter "13" into the Pass count text box.
Break if expression is true
If you select Break if expression is true, the Expression text box and ellipsis button become enabled. You can enter any valid Visual FoxPro expression in the text box, or create an expression with the Expression Builder that is opened if you click the ellipsis button.
What types of expressions might you want to break on?
The first type of expression most people think about is comparing a variable with a constant, such as when an amount is equal to zero, or, alternatively, when the amount becomes non-zero. You can compare two variables with each other, such as a gross amount and a net amount. And you can concatenate two expressions-when a date reaches a certain value and an amount is greater than a certain amount.
However, you're not limited to just these types of expressions. How about checking to see if you're at beginning or end of file in a table, or if you've got the correct cursor in the current work area, or have an index set? You could check to make sure you have buffering set the way you expected it to be, or if you have Deleted set to ON or OFF, or what the setting of SET EXACT is.
Another favorite is to look for a specific text string in the name of the currently executed program, and break there-that way, you can run your application until you get to the area of interest, and then break. If you specify an expression involving a local variable instead of a hard-coded value, the breakpoint will also fire when the execution dives into another routine- in which case the variable won't be in scope any longer.
Break at location if expression is true
If you select Break at location if expression is true, the Location, File, and Pass Count text boxes become enabled as well as the Expression text box and Expression ellipsis button. This works like creating a compound expression on Break at location and Break if expression is true, so all of the same ideas work here in combination.
Break when expression changes
If you select Break when expression changes, the Expression text box and Expression ellipsis buttons become enabled, just as with Break if expression is true. However, with this break type, you don't have to know exactly the value of the expression that you're matching. Instead, Visual FoxPro will watch for any change in the expression. Like "Break if expression is true," you can either enter your own expression in the text box or create an expression using the Expression Builder.
This type of breakpoint is handy when you're chasing down issues where a value or a setting changes when you don't want it to change. You don't particularly care what it's changed to, you just want to find out where it's being changed. For example, suppose a command you're using to match a value is all of a sudden not working-and you determine that the setting of EXACT has been changed to ON. You might use the expression
SET('EXACT')
to determine when the setting of EXACT is being changed. Similarly, suppose you are moving the record pointer in a cursor, table, or view, and suddenly you get mysterious error messages indicating that you don't have a table open, or that you're not in the place you thought you were. You can use the expression
ALIAS()
to determine where you're switching work areas.
Managing breakpoints
Once you've entered all the values needed for the breakpoint you're creating, click the Add button and the breakpoint will appear in the Breakpoints list box at the bottom of the Breakpoints dialog. If you made a mistake, you can delete the breakpoint from the Breakpoints list box by selecting the row in the list box and then clicking the Remove button. Note that you will not be prompted to confirm your choice. Further, you can delete all breakpoints from the list box by clicking Clear All. Like Remove, you will not be prompted to confirm your choice after clicking Clear All-it will just blast them away.
Once you've created a breakpoint, you'll want to enable it. It's enabled by default (you can tell by the check mark in the check box in the breakpoint's item in the list box), but if you've disabled it, you can enable it by clicking the check box to the left of the breakpoint in the list box, or highlighting the list box and clicking the Enable button.
If you want to keep a breakpoint in a group, but temporarily disable it, click the check box to the left of the breakpoint in the list box, or highlight the list box and click the Disable button.
To store this group of breakpoints, use the File, Save Configuration menu option.
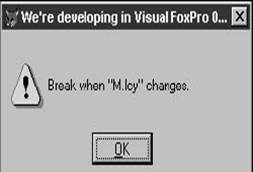
When you set a breakpoint (other than a "Break at location" breakpoint), you'll get a breakpoint message when the breakpoint hits. For example, in Figure 19.10, I set a breakpoint to fire when the expression "m.lcY" changes. This memory variable is simply assigned a value in the Click() method of a command button.
When I click the command button, the variable m.lcY is assigned a value, the breakpoint fires, and the message box shown in Figure 19.11 is displayed.
If you want to prevent these breakpoint message boxes from displaying, uncheck the Display breakpoint messages check box.
This affects all breakpoints, not just the breakpoint that's highlighted in the list box.
Trace window shortcut menu
If you right-click in the Trace window, you'll get a context menu that contains a number of helpful options.
Open
Displays the Open dialog box so you can open a file for viewing in the Trace window.
Resume
Oftentimes, you'll want to simply examine part of a program and then continue with it. You'll temporarily stop execution by setting a breakpoint (or selecting Suspend in the Cancel, Suspend, Ignore error dialog). To start up again, you can just select Resume here.
Step Into
This command will execute the next line of code if you are stepping through a routine line by line.
Step Over
This command will execute the next line of code, just as Step Into, but with one difference. If the line of code to be executed calls another routine, that routine will be called in the background and then control continues with the next line.
Step Out
This command will continue executing code in a procedure without stepping through code line by line. Suppose you're stepping through a routine, ProgA, and that routine calls a subroutine, ProgB. You've started stepping through the lines of code in ProgB, and then realize that you don't need to-you'd like to finish up ProgB and then resume stepping through, line by line, the code in ProgA again. Step Out will execute the rest of the lines of code in ProgB without pausing, and then suspend program execution once ProgA is reached.
Set Next Statement
Suppose you've suspended execution and examined part of a routine. Now you need to skip one or more lines of code from where execution was suspended-perhaps you want to bypass a line or segment that you know is going to fail, or perhaps you have manually set some values and you don't want the next few lines of code to alter those values.
But you don't have to skip forward! You can also use this to go back and re-execute some code after you've changed something, such as initializing a variable correctly! (Good luck remembering to change it correctly in your code later! I usually repeat this mistake twice before remembering.) Or perhaps you just want to replay a sequence of code in super-slow-mo because it went by on the head-cams too quickly the first time around.
You can place your cursor on another line of code in the Trace window, and then execute this menu option in order to resume execution where the cursor is, not where the routine was suspended.
Run to Cursor
No, this isn't a fancy way of saying that you want to store a bunch of values to a cursor while the Trace window is open. Instead, suppose that you have suspended execution, and now you want to run a segment of code-perhaps just the next few lines of the routine. However, when that batch of lines is finished executing, you'd like the program to be suspended again.
You can place your cursor on the last line of the section of code you want to execute, and then select this menu option, and just that section of code will be executed. In other words, you're going to continue to run the program until you reach the line where you had just placed the cursor-thus, "run to cursor." Perhaps "run to cursor location" or "execute to marked line" would have been a bit clearer, but once you try it a few times, you won't think twice about it.
Trace Between Breaks
Suppose you have several breakpoints set in a routine, and you want to step through the code between breakpoints A and B, and then between C and D-but you don't want to laboriously step through line-by-line between B and C. You can toggle tracing with this menu option. First, you'd execute your code until you hit the first breakpoint. Then you'd toggle this on, so you can watch each subsequent line execute. Once you reached breakpoint B, you'd toggle this off, and then continue execution until reaching breakpoint C, where you'd toggle it back on.
Docking View
If this menu command is checked, you can dock the window inside the debugger frame. If this menu option is not checked, you won't be able to dock the window.
Hide
Simply hides the Trace window.
Font
Opens the Font dialog box so you can change the font name, style, and size.
Watch window
The Watch window allows you to enter the name of a variable, and then see what value that expression evaluates to.
Creating a watch expression
To set a watch expression, follow these steps:
1. 1. Open the Watch window.
2.
2. Enter the
name of a variable or other expression in the text box at the top
of the window.
3. 3. Press Enter.
The expression you entered will be moved to the list box underneath the text box, and the value will initially be set to "Expression cannot be evaluated" (unless you currently have a variable in memory that matches that expression).
You can also drag expressions from the Trace window to the Watch window if you've got both windows open. Pretty awesome, eh?
Manipulating watch expressions
One hidden mechanism in the Watch window is the ability to change the value of an expression. You can select a watch expression in the Watch window, and then either change the expression or the value of the expression. To do so, double-click the expression or the value so that it's put into edit mode, type a new expression or value, and then press Enter.
Using watch expressions
So now you know how to create and change watch expressions. How do you use them in the living hell that we all know as "debugging at 2:30 in the morning"?
First, you can use the Watch window just to determine the value of expressions as lines of code are being executed. If you set a breakpoint on a line of code, execution will pause so that you can either look at existing watch expressions or enter new ones. Sure, you can simply hover your cursor over expressions that are explicitly listed in the code, but you can't do that if you want to look at other expressions at the same time.
Second, if you play your cards right, you can actively change values while running your routine. This can be handy if you've identified an error and want to temporarily fix it instead of having to stop execution, fix your program, and then run it again. For example, suppose you have a variable that, instead of being initialized to a numeric zero, is erroneously initialized to an empty character string. Later you want to add it to another number, but the addition crashes because you can't add a character string to a number. You can suspend execution after the variable is assigned the character string, change it to a zero, and then continue execution of your routine-the addition statement will succeed this time.
You can set or clear a breakpoint on a Watch expression-one of those "when expression changes" types of breakpoints-by double-clicking in the gray band to the left of the expression. You can also set a "By Location" breakpoint by using an expression such as "FunctionName" or "MethodName" $ PROGRAM() and setting a breakpoint on the expression. For example:
'DoSecondIncrement' $ PROGRAM()
Watch window shortcut menu
As with the Trace window, the Watch window has a context menu, albeit a shorter one.
Insert Watch
This is a little tricky-executing this menu option inserts a new blank watch expression. You might think this would add a new row to the list box, but it actually just sets focus to the text box. Go figure, ya know?
Delete Watch
You can delete an existing Watch expression by highlighting the expression in the list box and then selecting this menu option, or by selecting the expression and pressing the Delete key. You won't be asked to confirm your action. Note that you have to delete watch expressions one at a time because the list box doesn't allow you to select multiple expressions.
Docking View
If this menu command is checked, you can dock the window inside the debugger frame. If this menu option is not checked, you won't be able to dock the window.
Hide
Simply hides the Watch window.
Font
Opens the Font dialog box so you can change the font name, style, and size.
Locals window
The Locals window is sort of like the Watch window on steroids and amphetamines. Instead of just displaying the expressions that you want to see, the Locals window displays a list of every available variable in the current program stack. This includes a complete list of the object model in memory-for example, if you are running a form, you can drill down into the form to a command button that's on a particular page in a page frame and see the current value of each of its several dozen properties. This capability even works for arrays and collections-you'll see a plus sign next to the name of a variable, indicating that you can drill down to a lower level, whether elements of an array or items in a collection.
Call Stack window
A call stack is the list of programs that were executed in order to get to a certain point. If PROG1 called PROG2, which in turn called PROG3, the list of those three programs is the call stack.
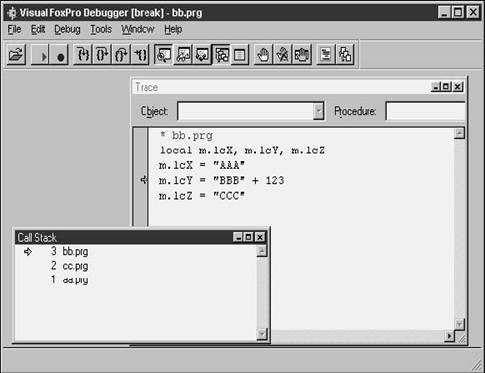
To demonstrate the use of the Call Stack window, I created three programs: AA, BB, and
CC. Program AA assigns values to three local variables, and then calls CC (not BB). Program CC assigns values to local variables with the same names as in AA, and then calls BB. Program BB again assigns values to local variables with the same names as in AA and CC, and I deliberately add a character string and a numeric value to generate an error in the third program in line:
�.* aa.prglocal m.lnX, m.lnY, m.lnZ
m.lnX = 1
m.lnY = 2
m.lnZ = 3
do CC.PRG
�.* cc.prglocal m.lcX, m.lcY, m.lcZ
m.lcX = '10'
m.lcY = '20'
m.lcZ = '30'
do BB.PRG
�.* bb.prglocal m.lcX, m.lcY, m.lcZ
m.lcX = 'AAA'
m.lcY = 'BBB' + 123
m.lcZ = 'CCC'
I ran program AA and generated the usual Cancel, Suspend, Ignore error dialog. I suspended, and then opened the Call Stack window in the Debugger, as shown in Figure 19.12. I also opened the Trace window to ensure that the specific line that caused the error was the one I intended.
The programs called are all listed in the Call Stack window. Checking the Show call stack indicator check box in the Tools, Options dialog caused the numbers to be displayed next to the names of the programs. As you can see, AA was called first, then CC, then BB. The arrow next to program BB is displayed because I checked the Show current line indicator check box in Tools, Options.
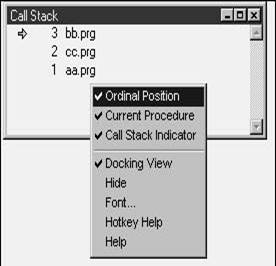
Call Stack window shortcut menu
Right-clicking in the Call Stack window, as shown in Figure 19.13, produces a menu with several useful options. Each of the first three map to the check boxes in the Debug tab of the Tools, Options dialog. Clicking the Ordinal Position menu option will turn the numbers next to the programs listed in the Call Stack window on or off. Note that the documentation for the Call Stack window in the Debug tab never refers to these values as "Ordinal Positions." Clicking the Current Procedure menu option will turn the yellow arrow pointing to the currently executing procedure on or off. And clicking the Call Stack Indicator menu option will turn the yellow arrow in the Call Stack window on or off to indicate the procedure displayed in the Trace window. If the current line and the call stack procedure are the same, you'll see only the current line indicator, so messing with this option won't appear to do anything.
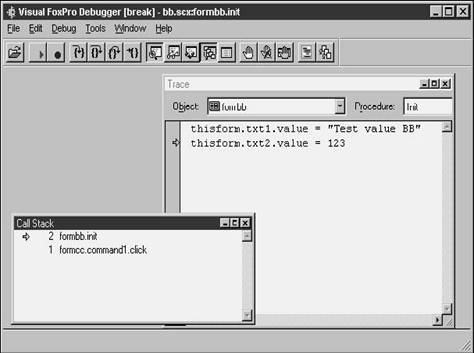
So that's how it works with a set of programs. What about when forms and events and methods get involved? Next, I created a series of three forms, innovatively called FormAA, FormBB, and FormCC. Each has a text box, named txt1, and a command button, command1. See Figure 19.14.
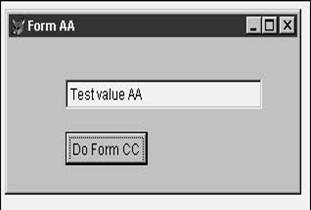
In each of the form's Init() methods, I set the value of a text box, txt1. Then I have FormAA's command button call FormCC, and FormCC's command button call FormBB. In the Init() of FormBB, I reference a text box, txt2, that didn't exist, which causes an error. The results of the Call Stack and Trace windows are shown in Figure 19.15.
Debug Output window
The Debug Output window is my personal favorite. The Watch window allows you to look at the values of expressions while your code is running, and that's all fine and good-but once your code has run, the Watch window will only hold the values that those expressions last held.
The Debug Output window, on the other hand, allows you to output the value of expressions (or even just text strings) while your program is running, and it keeps those values available after the routine is finished. You can even capture the values to a text file if you want. This provides not just a snapshot of your application at a specific time, but also a history over time.
To output (or echo, if you prefer) the value of an expression to the Debug Output window, use this command in your code:
DEBUGOUT <expression>
For example:
DEBUGOUT
m.lnX
DEBUGOUT alias()
DEBUGOUT cursorgetprop('Buffering')
DEBUGOUT 'Routine ' + PROG() + ' ' + TTOC(datetime())
These are all valid expressions you could echo to the Debug Output window. Naturally, you'll have to have the Debug Output window open in the Debugger for the values to be visible. Because I use the Debug Output window all the time, I usually have the Debugger Environment combo box in the Tools, Options dialog set to FoxPro Frame, and then I place the Debug Output window on the left side of the FoxPro desktop. See Figure 19.16.
I find the first expression to be a handy technique for marking the start of a set of output values. It identifies that a new run through the routine is starting, identifies which program is running, and notes the date and time of execution.

Debug Output window shortcut menu
Once there is content in the Debug Output window, you can right-click in the window and select the Save As menu option to select or name a file to which the data in the Debug Output window will be sent. This file is a plain text file and can be opened later in the Visual FoxPro editor or any other text editor.
You can also select the Clear menu option to get rid of everything in the Debug Output window-just like you do with the Command window.
Docking View
If this menu command is checked, you can dock the window inside the debugger frame. If this menu option is not checked, you won't be able to dock the window.
Hide
Simply hides the Debug Output window.
Font
Opens the Font dialog box so you can change the font name, style, and size.
The name of the Debug Output window is "Debug Output"-you might find this handy if you are trying to work with it programmatically. You need to enclose
* the name in quotes because of the space in the name. For example, to open the window with the ACTIVATE WINDOW command, use the statement
activate window 'Debug Output'
Debugger toolbar
I've mentioned bits and pieces of the Debugger toolbar before-it's time to discuss what each button does. But before I do, I should mention that the Debugger toolbar is available regardless of which debugging environment you're using. If you've got the Debug Frame open, the Debugger toolbar shows up under the menu, as shown in Figure 19.17.
However, if you're opening debugging windows inside the FoxPro Frame, you can still get to the Debugging toolbar. Open it through the Toolbars dialog, accessible from the View, Toolbars menu option, or right-click in the gray area of a toolbar and select the toolbar from the context menu that appears.
The Debugger toolbar contains the following buttons from left to right:
Open
Performs the same function as the Open menu option in the Trace window shortcut menu.
Resume
Performs the same function as the Resume menu option in the Trace window shortcut menu.
Cancel
Cancels the currently executing program, and, in the Visual FoxPro interactive environment, returns control to the Command window.
Step Into
Performs the same function as the Step Into menu option in the Trace window shortcut menu.
Step Over
Performs the same function as the Step Over menu option in the Trace window shortcut menu.
Step Out
Performs the same function as the Step Out menu option in the Trace window shortcut menu.
Run To Cursor
Performs the same function as the Run To Cursor menu option in the Trace window shortcut menu.
Trace window
Opens or closes the Trace window.
Watch window
Opens or closes the Watch window.
Locals window
Opens or closes the Locals window.
Call Stack window
Opens or closes the Call Stack window.
Debug Output window
Opens or closes the Debug Output window.
Toggle breakpoint
Sets a breakpoint on or off.
Clear all breakpoints
Sets all breakpoints off.
Breakpoints dialog
Opens the Breakpoints dialog.
Toggle coverage logging
Starts or stops coverage logging. See Chapter 21 on the Coverage Profiler for more details.
Toggle event logging
Starts or stops event logging. See the section on event tracking in this chapter.
Debug Frame menu
If you open the Debugger in the Debug Frame, the window has its own menu. Most of the options are available from the Debugger toolbar as well, but there are a couple of special features.
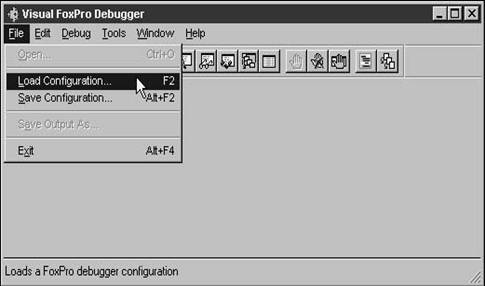
File
The File menu provides options for handling external files having to do with the Debugger, as shown in Figure 19.18.
Open
Performs the same function as the Open menu option in the Trace window shortcut menu.
Load Configuration
Loads a previously saved group of Debugger settings. See "Save Configuration" for details.
Save Configuration
You often might find yourself switching between one group of settings and another, and it's a real pain to have to keep entering the breakpoints, expressions, and so on each time. You can save a particular configuration of the Debugger, including breakpoints, watch expressions, and events to be tracked. This information is saved through the Save Configuration menu option, and is stored in a text file with a .DBG extension. You can use the Load Configuration menu option to later reload a configuration that you previously saved.
Save Output As
Performs the same function as the Save As menu option in the Debug Output context menu. This menu option is enabled only when there is content in the Debug Output window.
Edit
The Edit menu contains the standard Cut, Copy, Paste, Select All, Find, and Find Again menu options that you would expect.
Debug
The Debug menu provides access to functions used during the debugging process, as shown in Figure 19.19.
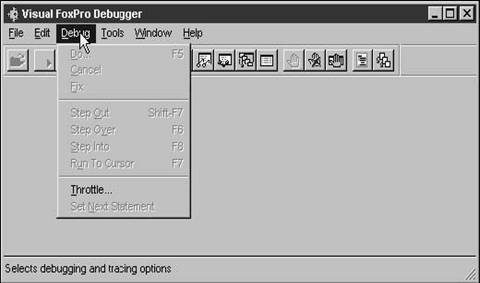
Do
Executes a program.
Cancel
Cancels the currently executing program, and, in the Visual FoxPro interactive environment, returns control to the Command window.
Fix
Suspends program execution and allows source code to be modified.
Step Out
Performs the same function as the Step Out menu option in the Trace window shortcut menu.
Step Over
Performs the same function as the Step Over menu option in the Trace window shortcut menu.
Step Into
Performs the same function as the Step Into menu option in the Trace window shortcut menu.
Run To Cursor
Performs the same function as the Run To Cursor menu option in the Trace window shortcut menu.
Throttle
Opens the Execution Throttle dialog so that you can pause between executing statements.
Set Next Statement
Performs the same function as the Set Next Statement in the Trace window context menu.
Tools
The Tools menu provides access to several debugging tools as shown in Figure 19.20.
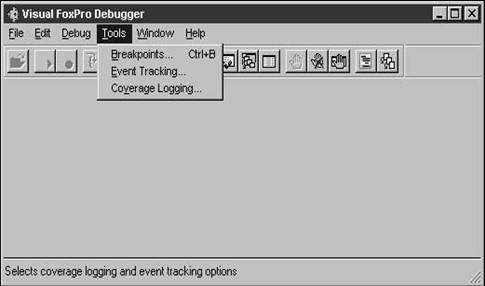
Breakpoints
Opens the Breakpoints dialog.
Event Tracking
Opens the Event Tracking dialog. See the section on event tracking later in this chapter.
Coverage Logging
Opens the Coverage Logging dialog. See Chapter 21 on the Coverage Profiler.
Window, Help
The Window and Help menus both contain the standard menu options you would expect. The only difference is that the Window menu has hard-coded menu options for each of the five Debugging windows.
Event tracking
Once you start building forms that are more complex than just a bunch of controls mapped to a single table, you'll find yourself starting to wonder if the error you're running into is a result of one method firing at an inappropriate time with respect to another. To make sure, many developers put markers of one sort or another in specific events that they are interested in. These markers can take the form of message boxes, WAIT WINDOW statements, or even DEBUGOUT statements. Everyone has written code like this:
messagebox('We are starting the Init() method of the Customer form.')
or
WAIT WINDOW 'The IMPORT process in the cmdPost button's ' ;
+ 'Click method is about to begin'
Both message boxes and WAIT WINDOW statements, while useful, are a real pain to deal with because (1) you have to click the mouse or press the Enter key for each marker, and
(2) you have to remember to comment out or delete each of these lines before shipping your app to the user.
The DEBUGOUT statement is a bit more forgiving, because the user doesn't have a Debug Output window. But a lot of statements still garbage up your code; they might impose a performance penalty depending on where they are located; and heaven forbid if anyone else sees your application with this temporary code still in it!
Visual FoxPro now comes with a new tool, accessible through the Debugger, that allows you to send a listing of which events are firing, and in which order, to the Debug Output window or to a text file. This tool is called the Event Tracker.
Using the Event Tracker
The Event Tracker can be started two ways. If you've not used it before, you should probably open it through the Tools, Event Tracking menu option in the Debugging menu. The dialog is shown in Figure 19.21.
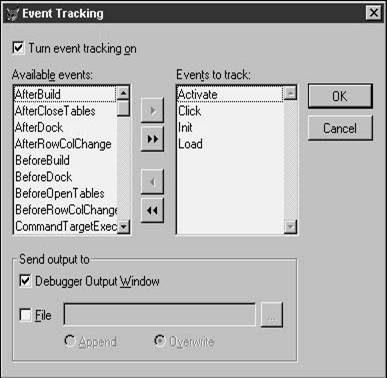
The Event Tracking dialog contains two list boxes-one with a list of all available events in Visual FoxPro, and another that starts out empty. You'll use this dialog to identify which of the available events you want to track.
To get started, you'll first want to check the Turn event tracking on check box-if you don't, anything else you do won't matter. Next, you'll move events that you want to track from the Available events list box to the Events to track list box. You can move all of the events over, but that's probably a bad idea because an event record is generated each time one of the selected events fires. Some events fire only at specific times, such as Load() or Init(), but other events fire incessantly, such as MouseMove() and Paint()-you can slow down your application's performance to a crawl and fill up your event-tracking log quickly if you decide to track the MouseMove() event and then go crazy with your rodent.
After you've selected the events that you're interested in, decide whether you want to send the output to the Debug Output window or to a file. If you're not sure, send your output to the Debug Output window-you can always send the contents of the Debug Output window to a file later. Note that if you decide to send the results to a file, you can enter your own file name or pick an existing file, and you can choose to append or overwrite the contents of that file.
When you're done with this dialog, open the Debug Output window if that's the route you chose, and just run your application. When you're done with the section of the app that you're examining, flip over to the Debug Output window (or open the file) and examine the output.
Once you've set the events you want to track, you can turn event tracking on and off by clicking the Toggle Event Tracking button on the Debugging toolbar. This will prevent you from generating a 300K file before you ever get to the routine or section of code you're interested in.
You'll very likely find the Event Tracker useful in at least two specific situations. The first is when you have a complex set of interactions between controls, including list boxes and grids. It's very easy to make an incorrect assumption as to which events are firing in what order. The other is when you are seeing behavior that makes you believe a section of code isn't firing. You can track the specific events to verify what is and what is not being fired.
Going about the debugging process
Now that you've started to really write some code, you are probably running into problems. In other words, things aren't going as planned or as expected. This is the time that weeds out the wannabes from programming. And it's all because of expectations.
Expectations are a funny thing. When there's a difference between what is happening on the computer and what you thought would happen, there's a difference between expectations and reality. Computers are different from humans, however. A difference in expectations between two people can often be resolved through compromise. With your computer, however, no compromise is possible-you have to do it the computer's way, period! But it's not always easy to find that way. Like a child, a computer can't always tell you "where it hurts;" the information it provides can be incomplete or misleading; and, most importantly, it's not always clear what you have to do to make it better.
Thus, when you're faced with computer misbehavior-specifically, when you're getting unexpected results-you have a challenge in front of you. The purpose of this chapter is not only to provide information on how to use the tools you have at your disposal to solve those problems, but, even better, to provide a philosophy and techniques for using those tools properly.
Types of misbehavior
I'm going to assume that you're running an application, and that your problems are occurring as a result of using the various components in VFP-that you're not just trying to put a control on a form or set a property a certain way. There are five general types of errors you will encounter: defects in the product, compile-time errors, run-time errors, logic errors, and user-generated errors.
Defects in the product
Visual FoxPro is in its third major revision, and it's been used by literally millions of people around the world. After this period of time, most of the defects have been found and corrected. Service Pack 3 for version 6.0 took care of more than 300 defects that had dated back to version
3.0. Sure, there are probably a few left, but it's highly unlikely that the issue you're facing is a defect in the product. It's much more probable that the problem lies elsewhere. Nonetheless, it's good to be aware that, when all else fails-and I mean really fails-the behavior you're experiencing could possibly be a bug in VFP itself. But we'll leave that possibility for the very last.
Compile-time errors
A compile-time error is a programming error that you catch when compiling your program. For example, if you use the FOR clause in a SQL SELECT command and then try to compile the form, class, or program that contained that SELECT command, VFP will generate an error message in a Cancel/Ignore/Ignore All dialog:
Command contains unrecognized phrase/keyword.
There's a truism in our industry that has analogies in other businesses as well: The earlier a defect (or a problem, or a design defect, or an illness) is caught, the easier it will be to fix, and the less it will cost to do so. By catching errors almost at the same time you're creating the error, VFP is reducing your time and cost to fix it to almost nothing.
The only problem might occur when you can't figure out what the error is. In those cases, it can be quite a nuisance-all you want to do is save the darn form and run to the bathroom, but VFP keeps complaining. You can select Ignore to let the compiler continue, while ignoring that line, or select Ignore All to ignore that line and all future compile errors.
Run-time errors
A run-time error occurs once you run the program. For example, suppose you are tracking the dollar value of automobiles owned by individuals attending a car show. To do so, you would sum up the total value of the automobiles, and then divide by the number of people at the event. However, if your program did this calculation before anyone was registered for the event, the calculation performed would be zero divided by zero.
As we all know, one mustn't divide by zero or else you'll have to sit in the corner for the rest of the day. When a computer divides by zero, an error will be generated. However, since the application didn't know it was going to be dividing by zero when the program was compiled, the error passed through the compiler, and was not caught until the program was run and those two statements were executed. Thus, it's called a "run-time" error.
Logic errors
A logic error is one that violates the intent-or the business rules-that the program needs to use in order to function properly. For example, suppose you have a CASE structure that calculates dues based on which season the member joined the club. The CASE structure could look something like this:
do case case thisform.txtSeason.value = 'Winter'
* they get charged a full year of dues
nDues = thisform.txtDuesAnnual.value case thisform.txtSeason.value = 'Spring'
* they get charged for nine months of dues
nDues = thisform.txtDuesAnnual.value * 0.75 case thisform.txtSeason.value = 'Summer'
* they get charged for six months of duesnDues
= thisform.txtDuesAnnual.value * 0.5
case thisform.txtSeason.value = 'Fall'
* they get charged for three months of dues
nDues = thisform.txtDuesAnnual.value * 0.25 endcase
* multiply dues by number of carsnDues = nDues * thisform.txtNumberOfCars.value
What's the problem? First, if the user could enter the season via a text box that allowed any type of data (admittedly, a bad choice of controls), they might end up entering a value like "Autumn," or misspelling a season, like "Witner." Suppose, however, you provided a four-button option group instead, and the user could choose only one of those four choices. What if they didn't make a choice? The value of txtSeason (it would probably be called opgSeason, actually) would be empty.
In any of these cases, there wouldn't be a value assigned to the variable nDues, and then the next line-in which the number of cars is factored into the dues-would fail. This is an example of a logic error that then generates a run-time error, but it doesn't tell you the location of the logic error, making it tough to track down. There are two ways to correct this particular problem. The first is to initialize the value of nDues before the CASE statement, like so:
nDues = 0.00
By doing so, the statement where the number of cars is factored into the dues wouldn't cause a run-time error. However, it still might not produce the correct answer. The second way, and the better alternative, is to include an OTHERWISE statement in which you handle the possibility that none of your CASE statements account for the actual value of thisform.txtSeason.value. For example, the following code placed before the ENDCASE statement would work fine:
otherwise nDues = 10.00
Another example of a logic error is when you haven't correctly analyzed the rules for the application. You're performing the operation correctly-it's just that you're performing the wrong operation correctly. For example, suppose the club rule stated that a member was charged the minimum annual amount for dues-regardless of how many cars they owned, or even if they didn't own any-and then an additional amount was included for each automobile they owned. The code might look like this:
* multiply dues factor by number of carsnDues = (nDues + nDuesFactor) * thisform.txtNumberOfCars.value
The parentheses indicate that the Dues and the DuesFactor are added together, and the result multiplied by the number of cars. This would produce the wrong result for two reasons. First of all, the DuesFactor was an additional value that would to be multiplied by the number of cars-and that result would be added to the Dues calculated in the CASE structure. Secondly, the intent was to have a base amount that every member was charged, regardless of how many cars they owned. The equation above would result in a dues amount of $0.00 if they owned no cars. The statement wouldn't throw an error if thisform.txtNumberOfCars.value was equal to zero, but it wouldn't calculate the correct amount, either. Again, a logic error. Logic errors are usually the nastiest kind, because there's often no error shown to the user-only aberrant behavior that may or may not manifest itself in an obvious fashion. If it doesn't-if the error occurs only when the 13th of the month is on a Friday-you could go months before you run into it, and then more months before it happens again. And who knows how long it would take you find the cause?
User-generated errors
The last type of error is that which cannot be controlled by the developer-an action by the user outside the realm of the application. For example, suppose the user is printing a report, and turns the printer off partway through, or the printer runs out of paper. Or what if your application is set up to use a separate "library" file, but some unwitting user, trying to be helpful and clean up some disk space, has deleted that file, not knowing what it was? The application will fail as soon as a function from the library is called anywhere in the application. Or perhaps the user is exporting data from the application or importing from another source, and during the operation, another user on the network copies a big file onto the same drive, using up all the disk space.
While these types of errors are not your fault, you will have to consider the possibility that some will occur, as appropriate for your application. (Obviously, if you don't ever let your users print, then you wouldn't have to worry about printer errors, for example.) You'll have to plan your application in order to detect errors and react to them so that the application doesn't simply crash or stop operating.
Debugging covers developer-generated errors
The following discussion will cover the middle three errors. You are, in reality, at the mercy of Microsoft when it comes to those rare defects in VFP itself. And while it is incumbent upon you to handle user-generated errors as well, that should be taken care of via an error handler in your code, which is clearly outside the domain of debugging.
The debugging mindset
The typical programmer-in other words, the self-taught amateur who lacks discipline, rigor, and an interest in achieving those attributes-will make a series of random, uncoordinated attacks on various parts of the application, basing those attacks on wild guesses and perceived ease of implementation. In other words, if they succeed, it's simply because they're lucky. A great many of these programmers make their way through their careers, narrowly escaping great danger as they get lucky one time after another.
This isn't uncommon, because many problems-not all-can be solved through such a haphazard method of trial and error. However, when it doesn't work, the aforementioned programmer must resort to any number of tricks, including simply accepting an error that doesn't occur often enough to fix, unnecessarily rewriting pieces of code that were 99% finished, and telling the customer, in error, "It can't be done" or "There's a bug in Access that prevents me from making this work."
There is a better way, obviously, or I wouldn't be spending so much time berating the "wild, random guesses" methodology I just described. It is important to develop a "debugging mindset" where you approach an issue of errant misbehavior in a logical, rational manner, much as you learned about the scientific method in seventh grade.
Make observations
The first action is to describe the errant behavior. There are four parts to this description:
. . Part 1 is a list of steps to reproduce the behavior. If you can't reproduce the behavior, then you might as well put it down as "one of those things" and move on. This entire process depends on being able to duplicate the behavior so you can analyze it. Furthermore, by writing down the steps, if it goes that far, you will often find that the behavior was caused by forgetting to perform a step, not by anything else.
. . Part 2 is a description of what happens as a result of following the steps described in part 1. Sometimes this description gets intertwined in the steps, because there are several related behaviors, and each behavior generates an additional step on your part, which then causes the application to exhibit another behavior.
. . Part 3-and this is the key-is to describe what you expected to happen. By doing so, you make the difference in expectations very clear: Part 2 describes reality, and this part describes your intended result. The difference, then, is what needs to be investigated. Again, like in part 2, actually thinking through (or even writing down) your expectations will often generate the "Aha!" moment, whereby you realize that your expectation was misguided. It might become obvious that an entirely different behavior should really have occurred.
. . Part 4 in this first step is to list any "other interesting facts" that you think might have bearing on the problem at hand.
Go through the scientific method
Now that you have a description of the problem, it's time to figure out what is going wrong.
1. Generate hypotheses.
In this step, you'll create one or more hypotheses, and then test each hypothesis. Did a light bulb suddenly go on during this last sentence? If you're thinking that this process maps closely to the traditional scientific method, you're correct. Gather facts and observations, and then generate hypotheses about what might be the cause. You thought seventh-grade science would never be useful!
What could possibly be going wrong? Unfortunately, there isn't any magic methodology for creating these hypotheses, which is why scientific geniuses aren't a dime a dozen. It's a special talent to be able to come up with "good" hypotheses. You can begin by tracing the code to determine whether you can generate possible problems based on what you see. Perhaps you aren't using a function properly. Perhaps the function doesn't return the type of value you think it does. Perhaps you're assuming that a variable contains a certain value when, in fact, it contains a different one. And so on and so forth.
2. Test your hypotheses.
Now that you have one or more hypotheses, it's time to test them. For example, suppose you suspect that a function is returning a value other than the one you think it is. Don't wait until the end of the routine to find out the answer you're getting isn't correct-find out that value right away!
2. 3. Repeat.
This is the tough step. If your hypothesis is correct, you're basically done. Make the appropriate change to the code, or figure out what else you need to do in order to fix the problem, and then test it again. If, however, your hypothesis was not correct, you need to repeat the prior two steps-again and again until you find the answer.
I can't stress this enough: You must repeat these steps until you find the answer. Start at the very beginning and examine every assumption-including the ones you know to be true. Check each fact, and check it again: Check your observations and do everything step by step. Most problems occur at this stage for one of two reasons. Either you're rushing through and making an incorrect assumption, or you don't understand how the product actually works, which, really, is another case of making an incorrect assumption.
Know why it worked
Simply fixing a defect isn't enough, though. It's kind of like whacking your TV upside the tuner every time the picture goes fuzzy. It might seem like you've fixed it, when all you've done is shake a bad tube partway out of its seating. In a few minutes, as the temperature in the case rises, the tube will fall back into place, and the picture will go fuzzy again. Wouldn't it be better to just get the tube replaced and fix the root of the problem? (Or, as my tech editor suggested, perhaps you should just go replace your 40-year-old TV with one that doesn't use tubes. I guess I was thinking about the picture tube.)
Same thing here-only more so. If you perform an action that "seems" to fix a bug, you can pretty much count it appearing somewhere else. You might have found a clever workaround for the particular situation, but you've not learned anything-thus, you're bound to make the same mistake somewhere else, perhaps where it's not going to be as easy to work around.
And don't relax if you run into one of those bugs where "it just went away on its own." As has been said many times, "Bugs that go away on their own tend to come back by themselves." Steve McConnell, in his landmark programming text, Code Complete (Microsoft Press), says "If you aren't learning anything, then you're just goofing around."
Find (and fix) one thing at a time
Finally, resist the temptation to fix a bunch of bugs at the same time, and then run the application to see if you've fixed them all. This technique is tempting because it seems to be much more efficient. Fixing the defects one at a time seems an awful lot like going to the car dealership to get the muffler fixed, picking it up and returning it later that day to get the window repaired, and then picking it up and returning it yet again to have the engine tuned. Why not have it all done at once?
Two reasons, folks. The first answer is that you're simply not going to remember everything to fix, or if you did, you won't remember everything to test afterwards. There are just too many other things that can intrude-and your concentration is much more apt to be interrupted if you try to juggle a chainsaw, a flaming torch, and a balloon full of sharp glass than if you handle one at a time. The other reason is that one fix might improperly affect the other. If you fix one defect and test it until the issue is resolved, you can put it to bed, knowing the "whats" and "whys." If you fix two things-in other words, if you change two things-at the same time, you won't necessarily know which change affected which problem (or possibly both problems). As I've said before, "A man with a watch knows what time it is. A man with two is never quite sure."
A final word
Now that you've read all this, it might seem that each bug you run into, if you approach it properly, will take the better part of an hour to squash. That's not necessarily so, although sometimes, sadly, it is. Many times you can perform all of these steps mentally, and in a fraction of a minute. You don't necessarily have to write out "Steps to reproduce" or "Expected Behavior." You don't have to formally document each hypothesis when you run into an "Invalid Value" error message on a statement that has only two variables.
However, just because many bugs can be detected and disposed of quickly doesn't mean that you can always do so. And when the bugs get tough, it's time to introduce more rigor and formality into your bug-stomping process. Now you have a guideline for doing so.
|
Politica de confidentialitate | Termeni si conditii de utilizare |

Vizualizari: 1326
Importanta: ![]()
Termeni si conditii de utilizare | Contact
© SCRIGROUP 2025 . All rights reserved