| CATEGORII DOCUMENTE |
| Bulgara | Ceha slovaca | Croata | Engleza | Estona | Finlandeza | Franceza |
| Germana | Italiana | Letona | Lituaniana | Maghiara | Olandeza | Poloneza |
| Sarba | Slovena | Spaniola | Suedeza | Turca | Ucraineana |
|
|
User Manual
WIH for demand handling within the Ericsson Business Process
Abstract
All IT demands on Global Business Applications are to be handled in the WIH application (Worldwide Integrated Helpdesk). This User Manual includes a general description of WIH and a work instruction how the application is used for demand handling.
This document is to be used as a reference book, and therefore some topics are recurrent. The User Manual is divided into three main areas:
WIH Structure
WIH Basics
IT Demand handling in WIH
All IT demands on Global Business Applications are to be handled in WIH, and Process Owners, Group IT and the IT Suppliers should consequently exist as user groups in the application.
The WIH structure can be summarized using four different parts[1]:
Access Groups[2]
Support Units
Teams
Team members
Each of the levels is further described in a separate section below, and figure 1 indicates their relationship.
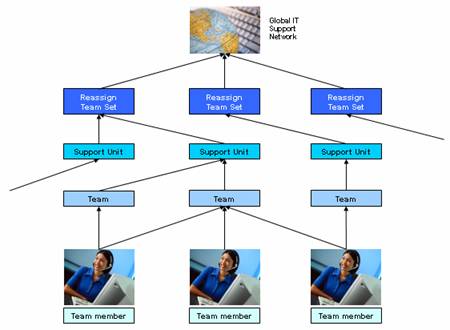
Figure 1. Relationship of the different levels that together build the base for the WIH structure.
An Access Group is a logical
grouping of Support Units. The reasons and underlying causes could be their
organizational belonging, that they work with the same kind of process or that
they share a
A Support Unit is a high-level unit that consists of different teams. This means that the Support Unit itself does no have team members and it cannot be assigned to requests. The teams in a Support Unit should be logically grouped together for example as they handle incident requests for the same application or work within a unique process.
The Support Units should, for security reasons, not consist of teams with different organizational belonging. This is important as all team members in a single team in the Support Unit can view and open all requests assigned to the Support Unit regardless of what team the request is assigned to.
A Support Unit can belong to an Access Groups according to section 1.1.1, but this is not mandatory. Support Units, that are not included in an Access Group, are simply located outside these logical groupings.
In WIH, each Support Unit has a Support Unit Owner and a Support Unit Administrator[4]. The Support Unit Owner is responsible for the Support Units, its requests and towards IT Service Desk. The Support Unit Administrator is a system administrative role with responsibility for the Support Unit and how they work in the system.
All Support Unit have a unique Support Unit code (example E2173 for Group ITs Support Unit), that is used within the application to refer to it.
A Team is the lowest structural level in WIH, and at this level WIH requests are created and managed. The teams are built up of selected WIH users called Team members. The Team must belong to one Support Unit according to section 1.1.2 above.
In WIH, each Team has a Team Leader, which is responsible for the Team, its requests and towards IT Service Desk.
Team members are represented by the actual WIH users. A WIH user can belong to one or several teams, although these belong to different Support Units and/or Access Groups. A Team Member has the rights to:
Modify all requests assigned to the Team
View all requests assigned to the Support Unit that the Team belongs to
Each of the stakeholders should have an own Support Unit according to figure 2, where a circle represents a unique Support Unit. The grey clouds are grouping of Support Units called Access Groups.
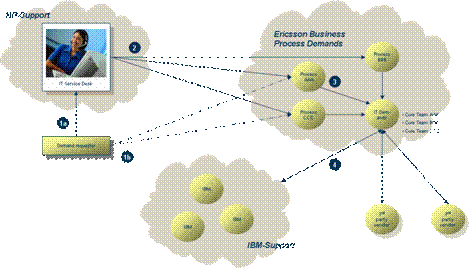
Figure 2. View of the WIH structure for IT demand handling. The yellow circles represent Support Units and the grey clouds represent Access Groups. The numbers correspond to the different stakeholder boarders: (1a) Demand requestor to IT Service Desk or (1b) Demand requestor to Process Owners, (2) IT Service Desk to Process Owners, (3) Process Owner to Group IT and (4) Group IT to IT Suppliers.
IT Service Desk personnel at HP are not using WIH. Instead they have a transfer bridge (Case Exchange) between their Radix/Open View Service Desk (OVSD) application and WIH.
Each Process Area is recommended to have an own Support Unit in WIH, in which they handle and prioritize all incoming demands. IT demands are required to be handled using WIH when sent to Group IT, but the application structure is also applicable for management of process demands. The Process Area Support Units are placed in a WIH Access Group called Ericsson Business Process Demands.
The following Support Units exist:
Process Area Support Unit code
New New ticket, not yet saved
Finance Not implemented the new structure
HR Not implemented the new structure
IT Not implemented the new structure
Product Management Not implemented the new structure
R&D Not implemented the new structure
Sales & Marketing Not implemented the new structure
Security Not implemented the new structure
Service Delivery E2172
Sourcing Not implemented the new structure
Supply Not implemented the new structure
Web/Portal/Collaboration Not implemented the new structure
Table 1. WIH Support Unit codes for each Process Area.
As a recommendation, team members should be people having (but not limited to) the following roles: Process Owners, Process Managers and BISO.
Each Process Area can structure their Support Unit and teams to best support wanted way of demand handling. However, chapter 2 describes WIH requirements when to reassign an IT demand to Group IT for technical review.
Group IT have a Support Unit (Support Unit code: E2173, Support Unit name: IT Demands) that handles all kind of IT related demands within the Ericsson Business Process. WIH demand tickets should be assigned to IT Demands when the demand is approved from a process view by the Process Owner.
Simplified, one Process Area should most of the time only need to communicate with one team within Support Unit E2173. The following teams should at least exist within the Support Unit when the new structure is in place:
IT Area Finance
IT Area HR
IT Area IT
IT Area Product Management
IT Area R&D
IT Area Security
IT Area Service Delivery
IT Area Sourcing
IT Area Supply
As a recommendation, team members should be people having (but not limited to) the following roles: IT Account Manager, IT System Area Manager, IT System Manager, IT Performance Manager, IT Solution Expert, Enterprise IT Architect, IT Program Manager, Information Manager and Cross Process Driving PA.
All IT Suppliers should have their own Support Unit(s) in WIH[5] . If the IT Supplier does not have a Support Unit in WIH or if all communication for some reason is made outside the application, then it is recommended to clearly state this in the [Work Log] field. The mail functionality in WIH should preferably be used for IT Supplier communication to increase the follow-up and traceability possibilities within WIH.
WIH User Accounts are ordered through the Gordon application.
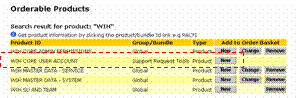
Use the product called WIH CORE USER ACCOUNT (NEW) with the following parameters:
Access Group ID: ERICSSON BUSINESS PROCESS DEMAND
Region: 1 EUROPE, MIDDLE EAST AND
Support Unit: <<Support Unit code>>
Access to Team(s): <<Team(s) within the Support Unit>>
Access Rights: READ / WRITE WIH USER ACCOUNT
Comments:

WIH can be accessed in two different ways:
Downloaded client on a local machine
Web client accessed on a web page
The same WIH user name and password applies for both ways.
Contact the IT Service Desk to request a remote ESOE installation of the Remedy User Tool (version 6.3.1.0). Several warning messages will probably appear during installation. Please, accept all of them by pressing the [OK] button.
First time log-in, when the installation process has finished:
Start the Remedy User Tool
Enter your login name in the [User Name:] field
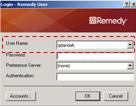
Press the [Accounts] button
Press the [Add] button to activate the WIH production server
Enter server name wih.al.sw.ericsson.se
Enable the box to the left of the server name until you see a green tick ( ) and this will be the default server for future login sessions. If you have more than one server name in the list, you should mark the other ones with a red cross (
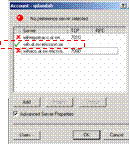
Press the [OK] button
Enter your password in the [Password:] field
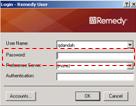
Press the [OK] button
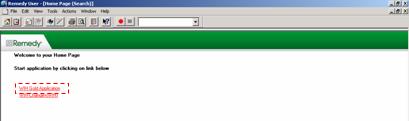
Press the [WIH Gold Application] link
At the next login session, only step 1-2 and 8-10 have to be performed.
WIH can also be accessed via Remedy Mid Tier, which is a web version of the Remedy User Tool with some exceptions.
Log-in instructions:
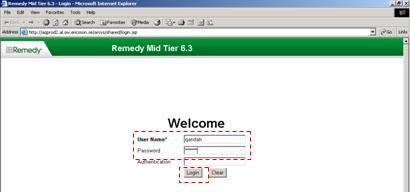
Access the Remedy Web login
page
https://aqprod2.al.sw.ericsson.se/arsys/forms/wih2.al.sw.ericsson.se/Home+Page/
Enter your login name in the [User Name] field
Enter your password in the [Password] field
Press the [Login] button
Follow these steps to change the WIH password (your password in WIH never expires)
Go to Features/Change Password
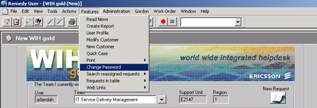
Enter a new password in the [New Password] field
Press the [OK] button.
Follow these steps to change the font size:
Go to Tools/Options
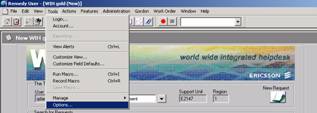
Press the [Display] tab
Select Edit Field in the [Field Type] drop down list
Change to wanted font size in the [Size] field (the default value is 8)
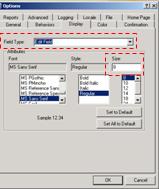
Press the [OK] button
Follow these steps to change the Start Team in WIH:
Go to Features/User Profile
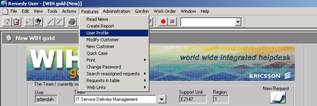
Select wanted team in the [Team] drop down list at the This is Your start Team in WIH gold section
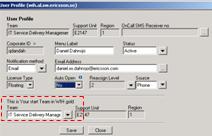
Press the [Save] button
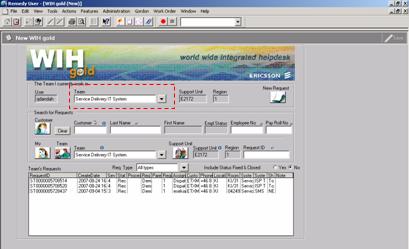
The WIH Start page is divided into three areas:
Information fields
Search fields
Result window
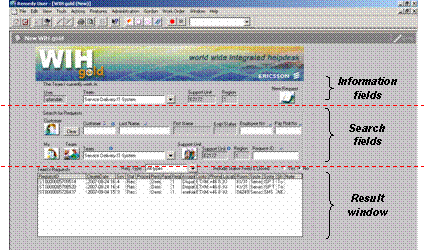
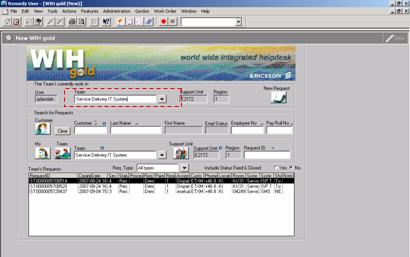
The [Team] field contains the teams your user belongs to. If you are a member of several teams, you can choose which team to work in by using the [Team] drop down list.
The [Support Unit] and [Region] fields are disabled and will automatically reflect chosen Team.
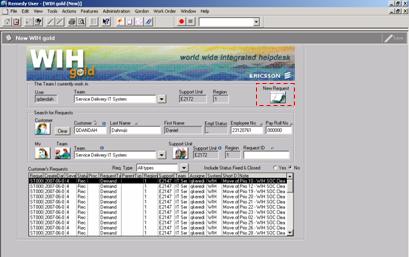
The [New Request] icon in the upper right corner is used for ticket creation within the chosen team.
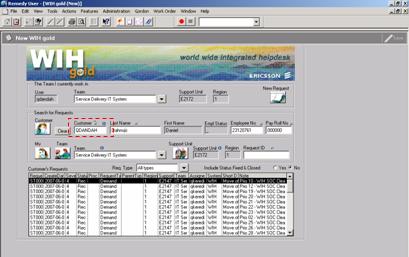
The following fields can be used to search for requests for a unique customer:
[Customer ID ] field (populate with the Corporate ID)
[Last Name] field
[Employee No] field (populate with the Employee Number)
[Pay Roll No] field (populate with the Pay Roll Number)
To search for a specific request, enter whole or part of the Request number in the [Request ID] field.
In all cases, press the Return key to start the search. The search result tickets are displayed in the Result window.
The following search icons are also available when searching:
Press the [My] icon to show all tickets assigned to your user regardless of team
Press the [Team] icon to show all tickets assigned to the chosen team in the [Team] field. You can select wanted team within your Support Units in the drop down list.
Press the [Support Unit] icon to show all tickets assigned to the Support Unit for the chosen team.
You have the possibility to choose if you want to include tickets with Fixed and Closed status or not, by using the [Include Status Fixed & Closed] radio button.
The result tickets can be sorted by clicking on the header list above the columns.
Each ticket is given a unique Request ID number and if created within WIH or by IT Service Desk the Request ID starts with STO
There are six Status categories to describe the status of a demand ticket in WIH:
Status Definition
New New ticket, not yet saved[7]
Received Ticket assigned to a Team (Dispatcher) or an individual (team member). No work is performed yet. This status is hence automatically set (1) for newly created WIH tickets and (2) when a ticket is reassigned to a team or user to indicate that no work is performed yet.
Opened Ticket has been accepted by a Team member and work is ongoing.
Pending Demand put on-hold for various reasons. For IT Suppliers, this status option only is allowed when work is dependent on Ericsson employees.
Fixed Demand is closed (finalized or rejected) and a solution text has been sent to end user. The Demand Owner has ten days to return with comments on the solution. Within that time the ticket can be re-opened for further action.
Closed After ten days a Fixed ticket is reversed into Closed status. A closed ticket cannot be re-opened. If the Demand Owner finds the solution unacceptable after ten days a new ticket need be created.
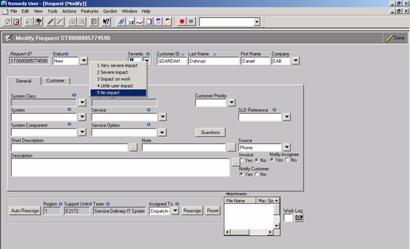
Different severities of IT demands are not set, but the field should always contain value 5 (No impact)
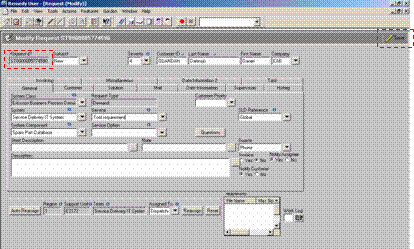
The [Customer ID] field should contain the Demand Owners Corporate ID. Enter the Corporate ID and press the return key. WIH will then automatically populate the [Last Name], [First Name] and [Company] fields via look up in the Ericsson Global Directory.
The [Last Name] field should contain the Demand Owners last name. The field is populated automatically based on the value in the [Customer ID] field.
The [First Name] field should contain the Demand Owners first name. The field is populated automatically based on the value in the [Customer ID] field.
The [Company] field should contain the Demand Owners company trigram. The field is populated automatically based on the value in the [Customer ID] field.
Press the [Save] icon after a modification or add of information in a ticket to save the transaction.
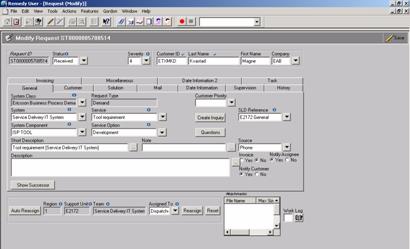
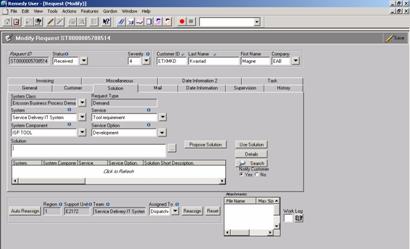
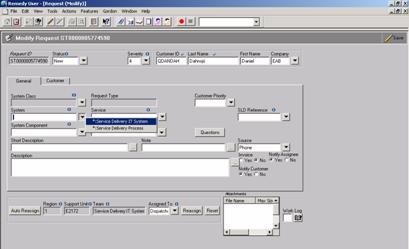
The [System Class] field should state Ericsson Business Process Demand. The field is disabled and will automatically be set when a value in the [System] field is chosen.
The [System Class] field should contain information about affected Process Area and Demand type (IT System demand or Process demand) according to the following syntax: <<Process Area>> <<Demand Type>> (examples: Service Delivery IT System and Service Delivery Process
The [System Component] field should be a sub category for chosen value in the [System] field:
Name of a Global Business Application if it is an IT demand
Name of the affected sub-process if it is a Process demand
The [Request Type] field should state Demand. The field is disabled and will be set automatically when a value in the [Service] field is chosen.
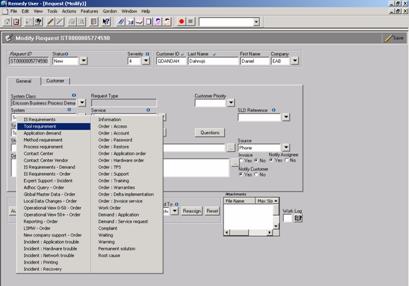
The [Service] field should be a classification of the demand: Tool requirement Process requirement or Method requirement
The [Service Option] field should be a sub category for chosen value in the [Service] field.
The [SLD Reference] field should state Global as it is a demand a Global Business Application or a Global Process. The field is enabled but will automatically be set when a value in the [Service] field is chosen.
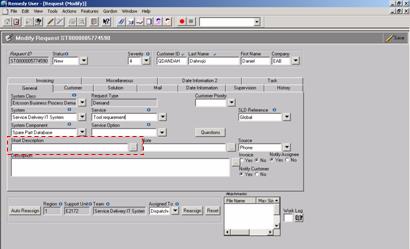
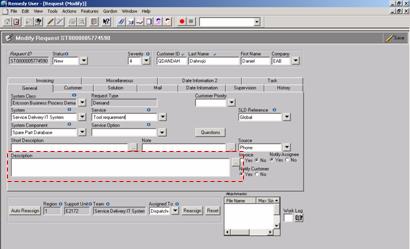
The [Short Description] field should contain the title of the demand from the Demand Specification template. The field can hold 70 characters, but only 35 can be issued on reports.
The [Note] field should contain short and valuable information. The field is displayed on the WIH start page overview.
The [Description] field should contain the demand description from the Demand Specification template.
N/A. The field will contain OVSD as value if the demand is created by IT Service Desk.
N/A
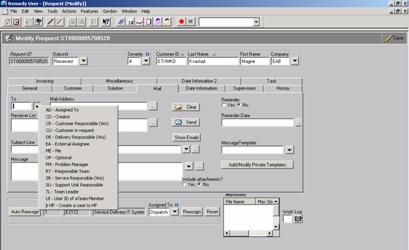
The [Notify Assignee] radio button can be set to either Yes or No. If the value is Yes when a ticket is reassigned to a user, the new ticket assignee will receive an automatically generated informative e-mail.
The [Notify Customer] radio button should be Yes. The Demand Owner will then receive automatically generated mails when the WIH ticket is created and when the [Status] field is set to Fixed.
N/A
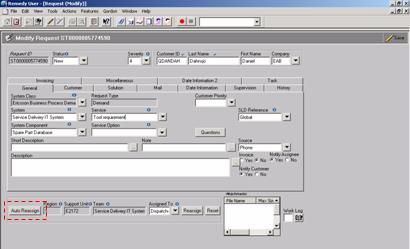
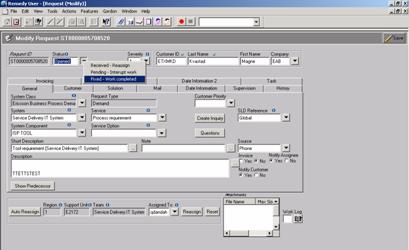
The [Auto Reassign] button is used to reassign the WIH ticket to other teams outside the own Support Unit. A selection list will be displayed if several teams are available. Available teams are dependent on the ticket classification (see section 3.4.3).
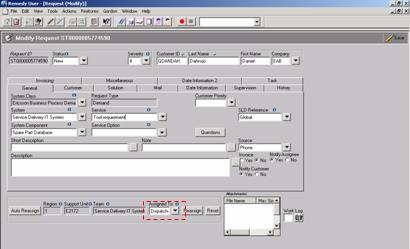
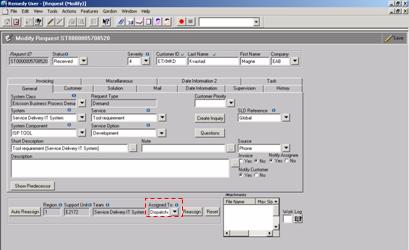
The [Assigned To] field shows which team member the ticket is assigned to. The ticket can be assigned to another user within the same team, by using the drop down list next to the field.
The [Reassign] button is used to reassign the WIH ticket to users in the same Team or Support Unit. The button is also used to return a WIH ticket to previous assigned Teams and/or users.
The [Reset] button empties the [Assigned To] field.
The [Work Log] field is used for communication between WIH Users. Reasons for ticket reassign and Pending status is recommended to clearly be stated in the [Work Log] field. The Demand Owner (from the [Customer ID] field) does not have access to information written in the [Work Log] field.
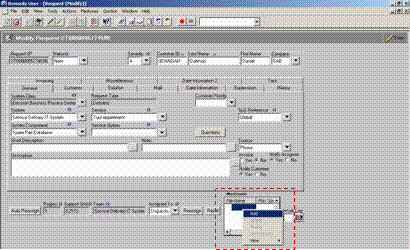
The [Attachment] field contain up to five attachments (2 MB each). Examples of attachment that should be included in the demand ticket are Demand Specification, Business Case, Design Specification and Cost estimate.
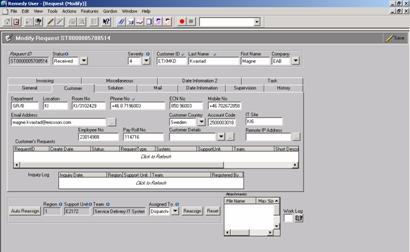
The [Customer] tab contains information about the Demand Owner with information from the Ericsson Global Directory. The tab also lists all requests for the Demand Owner both opened and fixed/closed. The request list includes all WIH tickets where the Demand Owners Corporate ID is entered in the [Customer ID] field[8].
The [System Class], [System], [System Component], [Request Type], [Service and [Service Option] are pre-populated from the equivalent fields at the [General] Tab.
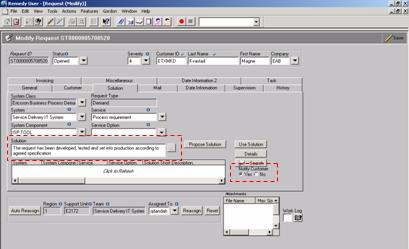
The [Solution] field should contain information why the demand is closed (example: The request has been developed, tested and set into production according to agreed specification
If the [Notify Customer] radio button is set to Yes, this information together with the [Short Description] and [Description] will be sent as an e-mail to the Demand Owner.
N/A
N/A
N/A
N/A
The [Notify Customer] radio button should be Yes. The Demand Owner will then receive automatically generated mails when the WIH ticket is created and when the [Status] field is set to Fixed.
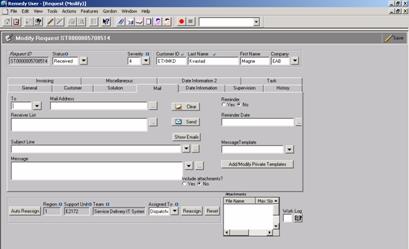
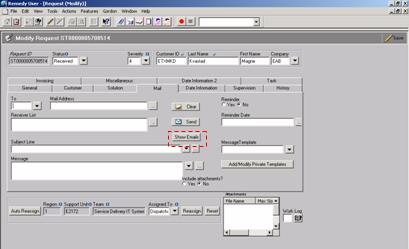
The [To] drop down list can be used instead of writing mail addresses when using the mail functionality in WIH.
The [Mail Address] field is used to populate either a Corporate ID or a whole e-mail address for an e-mail recipient. After each recipient press the return key and the mail address will be included in the [Receiver List] field.
The [Receiver List] field shows all receivers of an e-mail.
The [Subject Line] drop down list can be used to create wanted subject line of an e-mail.
The [Message] filed contains the message body of an e-mail. The drop down list can be used to reference values from important WIH fields.
The [Include Attachments?] radio button should be set to Yes if attachments are to be included in the e-mail.
The [Clear] button will empty the [Mail Address] and [Receiver List] fields.
The [Send] button will send the message to the specified recipients in the [Receivers List] field.
The [Show Emails] button is used to show both sent and incoming e-mails (including attachments). The text colour of the [Mail] tab will turn red if the ticket has any sent or incoming e-mails. However, the tab colour does not indicate if the mail has been read or not.
N/A
N/A
N/A
N/A
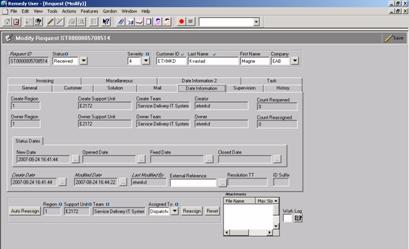
The [Date Information] tab contains information regarding the ticket such as creator, time for creation, last modified by, modified date, ticket owner and owner team.
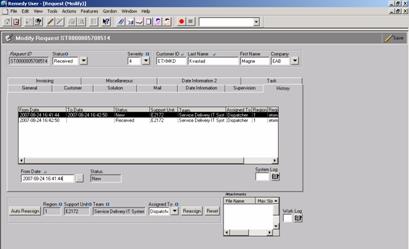
The [History] tab shows the history of the ticket in short. Click on the white area to see all teams and users that have owned the request.

The [Comment 1] field can be used for any free text comments.
The [Comment 2] field can be used for any free text comments.
The [Field 3] field is used by some IT demand user groups to indicate status of cost estimation.
The [Confirmation Date] field can be used for any comments. Some demand management user groups use the field to indicate when the demand is ready for acceptance test.
These fields will contain the initial values set by the ticket creator, no mater if the values have been changed along the way. These fields can be useful for reporting purposes
N/A
Other tabs that might be displayed are most likely not used for demand handling in a standardized and common way.
WIH is delivered by the Support Specialist team 'Managed Services Production Management' (former 'Method & Tools') at HP. Contact IT Service Desk for creation of a Service Call, if you need help with the application.
Demands on the WIH application should be placed and handled according to the defined IT Service Development flow for Global Business Applications. Suggestions should however if applicable first be directed to the Access Group Administrators.
The WIH web page at the IT Catalog can be used among others to find:
Training material
User Guides
Administrative User manual
Installation and order procedures
Structural descriptions
Open demand list
Contacts
Depending on if the demand issuer has access to WIH or not, there are two alternative ways to issue an IT demand. In both cases a Demand Specification template should be used.
Follow these steps to create a demand ticket in WIH:
Use the [Team] drop down list at the start page to select your team.
Enter the Corporate ID of the Demand Owner in the [Customer ID] field and press the return key on the keyboard.
Press the [New Request] icon to create a new demand
Change the [Severity] field to 5 (No impact)
Select Process Area and Demand Type in the [System] drop down list. If wanted combination does not appear in the drop down list, enter the Process Area name and press the return key to search.
Select relevant Global Business Application name (if IT demand) or sub-process area (if Process demand) in the [System Component] field.
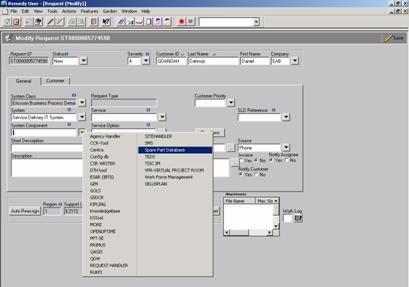
Use the [Service] drop down list to select one of the following:
Tool requirement (demand on an IT tool)
Process requirement (demand on a global process)
Method requirement (demand on a method within a global process)
The [Request Type] field will automatically be set to Demand.
The [SLD Reference] field will automatically be set to Global.
Leave the [Service Option] field blank
Copy the title of the demand from the Demand Specification template and paste it into the [Short Description] field
Copy the text from Detailed demand description in the Demand Specification template and paste it into the [Description] field
Attach the Demand Specification template in the [Attachment] field.
Right click in the [Attachments] area
Choose Add and proceed in the displayed [Add attachment] window.
As an alternative the Demand Specification template can be inserted as an Eridoc link in the [Description] field.
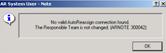
Press the [Auto Reassign] button.
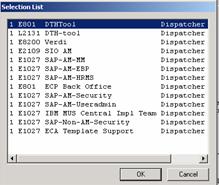
Select affected Process Area in the selection list and press the [OK] button.

The [Region], [Support Unit] and [Team] fields will be updated accordingly.
If possible, choose the correct receiver in the [Assigned To] field.
Press the [Save] icon in the top right corner of the screen. The Request ID (demand number) is displayed in the [Request ID] field.
Fill in the Demand Specification template and secure that local management has approved the demand.
Create an e-mail with IT demand for Process Area AAA as subject, where AAA is the Process Area that is affected by the demand. Attach the demand specification document to the e-mail and send it to IT Service Desk . The e-mail will be returned to the sender, if no Process Area is stated in the subject line.
HP personnel will thereafter create a demand ticket in WIH and route it to the affected Process Area.
Select you team in the [Team] field
Press the [My] or [Team] icon, depending on if you want to see your demands (regardless of team) or all demands assigned to team chosen in the drop-down list next to the icon
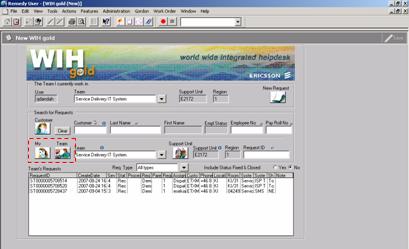
You can sort the found demands by clicking on the header list above the columns
Double click on the demand ticket row to open it
Change the [Status] field to Opened (Start work) if not already done

Perform wanted actions and modifications
Press the [Save] icon
IT Demands can be closed due to two different reasons:
The demand has been developed, tested and set into production: This step is performed by the IT Supplier (or Group IT, if the Supplier does not use WIH)
The demand has been rejected: This step is always performed by the Process Owner. If the WIH ticket is owned by another Support Unit it should hence be reassigned the Process Area Support Unit with rejection information in the [Work Log] field.
It is also
the responsibility of the Process Owner to contact the Demand issuer and Owner
with information regarding the demand rejection.
The following steps should be performed to closed a WIH demand ticket:
Select you team in the [Team] field
Press the [My] or [Team] icon, depending on if you want to see your demands (regardless of team) or all demands assigned to team chosen in the drop-down list next to the icon
You can sort the found demands by clicking on the header list above the columns
Double click on the demand ticket row to open it
Change the [Status] field to Fixed (Work completed)
Go to the [Solutions] tab
Enter information why the demand is closed (example: The request has been developed, tested and set into production according to agreed specification).
Make sure the [Notify Customer] option is set to Yes
Press the [Save] icon
Choose a new team member in the [Assigned To] drop down list
Press the [Save] button
Press the [Reassign] button

Choose a new team member in the [Assigned To] drop down list
Press the [OK] button
Press the [Save] button
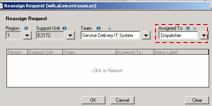
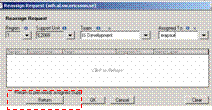
Press the [Reassign] button
Choose a new team in the [Team] field
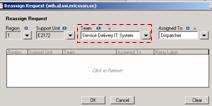
Choose a new team member in the [Assigned To] drop down list
Press the [OK] button
Press the [Save] button
Press the [Auto Reassign] button
An informative error message will indicate if no teams are available.
If only one team is available, the [Region], [Support Unit] and [Team] fields are updated accordingly
If several teams are available, a pop-up message is displayed indicating the different choices. Select the correct team from the selection list and press the [OK] button. The [Region], [Support Unit] and [Team] fields are updated accordingly
Press the [OK] button
If possible, choose the correct receiver in the [Assigned To] field.
Press the [Save] button
Which teams are available in the list?
Only teams that according to the IT Service Development flow should receive demand tickets from your team are available for selection.
If a team is missing?
Contact the receiving team and ask them to define a pre-defined auto reassign rule (Product Key Connection) to support the wanted flow[10].
A request can always be returned to all previous touching teams (creating team and all teams that thereafter have modified or owned the request), if using the [Return] button in WIH.
Press the [Reassign] button
Press the [Return] button
Choose wanted team from the selection list
Press the [OK] button
Choose a new team member in the [Assigned To] drop down list
Press the [Save] button
Use the mail functionality within WIH when communication with other people (within or outside WIH). The mail conversation is then automatically saved in the ticket and thereby traceable.
Add wanted receivers (three possible ways)
Using the [To] drop down list to select a receiver
Write a Corporate ID in the [Mail Address] field and press the return key
Write a complete mail address in the [Mail Address] field and press the return key
The recipients mail addresses are then automatically entered in the [Receiver List] field
Use the [Subject Line] drop down list to create wanted Subject Line. By default the Subject Line will begin with WIH <<Request ID>>
Enter wanted text in the [Message] field. The drop down list can be used to insert values from WIH fields, such as descriptions.
Set the [Attachments] radio button to Yes if you want to include attachments. A pop-up window will then be displayed.
Check the boxes to add an attachment into the e-mail and then press the [Continue] button
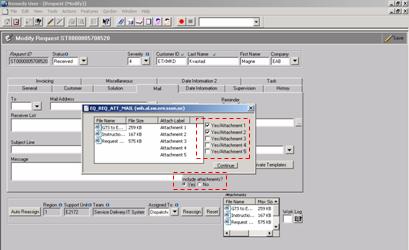
Press the [Send] button
Sent mails can be displayed, by using the [Show Emails] button.
End user can reply to WIH mails. The replies will be sent into the WIH ticket. At the same time a notification mail will be sent to the user assigned to the ticket. The Subject field is not to be changed when an e-mail is replied upon. The mail will not reach WIH and the correct demand ticket, if the Subject line is changed.
Received mails can be displayed, by using the [Show Emails] button.
The [Show Emails] button is used to show both sent and incoming e-mails (including attachments).
Press the [Show Emails] button at the [Mail] tab
Highlight wanted mail. The message and attachment will be displayed in a pop-up window
Use the [] icon to display the message body of the mail
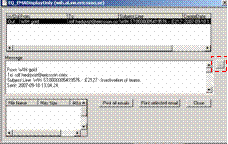
The text colour of the [Mail] tab will turn red if the ticket has any sent or incoming e-mails. However, the tab colour does not indicate if the mail has been read or not.
Up to five attachments (2 MB each) can be added into a WIH ticket in the [Attachments] field at the [General] tab:
Right click in the [Attachments] area
Choose Add and proceed in the displayed [Add attachment] window.

WIH reporting and macro functionality is described in document Users Guide: Macros and Reports.
The search result when performing request search queries in WIH is based on the users visibility rules the search result will only include those WIH tickets the users is allowed to see and modify. A WIH ticket is visible for the following users (and consequently also in the WIH report server):
Creating Support Unit: A team member can always see a ticket, that has been created by one of the teams in the users Support Unit (regardless of the users team belonging within the Support Unit and where the tickets is located when searching)
Owning Support Unit: A team member can always see a ticket, that is owned by one of the teams in the users Support Unit (regardless of the users team belonging within the Support Unit and where the tickets is located when searching)
Touching Support Unit: A team member can always see a ticket, that once has been owned by one of the teams in the users Support Unit (regardless of the users team belonging within the Support Unit and where the tickets is located when searching)
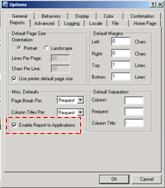
The following steps must be followed to enable WIH generated reports in Excel format[11]:
Open the Options menu: Tools/Options at the WIH Start page overview
Press the [Reports] tab
Enable the [Enable Report to Applications] checkbox
Press the [Behaviors] tab
Enable the [Limit Numbers of Items Returned] checkbox
Enter 9999 in the [Limit Numbers of Items Returned] field
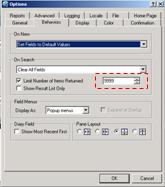
Press the [General] tab
Copy the text from the [Search Path:] field
In Windows: press the [Start] button
Choose the [Run] icon
Paste the search path from step 8
Use the [Up] function to go to the parent directory named HOME
Copy the file below[12]:
![]()
Paste the file into the directory from step 9 (the file name should be dde.ini)
Duplicate search results can occur when searching for WIH requests. This happens when a request has been assigned to more than one unique Support Unit[13]. Below Excel macro deletes duplicate rows if the Request ID values are listed in column A:

Instructions to install and run the macro in Excel:
Open menu Tool/Macro/Macros
Enter a macro name in the [Macro name:] field
Press the [Create] button
Replace the text with the text in the macro file
Go back to the Excel spreadsheet
Open menu Tool/Macro/Macros
Mark the macro name Remove Duplicates
Press the [Run] button.
For a complete description of the WIH structure, see document EAB-07:032814 Uen (WIH structure overview).
For a complete Access Group administrator role description and an administrative user manual, see document 1/198 17-FCP 188 0253 Uen (WIH Role description and User manual).
For a complete Support Unit administrator role description and an administrative user manual, see document 1/198 17-FCP 188 0253 Uen (WIH Role description and User manual).
The vendors should not be allowed as team members in Ericsson owned teams due to security reasons and structural principles. They should consequently not be added as team members in the Process Area or Group IT teams
Instructions how-to order a new Support Unit for IT Suppliers is found on the WIH web page at the IT Catalog (see section Ordering & Installation).
This is only a temporary ticket status option. When a ticket is saved and assigned to a team for the first time, the [Status] field automatically is set to Received. This status value is hence only applicable if the WIH ticket is created manually by a team in WIH.
The list will consequently not only include demand tickets as WIH is used for many purposes, such as Incident Management and Problem Management.
The User IT Support Portal can be used as an alternative. The template should still be attached and the affected Process Area must be specified.
Instructions how to define and set-up Product Key Connections can be found in document 1/198 17-FCP 188 0253 Uen (WIH Role description and User manual).
Otherwise the reports have to be exported in csv format and thereafter modified into an ordinary Excel file.
|
Politica de confidentialitate | Termeni si conditii de utilizare |

Vizualizari: 1332
Importanta: ![]()
Termeni si conditii de utilizare | Contact
© SCRIGROUP 2025 . All rights reserved