| CATEGORII DOCUMENTE |
| Asp | Autocad | C | Dot net | Excel | Fox pro | Html | Java |
| Linux | Mathcad | Photoshop | Php | Sql | Visual studio | Windows | Xml |
Before you start managing Microsoft Exchange Server 2003, it is useful to understand the administration architecture that Exchange uses and how this architecture influences the tools that you use to manage Exchange. Exchange 2003 interacts with and depends upon data in the Microsoft Active Directory directory service. It also stores and retrieves data from other places, including the mailbox store, the Microsoft Windows registry, and the Exadmin virtual directory. To access and manage Exchange data, there are two Microsoft Management Console (MMC) snap-ins-Exchange System Manager and Active Directory Users and Computers-where you will spend the majority of your time as an administrator.
After understanding Exchange administration architecture and the tools that you use to interact with Exchange, the next step is to determine how to efficiently use those tools. You may decide to set up a dedicated management station from which to manage multiple servers in the organization. You may also decide to create a customized management console that combines separate MMC snap-ins into one console. You may even want to automate additional administrative tasks using the Exchange Software Development Kit (SDK). You will find information about these choices in the latter portion of this chapter.
Exchange 2003 uses Active Directory to store and share information with Windows. Thus, all of the directory information that you create and maintain in Windows, such as organizational unit structure and groups, can also be used from Exchange.
The Active Directory schema can be extended to include custom attributes and object types to centralize and minimize data administration, as well as to make data available to applications that can access Active Directory information. In fact, when you install your first Exchange server, Exchange 2003 extends the Active Directory schema to include Exchange-specific information. Extending the schema affects the entire forest and, depending on the size of Active Directory, may take a considerable amount of time to complete.
Because Active Directory serves as a single-source directory for all of the objects in your organization, Exchange uses this information to reduce administrative overhead. With Active Directory, you can store and organize information about users, such as names, e-mail addresses, and phone numbers. This information is stored as attributes of the user object. Exchange and other applications can use this information. For example, the address lists to which a recipient belongs are written as values to the ShowInAddressBook attribute in that recipient's Active Directory object. To create address lists, Exchange performs Lightweight Directory Access Protocol (LDAP) queries on each of these objects and retrieves the information stored in the ShowInAddressBook attributes.
Note
Because Exchange 2003 relies on Active Directory, it is important
that you be familiar and comfortable with Active Directory terminology,
structure, and navigation. For a comprehensive overview of Active Directory,
review the documentation that came with your copy of Windows. For more information
about Exchange integration with Active Directory, see the books Planning an Exchange 2003 Messaging System and Exchange Server 2003 Deployment Guide (www.microsoft.com/exchange/library).
Microsoft Exchange Server version 5.5 and earlier do not use Active Directory. If your messaging topology is in mixed mode (contains both Exchange 2003 and Exchange 5.5 or earlier), you can still use Active Directory by using Active Directory Connector (ADC) to replicate directory information between the Exchange 5.5 directory and Active Directory. For more information about ADC, see the book Exchange Server 2003 Deployment Guide (www.microsoft.com/exchange/library).
When you make changes to your Exchange organization or to an individual user account, you often interact with data in Active Directory. This interaction occurs through one of two MMC snap-ins, Exchange System Manager or Active Directory Users and Computers. Figure 1.1 shows how these two tools interact with Active Directory.
Note
In addition to Exchange System Manager and Active Directory Users
and Computers, there are other tools that are useful for Exchange
administration. For more information, see Appendix A, 'Tools Used
with Exchange.'
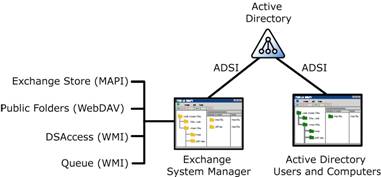
Figure 1.1 Where Exchange System Manager and Active Directory Users and Computers get information
As shown in Figure 1.1, all of the information that you see (read) and manipulate (write) using Active Directory Users and Computers is stored in Active Directory. Most, but not all, of the information that Exchange System Manager reads and writes also comes from Active Directory. However, in addition to data in Active Directory, Exchange System Manager draws information from other sources, such as:
MAPI Exchange System Manager uses MAPI to gather data from the Exchange store to display mailboxes (see Figure 1.2).
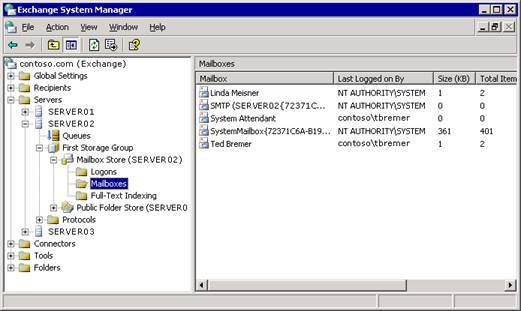
Figure 1.2 Mailbox data gathered using MAPI and displayed in Exchange System Manager
Windows Management Instrumentation (WMI) Exchange System Manager uses the data supplied by WMI to display cached directory information (DSAccess, a cache of directory information that reduces the number of calls to your global catalog server) and queue information.
Web Distributed Authoring and Versioning (WebDAV) Exchange System Manager uses the data supplied by WebDAV to display public folders using the Exadmin virtual directory.
Note
The location of the Exadmin virtual directory is in Internet
Information Services (IIS) under the default Web site. If the default Web site
service is stopped, you will not be able to display public folder information
in Exchange System Manager.
Although both Exchange System Manager and Active Directory Users and Computers provide access to Exchange-related data in Active Directory, typically you do not use them interchangeably. Generally speaking, you:
Use Exchange System Manager for configuration data for the server and organization.
Use Active Directory Users and Computers for recipient data.
To further highlight these usage differences, Table 1.1 provides specific examples of when you use Exchange System Manager, and when you use Active Directory Users and Computers.
Table 1.1 Comparing Exchange System Manager and Active Directory Users and Computers
|
Use Exchange System Manager to |
Use Active Directory Users and Computers to |
|
Manage your Exchange organization. |
Manage Active Directory objects (recipients). |
|
Manage servers. |
Manage users. |
|
Move all mailboxes from one server to another server. |
Move an individual's mailbox from one server to another server. |
|
Create public folders. |
Create distribution groups. |
As Table 1.1 shows, some tasks can be performed using either Exchange System Manager or Active Directory Users and Computers. For instance, you could move mailboxes using either Exchange System Manager or Active Directory Users and Computers. The difference between the two approaches is whether you want to find all of the users on a server or only a selected subset. When you want to quickly find all of the users on a server, Exchange System Manager is the better choice. When you want to select users based on specific criteria, use Active Directory Users and Computers because this snap-in allows you to create custom LDAP filters that can filter using virtually any criteria.
Tip
In newsgroups or conversations with other Exchange
administrators, some people refer to Exchange System Manager as ESM. Active
Directory Users and Computers may be referred to as ADU&C or DSA (Directory
Server Agent).
Building on the preceding overview of how Exchange System Manager and Active Directory Users and Computers work within the Exchange administration architecture, the next two sections explain Exchange System Manager and Active Directory Users and Computers in more detail. If you are already confident about using these tools, you can move ahead to the section, 'Deciding Where to Manage Exchange,' for information about whether to use these tools through Remote Desktop, Terminal Server, or a dedicated management station.
Exchange System Manager (Exchange System Manager.msc) is a specialized MMC console that helps you manage your Exchange organization. When you perform a typical installation of Exchange 2003 onto a server, the installation wizard automatically installs the Exchange System Management Tools onto that server as well.
Exchange System Manager provides a consistent administrative experience for administrators who deal with all facets of Exchange server management, including public folders, servers, routing, and policies.
Exchange System Manager is available on the Start menu of the Microsoft Exchange program group, as described in the following procedure.
To open Exchange System Manager
On the Start menu, point to Programs, point to Microsoft Exchange, and then click System Manager.
Figure 1.3 shows how Exchange System Manager appears on the screen.
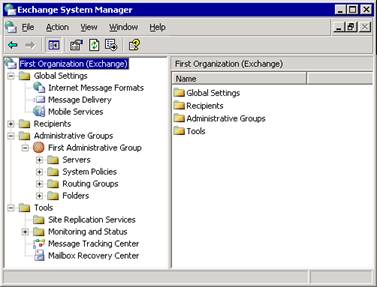
Figure 1.3 Exchange System Manager hierarchy
As shown in Figure 1.3, the left pane of Exchange System Manager is the console tree. The top node of this tree is the root organization node that contains all of the Exchange containers. Each of these containers gives you access to specific administrative features in Exchange. Table 1.2 describes what you can do with each of these containers.
Table 1.2 Exchange System Manager containers
|
Container |
Description |
|
Global Settings |
Includes features to configure system-wide settings. These settings apply to all servers and recipients in an Exchange organization. |
|
Recipients |
Includes features to manage objects and settings for recipients in your organization. You can manage address lists, offline address lists, recipient update services, recipient policies, mailbox management settings, details templates, and address templates. |
|
Administrative Groups |
Includes features to manage administrative groups. Each group is a collection of Active Directory objects that are grouped together for the purpose of permissions management. Each administrative group can contain policies, routing groups, public folder hierarchies, and servers. Note |
|
Servers |
Holds server-specific configuration objects, such as Queues, Mailbox stores, Public Folder stores, and Protocols information. |
|
System Policies |
Contains policies that affect the system's configuration settings. Policies are collections of configuration settings that are applied to one or more Exchange objects in Active Directory. |
|
Routing Groups |
Defines the physical network topology of Exchange servers. An Exchange mail system, or organization, consists of one or more servers on which Exchange is installed. Unless you are planning a small Exchange installation, you will probably have more than one Exchange server. Within some organizations, these servers are connected by reliable, permanent connections. Groups of servers that are linked together in this way should be organized into the same routing group. Note |
|
Container |
Description |
|
|
Folders |
Displays public folder hierarchies. A public folder stores messages or information that can be shared with all designated users in your organization. Public folders can contain different types of information, from simple messages to multimedia clips and custom forms. |
|
|
Tools |
Contains tools that help you to monitor your Exchange organization, track messages, and recover mailboxes. |
|
Using Exchange System Manager and its containers, you can:
Use Properties of the root node to configure Exchange 2003 to display or not display routing groups and administrative groups in the console tree.
Manage your Exchange organization by setting properties on different containers under the root node in the console tree. For example, you can delegate administrative permissions at the organization level in Exchange System Manager, or at an administrative group level using the Exchange Delegation Wizard.
Set permissions on a specific server by modifying the permissions settings in the server's Properties dialog box.
To find detailed explanations of how to perform these tasks, as well as other organization-level or server-level tasks, refer to the appropriate chapter within this book.
You use Active Directory Users and Computers to manage recipients. Active Directory Users and Computers is an MMC snap-in that is a standard part of Microsoft Windows ServerT operating systems. However, when you install Exchange 2003, the setup wizard automatically extends the functionality of Active Directory Users and Computers to include Exchange-specific tasks.
Note
If the Active Directory Users and Computers snap-in is installed
on a computer that does not have Exchange or the Exchange management tools
installed, you will not be able to perform Exchange tasks from that computer.
You launch Active Directory Users and Computers from either an Exchange server or from a workstation that has the Exchange System Management Tools installed.
To open Active Directory Users and Computers
On the Start menu, click Run.
In the Open box, type dsa.msc, and then click OK
-or-
On the Start menu, point to All Programs, point to Microsoft Exchange, and then click Active Directory Users and Computers.
Figure 1.4 shows how Active Directory Users and Computers appears on the screen.
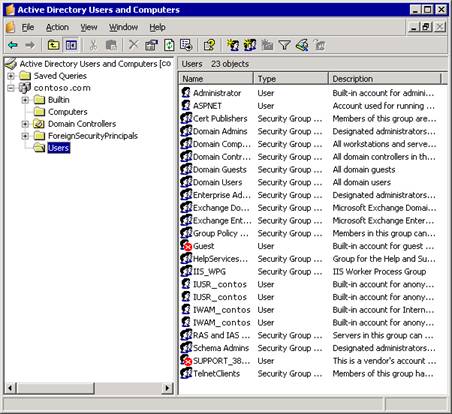
Figure 1.4 Active Directory Users and Computers hierarchy
The left pane of Active Directory Users and Computers is the console tree that shows your fully qualified domain name at the root level. Click the + (plus) sign to expand the root container. Under the root container are several default containers:
Builtin Container for built-in user accounts.
Computers Default container for computer objects.
Domain Controllers Default container for domain controllers.
ForeignSecurityPrincipals Container for security principals from trusted external domains. Administrators should not manually alter the contents of this container.
Users Default container for user objects.
In addition to the default containers, you can organize directory objects into logical units by creating containers called organizational units. For example, you could create an organizational unit for your marketing group that holds all of the directory objects associated with your company's marketing department. Organizational units are useful for applying group policy and for organizing objects in a meaningful way. For more information about organizational units, see the Windows documentation.
After you have organized the containers within Active Directory Users and Computers, you can then use those containers to:
Create recipients.
Perform Exchange-specific tasks.
Manage multiple Exchange domains.
After Exchange has extended Active Directory Users and Computers, you can mail-enable or mailbox-enable an object, and thereby turn the Active Directory object into a recipient. However, not all objects can be mail-enabled or mailbox-enabled. For example, you can create a mailbox for a user object or a mail-enabled group object, but you cannot do either for a computer object. Thus, the Active Directory objects that are of most interest to you as an Exchange administrator are:
Users
InetOrgPerson objects
Contacts
Groups
Query-based distribution groups
For more information about creating recipients, see Chapter 4, 'Managing Recipients and Recipient Policies.'
In Active Directory Users and Computers, you can select a user or a group object, and then use the Exchange Task Wizard to perform a variety of tasks that are specific to that object. These tasks depend on the type of object that you select and its current attributes. For example, the Exchange Task Wizard will not allow you to create a mailbox for a contact because contacts can only be mail-enabled, not mailbox-enabled. Likewise, selecting a user who already has a mailbox means that the Exchange Task Wizard allows you to the delete the user's mailbox, but not to create another mailbox.
Here is the complete list of Exchange-specific tasks that Exchange Task Wizard can perform:
Creation of mailboxes
Moving of mailboxes
Deletion of mailboxes
Designation of an e-mail address
Configuring of Exchange features
Removing Exchange attributes
Deleting e-mail addresses
Hiding group membership
Associating external accounts
To use Exchange Task Wizard to perform one of these tasks, use the following procedure.
To perform an Exchange-specific task
In Active Directory Users and Computers, right-click a user or group object, and then click Exchange Tasks.
You can use Active Directory Users and Computers to manage Exchange in more than one domain in a forest. To do this, you need to connect to the desired domain using the following procedure.
To manage Exchange in a another domain
In Active Directory Users and Computers, right-click the root object in the console tree, and then select Connect to Domain.
Note
You must have the appropriate permissions for the target domain.
Knowing the basics of how to use Exchange System Manager and Active Directory Users and Computers is just the beginning of managing Exchange 2003. The next step is to decide where is the best location from which to use these tools within your Exchange environment.
During a typical installation of an Exchange 2003 server, the setup wizard installs Exchange System Manager and extends Active Directory Users and Computers directly on the server. To use these tools, you log on to the server itself. However, it is advisable to limit direct interaction with the server to avoid exposure to unwanted practices. For example, it may be necessary to directly log on to a server to move log files, but in doing so, you may accidentally delete system files or inadvertently introduce viruses.
To minimize directly logging on to the server, you can use Remote Desktop, Terminal Server, or a dedicated management station. Table 1.3 outlines some of the inherent advantages and disadvantages of these various approaches to Exchange management.
Table 1.3 Administration scenarios
|
Management scenario |
Advantages |
Disadvantages |
|
Logging directly on to
the server |
No extra setup required. No extra hardware required. |
Increased risk. Administrators can inadvertently delete files or introduce viruses. |
|
Using Remote Desktop or Terminal Server |
No extra setup required. Can manage from outside of the data center. Administrators can perform most tasks without leaving their desks. |
Increased risk. Administrators can inadvertently delete files or introduce viruses. Number of remote connections is limited to the number of Terminal Server licenses purchased. |
|
Using a dedicated management station |
Decreased risk. Can place management station in convenient location. |
Extra setup required. Extra hardware required. |
Of the three approaches listed in Table 1.3, the only approach that is discussed further in this chapter is the dedicated management station. Directly logging on to the server requires no special setup. If you decide to use Remote Desktop or Terminal Server, the best source for setup information is the documentation that came with your copy of Windows.
By installing Exchange System Manager and Active Directory Users and Computers on a dedicated management workstation, you can avoid some of the risks outlined in Table 1.3. The following checklist briefly lists the steps to set up a management station.
Management Station Setup Checklist
|
c |
Install Microsoft Windows XP Professional with Service Pack 1 (or later) on the workstation. |
|
c |
Join the workstation to the domain with Exchange. |
|
c |
Install the Windows Administrative Tools Pack on the workstation. |
|
c |
Install the Simple Mail Transfer Protocol (SMTP) service on the workstation. |
|
c |
Install the Exchange System Management Tools on the workstation. |
|
c |
Shut down the SMTP service on the workstation. |
For more information about installing Windows XP and adding the workstation to the domain, see your Windows documentation. For the remaining steps in the checklist, use the following procedures.
Note
To manage Exchange, the workstation must be joined to the same
forest as your Exchange servers. You cannot manage domains in another forest.
After you have installed Windows XP with Service Pack 1 onto the workstation, you need to install the Windows Administrative Tools Pack. Installing this tools pack enables you to use the workstation to remotely manage servers running Windows.
To install the Windows Administrative Tools Pack
On the dedicated management workstation, browse to the Microsoft Knowledge Base Article 324745, 'HOW TO: Install the Active Directory Administrative Tools to Windows XP Professional in Windows Server 2003' ( https://support.microsoft.com/?kbid=324745 ), and follow the instructions.
After installing the Windows Administrative Tools Pack, you need to install the SMTP service on the workstation. Installing the SMTP service allows you to install the Exchange System Management Tools.
To install the SMTP service
On the dedicated management workstation, open Add or Remove Programs and then click Add/Remove Windows Components.
Select Internet Information Services (IIS), and then click Details.
Select the SMTP Service component check box.
Click OK, click Next, and then click Finish.
After completing the previous steps, you are ready to run Exchange setup.
To install the Exchange System Management Tools
On the dedicated management workstation, insert the Exchange 2003 Setup compact disc into the workstation's CD drive, and then navigate to <drive>: setupi386setup.exe.
On the Component Selection page, do the following:
Under Component Name, locate Microsoft Exchange. In the corresponding Action column, select Custom.
Under Component Name, locate Microsoft Exchange System Management Tools. In the corresponding Action column, select Install (see Figure 1.5).
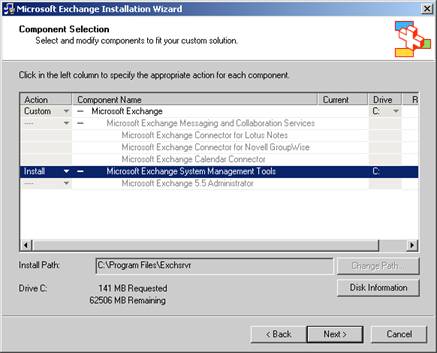
Figure 1.5 Microsoft Exchange System Management Tools installation option
Click Next, and continue with the wizard.
After installing the Exchange System Management Tools, you should disable the SMTP service because you only need this service to install the Exchange System Management Tools. In general, it is a good security practice to shut down any unneeded services.
MMC provides a framework for management tools (that is, snap-ins). Although MMC is not a tool itself, snap-in tools cannot be run independent of it. Opening a snap-in from the command prompt or the Start menu automatically results in the snap-in opening into its own MMC window.
As an alternative to opening an MMC snap-in in its own window, you can create a custom console. This custom console is a single instance of MMC that houses all of the snap-in tools that you use regularly. As an Exchange administrator, you may want to create a custom console that consolidates Exchange System Manager and Active Directory Users and Computers. For example, Figure 1.6 shows a custom console that houses Exchange System Manager, Active Directory Users and Computers, and Event Viewer.
Note
You can use a custom console regardless of where you decide to
manage Exchange-by directly logging onto the server, by using Remote Desktop or
Terminal Server, or by using a dedicated management workstation.
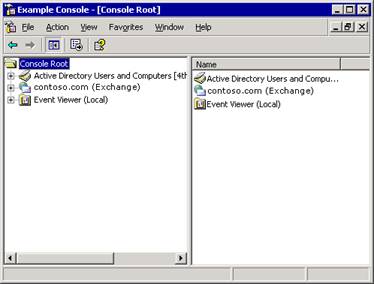
Figure 1.6 A custom console that contains Exchange System Manager, Active Directory Users and Computers, and Event Viewer
As shown in Figure 1.6, the user interface (UI) of a custom console is the same as that of the individual snap-ins. In the left pane is the console tree, which shows a hierarchical view of the different containers of the various snap-ins. On the right is the details pane, where you can manage the different objects in the containers by right-clicking an object and selecting an appropriate command for that object.
In addition to creating a custom console to help you manage Exchange, you can create custom consoles for different administrators or different tasks.
To create a custom MMC console, there are two steps. First, you create a new instance of MMC, and then you add the desired snap-ins to that instance.
To create a new instance of MMC
On the Start menu, click Run.
In the Open box, type MMC, and then click OK
This opens a blank MMC window (see Figure 1.7). The next step is to add the snap-ins that you want to use.
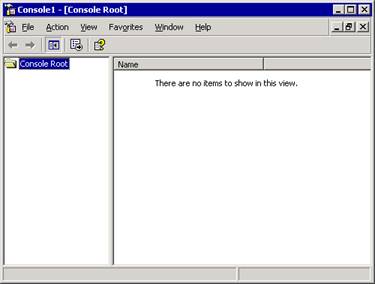
Figure 1.7 A new instance of MMC
To add snap-ins to MMC
In MMC, on the File menu, click Add/Remove Snap-in.
Click Add to open the Add Standalone Snap-in window.
Select the snap-in that you want to add from the list, and then click Add
For example, you can select Active Directory Users and Computers or Exchange System Manager.
Repeat Step 3 until you have added the desired snap-ins.
Click Close, and then click OK
In addition to Exchange System Manager, Active Directory Users and Computers, and the other tools described in this book, Exchange Server 2003 provides technologies for accomplishing most administrative tasks programmatically. These technologies include Collaboration Data Objects for Exchange (CDOEX), CDO for Exchange Management (CDOEXM), and a large set of WMI providers.
The Exchange SDK contains complete information about writing applications to manage, control, and extend Exchange, including numerous reusable code samples. You can download the Exchange SDK, or view it online from the Exchange developer center (https://msdn.microsoft.com/exchange).
|
Politica de confidentialitate | Termeni si conditii de utilizare |

Vizualizari: 1324
Importanta: ![]()
Termeni si conditii de utilizare | Contact
© SCRIGROUP 2025 . All rights reserved