| CATEGORII DOCUMENTE |
| Asp | Autocad | C | Dot net | Excel | Fox pro | Html | Java |
| Linux | Mathcad | Photoshop | Php | Sql | Visual studio | Windows | Xml |
Builders
As Visual FoxPro becomes more and more mature, the development team correspondingly has to spend less and less time creating core features, and more and more time enhancing the productivity features of the product. One often-overlooked productivity feature of Visual FoxPro is its Builder technology. In this chapter, I'll introduce you to Visual FoxPro Builders, and show you how to use the technology to build your own builders as well.
There are two mechanisms in Visual FoxPro that are supposed to assist you with various common tasks: wizards and builders. But what's the difference?
A wizard is a tool that guides you through the creation of a table, a form, a report, or some other process. Suppose that you've never produced a report in Visual FoxPro, but you need to create one. The Report Wizard will ask you questions about the type of report you want and then create one for you. I use wizards with software that I don't use very often, or those that I'm just starting to learn. For example, I use the wizards in PowerPoint about twice a month, because that's about how often I use PowerPoint. I'm simply not familiar enough with the product to be able to use it skillfully myself, and my demands aren't that sophisticated, so I let the wizards do the work for me.
Some wizards automate a series of steps that you might do often, but that require the meshing of disparate technologies or have a lot of standard, behind-the-scenes automation involved with them. The Visual FoxPro Setup Wizard is a good example-it leads you through the steps required to create a set of files that you can distribute to your users.
Wizards are good for getting started with a product, but they aren't terribly sophisticated. I don't mean that they're not complex; it's just that a wizard allows you to do what it wants you to do-and nothing more. What if you had a wizard that you could tailor for your own purposes? What if you could create your own wizards? What if you could make a wizard access a database to determine what it should do, instead of relying on hard-coded instructions?
That's what a builder is-sort of a customizable wizard. Sure, the name sounds like a blue-collar version of a wizard, but it's really a completely different breed of cat. You know that funny feeling you get when you try to answer the question, "What kind of programs can you write using Visual FoxPro?" Same thing with builders-it's difficult to pin down just what a builder can do. In short, a builder is a mechanism for creating and modifying forms and controls. Visual FoxPro comes with a series of builders that help you manipulate forms, format and modify some of the standard controls, and create referential integrity between tables.
However, the beauty of the Visual FoxPro Builder technology is that you aren't limited to the builders that come with the product-you can create your own and call them at selected times, instead of calling Visual FoxPro's built-in builders. In fact, one of the members of our community, Ken Levy, has extended the builder technology. His tool, BuilderD, is a data-driven set of classes that allows you to create builders that create builders. If your head is starting to spin, that's all right-just sit down and think of a robot factory whose main product is more robots.
This chapter will explain how the Visual FoxPro Builder mechanism works, and how to create your own builders. Finally, I'll create three builders that will demonstrate the breadth of what you can do with a builder, and show you where to go next if the BuilderD technology sounds intriguing.
The Visual FoxPro Builder technology
Think about what happens when you create a form. First, after issuing the CREATE FORM command, you place a control on the form. Then you open the Properties window and set a number of properties. Commonly, these properties include the name, the size (height and width), and a caption, as well as specific properties according to the type of control, such as the data source, how the control is initially populated, and so on. Yup, for each property you want to set, you either scroll through the list of properties in the All tab, or try to remember if the TabIndex property is on the Layout or Other tab. Once you've finished with the control, you add a second control and go through the same process. And again for the third control, and the fourth, and, yes, this gets tedious in short order. This isn't the best use of your time, is it? It's the programmer's version of data entry, and when you think about it, that's exactly what you're doing-data entry into the Properties window for each control.
Wouldn't it be nice if you had a "quick properties" tool that allowed you to set the half-dozen properties that you always used for a specific control? Perhaps a data-entry form that asked you what the name of the control should be, and what the caption should be? And perhaps you could set up a series of three or four standard sizes for the control, and then just select from that list, instead of trying to remember "Did I make these command buttons six pixels apart or eight?"
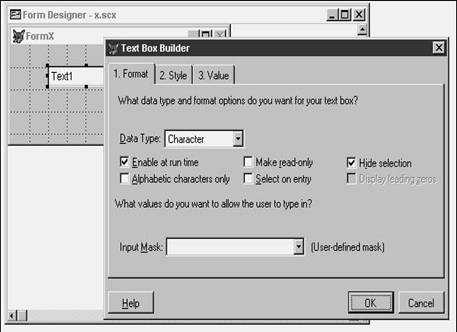
Visual FoxPro Builders provide this type of interface to the data-entry chore of entering values in the Properties window. How about trying one out. Create a form and place a text box on the form using the Form Controls toolbar. Then, right-click the control to bring up its shortcut menu. Select the Builder menu option, and the Text Box Builder will appear as shown in Figure 20.1.
This dialog allows you to set the format, style, and control source for the text box you've just placed on the form. And here's the fundamental idea behind a builder: Each of the choices- each control on each tab in the builder- maps to a specific property for the text box control. The control will change on the fly as you select options. This enables you to see the results of your changes before you finish with the builder.
This wouldn't be Visual FoxPro if there weren't 20 or 30 different ways of doing the same thing. You can also bring builders forward automatically by selecting the Builder Lock icon on the Form Controls toolbar, and then placing controls on the form. As each control is placed on the form, the appropriate builder will appear for you to do with what you wish. Additionally, you can keep the Builder Lock icon selected by default by selecting the Builder Lock check box in the Forms tab of the Tools, Options dialog box.
There are several pieces that play nicely together in order to make this work.
The first is the _BUILDER system variable. It is set to BUILDER.APP, located in the Visual FoxPro directory (you can see this by looking at the File Locations tab in the Tools, Options dialog box). When you select the Builder menu option or use the Builder Lock button in the Form Controls toolbar, the program or application specified by this system variable is automatically run.
BUILDER.APP does a whole bunch of stuff, but you can think of it as a "Builder Traffic Cop" whose main responsibility is to figure out which builder to run. Whoa! "Which" builder to run? There are more than just the native Visual FoxPro builders, like the Text Box Builder shown in Figure 20.1? You betcha!
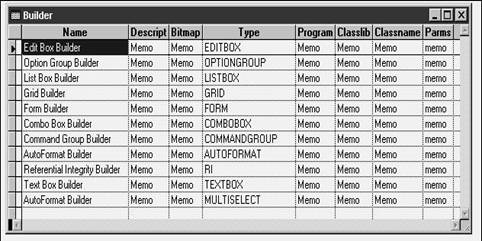
The second piece you need is a table called BUILDER.DBF, which is located in the HOME() + WIZARDS directory. It contains a list of the default Visual FoxPro builders, as shown in Figure 20.2.
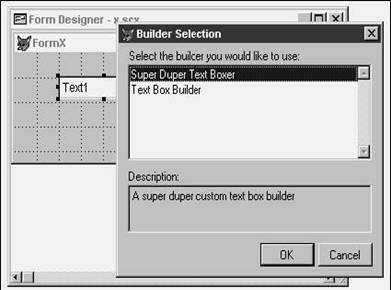
You can add your own builder definitions to this table as well. If you do so (I'll explain how shortly), clicking the Builder menu option will display a list of available builders for that type of control, as shown in Figure 20.3. Of course, BUILDER.APP does all this automatically. But there's more!
You can add a property called BUILDER to a control's base class. Then you can store the name of a builder to be used for that control in the BUILDER property. When you select the Builder menu option from the control's context menu, that builder will automatically run. (I'll discuss how to do this shortly as well.) Note that if there are other builders registered in BUILDER.DBF for that type of control, those builders will be ignored-you won't get a pick list of the registered builders in addition to the BUILDER property builder.
You could even write your own replacement for BUILDER.APP, and reference your new builder application in Tools, Options if you wanted. However, you're likely to find that you can get an awful lot done simply by creating builders that are called by BUILDER.APP, so writing your own builder app is an exercise left to the reader.
Setting up your own builder in BUILDER.DBF
I'll use a very simple builder to demonstrate how to add your own builder records to BUILDER.DBF. This builder will do very little useful work-it will simply set the font name and font size of a group of controls to a hard-coded value. Yes, I know that you can do this now with the Multiple Selection tool, but it will be an easy demonstration:
Write the builder program. The program, called LASSO.PRG, is as follows:
* lasso.prg*
* builder that sets the font name and font size of
* all selected controls in the form*
*
* these parms are passed by BUILDER.APP but not used
herelparameters m.lcX, m.lcY, m.lcZ
local
array laObjSel[1]
local lcFontName, lnFontSize, lnNumObj, i
* the font name and size are hard-coded for this example*
lcFontName = 'Courier New'
lnFontSize = 14
* place the references of all selected controls into an
array*
lnNumObj = aselobj(laObjSel)
* if we've got some in the array, change the
* font name and size for each control*
if
lnNumObj > 0
for i = 1 to lnNumObj
laObjSel[i].FontName = lcFontName
laObjSel[i].FontSize = lnFontSize
endfor
endif
There's a subtle command in this listing that's the key to the whole builder concept- the ASELOBJ function. ASELOBJ is one of those really smart functions: It places object references to currently selected controls in the active Form Designer window into an array and returns the number of items in the array. As a result, you now know which objects were lassoed, and you can address each one of them.
Create a new record in the BUILDER.DBF table. Remember, it's in HOME() + "WIZARDS", so go ahead and open it like so:
use HOME() + 'WIZARDSBUILDER.DBF'
3. Add a record with the following field values:
|
Field |
Contents |
|
Name |
Lasso Builder |
|
Descript |
Changes the Font Name and Size of multiple controls |
|
Type |
MULTISELECT |
|
Program |
LASSO.PRG |
Note that BUILDER.APP expects LASSO.PRG to be in the HOME() + "WIZARDS" subdirectory-if you put it elsewhere, you'll need to include the fully qualified path in the PROGRAM memo field.
Note also that you don't have to create a program; if you wanted to use a class library, you could put the class library name (the .VCX) in the CLASSLIB memo field, and the name of the specific class that holds the builder in the CLASSNAME field.
The last step is to close the table and test the builder. To do so, create an empty form and place three text boxes on it. (The font name should be Arial and the font size should be 9 by default.) Then select two of the text boxes, right-click, and select the Builder menu option. You should get a Builder Selection dialog that includes the Lasso Builder as one of the choices. Select it, and you'll see the font name and size of the two selected text boxes change.
Setting up your own builder in a BUILDER property
But what if you know that you want to run a very special builder for a specific class? For example, suppose you have a particular text box class that displays a type of value in a certain way, and you want to change a whole raft of properties each time you drop that text box class on a form?
It's more involved than the previous example, but here's how you would go about it. In this example, I'm again going to change just the font name and font size of the text box:
Create a class for the builder to be run on the text box class. Create a custom class named TxtBld in a class library called BUILDERPROG.
In the Init() method of this custom class, add the following code:
* init()local array laObjSel[1]
local lcFontName, lnFontSize, lnNumObj, i
* the font name and size are hard-coded for this example*
lcFontName = 'Courier New'
lnFontSize = 14
* place the names of all selected controls into an array*
lnNumObj = aselobj(laObjSel) *
* if we've got some in the array, change the
* font name and size for each control*
if
lnNumObj > 0
for i = 1 to lnNumObj
laObjSel[i].FontName = lcFontName
laObjSel[i].FontSize = lnFontSize
endfor
endif
If this code looks familiar, good-it's identical to the LASSO program I used in the previous example.
Next, create a class for the control of interest. For example, create a text box class named txtBuilder in the class library BUILDERCTRL. Add a property named BUILDER to this new text box class, and enter this string in the BUILDER property for the class:
BUILDERPROG,TxtBld
Create a form, and add the txtBuilder text box to the form. (You'll need to add it to the Controls toolbar.)
Right-click on the text box and select the Builder menu option. The TxtBld class will execute, the text box font name will be changed to Courier New, and the font size will be changed to 14. That's all there is to it.
Creating a user interface for a builder
The last example was all fine and good-as an example. But let's face it: You're not about to hard-code values in a program for a builder. The whole point is to allow the user of the builder (You? The developer down the hall?) to specify values after they run the builder themselves.
So you're probably wondering where you hook the user interface in.
It's fairly straightforward. Let's suppose you want to let the user pick the font size for the text box. All you need to do is pop up a form for the user to enter the new font size, and return the value to the program calling the form. There is a bit of extra plumbing involved, all of which has to do with certain assumptions that BUILDER.APP makes.
BUILDER.APP expects to see a form class, and will try to pass three parameters to it, even if you don't use them. Thus, the Init() method needs an LPARAMETERS statement, like so:
*
init()lparameter dummy1, dummy2, dummy3
Next, the builder assumes a number of built-in properties and methods, namely lAutoShow and lAutoRelease, and Show() and Release(). (In fact, BUILDER.APP doesn't even check to see if they exist!) You can fill the Show() method with all of the code that was in the Init(), like so:
*
show()LPARAMETERS nStyle
local array laObjSel[1]
local lcFontName, lnFontSize, lnNumObj
* the font name and size are hard-coded for this example*
lcFontName = 'Courier New'
do form GETTXTBLD to m.lnFontSize
*
place the names of all selected controls into an array*
lnNumObj = aselobj(laObjSel)
* if we've got some in the array, change the
* font name and size for each control*
if
lnNumObj > 0
for i = 1 to lnNumObj
laObjSel[i].FontName = lcFontName
laObjSel[i].FontSize = lnFontSize
endfor
endif
Then add this code to the Release() method:
*
release()release This
You would then create a form named GETTXTBLD, including a text box for the user to enter their choice of font size, and a property to store the value the user entered. You might also have a command button with code like this in it:
thisform.uRetVal
= thisform.text1.value
thisform.release
Naturally, you'd make this form modal, and you'd have code like this in the Unload event, just like I discussed in Chapters 14 and 15:
m.luRetVal
= thisform.uRetVal
return m.luRetVal
When the builder runs, the form appears, the user enters a value, and that value is returned to the m.lnFontSize variable in the builder program.
Of course, your own builders will get more complex in short order, but this is the guts of how this mechanism works.
Data-driving your builder-building process: BUILDERD
If you open the FoxPro Foundation Classes that come with Visual FoxPro 6.0, you'll see that all classes have two custom properties named BUILDER and BUILDERX. Furthermore, the BUILDERX property is set to the following in each class:
=HOME() + 'WIZARDSBUILDERD,BUILDERDFORM'
Welcome to BuilderD.
Back in the days of Visual FoxPro 3.0, a fellow named Ken Levy created a tool called "BuilderB"-short for "Builder Builder." The idea behind BuilderB was to automate the creation of builders, because creating a builder is actually like creating a mini-application- typically you'd have a data-entry form (with one or more pages) so that you could enter data that customized whatever you were building. When you think about it, each of these builders- data-entry forms, right?-is nearly identical. You do the same types of things over and over again, namely setting values for a fixed number of properties. This just kinda screams out for automation, doesn't it?
Well, along comes Visual FoxPro 6.0, and Ken decided he wasn't satisfied with the automation of builders. He decided to add data-driven-ness to the process, rewrote BuilderB, and voila! BuilderD ("D" stands for "Dynamic," not "Data-driven") was born.
Going into depth on how BuilderD works is beyond the scope of this chapter (or book), but to get you thinking along these lines, I'll show you what the BUILDERD.DBF table looks like in Figure 20.4.
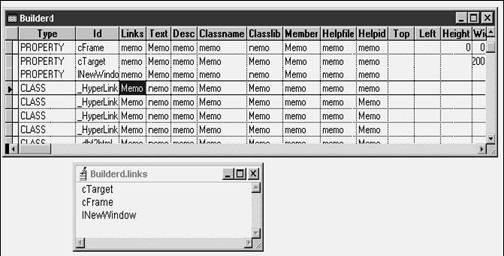
It might not be completely obvious, but this is just a set of commonly defined properties, and then definitions of classes that link to those properties. When you create a builder for, say, a Hyperlink class (you can see the various FoxPro Foundation Class _HyperLink classes in Figure 20.4), the information in the main class record is linked to records with information about other classes that make up the main class, and to properties as well. This information is used to create controls on one or more pages of a page frame in the builder. The controls that get plopped on the builder's pages are defined through base classes in BUILDERD.VCX.
This means that you can store in this table all of the parameters you would commonly use to create a builder, and create your builders automatically.
Yeah, I know that's a lot to swallow considering that I just introduced builders a few pages ago, but this should give you a feel for the extensibility of VFP's builder technology. If you're interested in more information about BuilderD, Doug Hennig wrote a pair of articles in FoxTalk ("Building Builders with BuilderD," March 1999, and "Building a Builder Builder," April 1999), that go into great depth. The FoxTalk Web site is at www.pinpub.com/foxtalk.
In this chapter I've given you an introductory glimpse into the world of builders. While introduced in Visual FoxPro 3, builders are still a completely new technology to most FoxPro developers, and I've just scratched the surface in order to show you how they work. You'll want to spend some time working with this, helping yourself automate your own work as well as that of your users. Finally, the shoemaker's children will have shoes of their own.
|
Politica de confidentialitate | Termeni si conditii de utilizare |

Vizualizari: 1219
Importanta: ![]()
Termeni si conditii de utilizare | Contact
© SCRIGROUP 2025 . All rights reserved