| CATEGORII DOCUMENTE |
| Asp | Autocad | C | Dot net | Excel | Fox pro | Html | Java |
| Linux | Mathcad | Photoshop | Php | Sql | Visual studio | Windows | Xml |
Distributing Your ApplicationsWith the VFP Setup Wizard
An application isn't much good if it never gets to the users. In the olden days, distribution was the easy part-you copied a bunch of files from your distribution machine onto a floppy disk, and then copied those same files onto your user's PC. It's considerably more complicated these days, and Visual FoxPro has a tool-the Setup Wizard-that allows you to package and distribute your application, much like VFP's installation routine itself works. In this chapter, I'll show you how to prepare your application for the Setup Wizard, walk you through the Setup Wizard, and point out a few options to be aware of, in case you need to take advantage of them yourself.
One of the nice things about Windows is the standardization of tasks and processes that ought to be standardized. Many of you have suffered through multiple incarnations of DOS and the applications that ran on top of it-and each application required you to perform a wide variety of different steps in order to accomplish common tasks such as printing and saving files. The initial installation of the application was another common task that could be done in many different ways.
With well-written Windows applications, however, the installation routine is always the same. Your application comes packaged as a set of files, including a SETUP.EXE installation routine, and one or more .CAB ("cabinet") files that contain all your application files.
Upon running SETUP.EXE, you are required to respond to a license dialog, then prompted for the location and name of the directory where the app is to be installed, and perhaps a few other questions specific to the application you are installing.
After installation is complete, the routine has created a new program group and perhaps a set of menu items under it, as well as an icon on the desktop. The installation program might have even offered to launch a Readme file.
With Visual Studio 6.0 and Visual FoxPro 6.0, you can distribute your applications to your end users with the same type of installation routine. You don't have to buy third-party programs or spend extra money to create a set of distribution files that contain an installation routine and all of the files-data and programs-that make up your application.
The tool you use with Visual FoxPro 6.0 is the Setup Wizard-yes, a wizard. For those of you who feel that Real Programmers Don't Use Wizards, you're wrong on this point. The Setup Wizard walks you through every step you need to cover to create a set of files that you can distribute to your users, and it's far too much work to install a VFP application otherwise.
Once your user has gotten the files-either via a network share, a CD, or downloaded from the Web-they'll run the SETUP executable, answer a couple of questions, and the custom app you developed for them will be installed and ready to rock and roll.
But there are a couple of things you're going to want to know before running the Setup Wizard, so I'll start at the beginning.
What does the Setup Wizard do?
To use the Setup Wizard, you need to have a copy of your application (in a separate directory) as it will appear on your user's machine. Generally, that means you'll compile your application to a standalone .EXE, and then copy this .EXE along with any other necessary files to a new directory, and run the Setup Wizard on that group of files. (If you're creating a middle-tier component, you'd actually be compiling to a .DLL, but the idea is pretty much the same.)
What other necessary files might there be? Most applications include, at the very least, an empty copy of the database to be used with the application. If yours does, that will be one set of files. You might also include some "system" files, like a data dictionary, a table that stores next available primary keys, a table of users, a help file, a couple tables of standard lookup codes, and so on. These all go on the pile as well.
There's one other set of critical files that are needed-but that you don't have to worry about. The standalone .EXE file (or .DLL) that you create just contains your code-and while your application is running, it needs to have access to the Visual FoxPro engine in order to work. However, you don't have to include a copy of VFP with your application, nor do you have to require your users to buy VFP. Instead, Visual FoxPro comes with a pair of "runtimes" that include all of the necessary functionality to provide support for your own .EXE-based or .DLL-based application. One runtime is for .EXEs and the other is for .DLLs. And, even better, you don't have to copy this Visual FoxPro runtime to this directory-I'll explain why in just a second.
Once you've gotten all your files together, you'll run the Setup Wizard, make a number of choices (which I'll walk you through in just a couple of pages), and click the Finish button. The Setup Wizard will crank for a bit (depending, of course, on the size of your application and the horsepower of your machine), and finish up with a group of files that you'll distribute to your users.
Because you're running the VFP Setup Wizard, it knows where to find the VFP runtime files and just grabs a copy while it's creating the distribution files. You don't have to do anything extra here.
The files that you distribute to your users can be packaged in one of several ways, depending on one of the choices you make in the Wizard, but the process the user follows will essentially be the same.
First, they'll run the SETUP executable that was created by the Setup Wizard, they'll load in floppy disks or CDs (or point to files on a network share) as appropriate, and then go through a standard Windows install. If they've installed Word or Excel or most any other common Windows program, they'll be right at home. A few minutes later, they'll be all set to run your application.
Behind the scenes, of course, the installation routine is doing more than would initially appear. For instance, remember that Visual FoxPro runtime that the Setup Wizard grabbed and automatically included in the distribution files? The installation routine automatically puts that file in the Windows SYSTEM (or SYSTEM32) directory-you won't find a copy of it in the root directory of your application.
The installation routine also automatically creates a series of registry keys for the application, which are used for rerunning setup and uninstalling. And, of course, the routine adds an entry in Add/Remove Programs, so that your users can remove the application just like every other well-behaved Windows app. The installation routine will even install and register ActiveX controls and the HTML Help engine.
Are you running SP3?
The first thing you have to do to prepare for distribution has nothing to do with programming, testing, or anything as far as your application goes. You want to make sure you are running Visual FoxPro Service Pack 3.
You can tell if you are by selecting the Help, About menu option and examining the first line in the About dialog-it should say "Microsoft Visual FoxPro 6.0 SP3", and if you use the VERSION() function, you'll get
Visual FoxPro 06.00.8492.00 for Windows
(The original version of VFP 6.0, for you trivia buffs, was 8167, by the way.)
The original version of the VFP 6.0 Setup Wizard has a number of bugs that can cause problems if you make heavy use of the various options, or if you depend on a couple particular configurations, such as multiple directories with files of the same names in both directories. In between the time that VFP 6.0 was released and SP3 was released, a new Setup Wizard that fixed these issues was made available on the Microsoft Web site, and that Setup Wizard has been incorporated into SP3.
Preparing your application
Now that you have updated VFP properly, you've got to get your house in order.
First is to build an executable. When you click the Build button in the Project Manager, you'll get the Build Options dialog as shown in Figure 26.1.
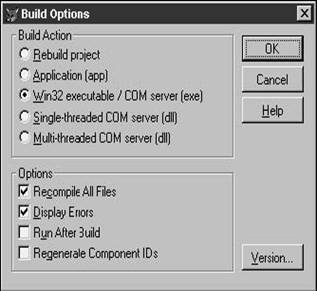
If you have a dialog that looks different-in other words, just four option buttons in the Build Action box-it means you're not running Service Pack 3. SP3 also gives you the ability to create three types of COM servers, while earlier versions gave you only two.
How do you decide which type of Build Action to choose? First of all, when you are building your application in order to distribute it, you'll need to choose one of the last three. You can choose Application (app) if you've already created an umbrella application that is started by an .EXE file, and have that .EXE call the .APP file. However, in this case, you won't be using the Setup Wizard to distribute the .APP file by itself.
If you're creating a LAN or client-server application and you're using Visual FoxPro as the front end-the user interface-select the Win32 executable/COM server (exe) option.
If you're creating a COM server that will be used as a middle-tier component, you'll select either Single-threaded or Multi-threaded COM server, and still use the Setup Wizard for packaging the necessary files and creating distribution disks. Just because a middle-tier app doesn't have a UI doesn't mean you can get away without the Setup Wizard. Your middle-tier app is still a VFP app-and, as such, still needs a Visual FoxPro runtime. It's just a matter of which runtime will be needed. (The Setup Wizard is smart enough to know which one to grab.)
The second step is to make a directory that contains the application files, as you want them to appear on your user's machine, and a directory where the resulting files will go. In Chapter 16, I mentioned that I use a pair of directories as shown in Figure 26.2.
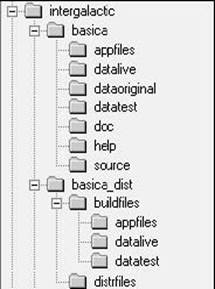
The application's development directory is called BASICA in Figure 26.2. The BASICA_DIST directory is used for all the various bits and pieces of packaging and distribution. BUILDFILES is the new directory I was talking about in terms of containing all the application files that will appear on your user's machine. As you see, the BUILDFILES directory in Figure 26.2 contains two data directories and an APPFILES directory that contains system files and whatnot.
The application's .EXE file goes in the root under BUILDFILES, along with a CONFIG.FPW file and any other files you'll want in your application's root directory. For example, I include a README.TXT file and an icon file for the application.
When you run the Setup Wizard, you'll be asked where you want to place the files that you're going to distribute to your users. This is what the DISTRFILES directory in Figure 26.2 is for. You'll want to create this directory before you run the Setup Wizard-I've run into occasional problems if I try to switch over to Windows Explorer and try to create it while I'm between steps 5 and 6 in the Setup Wizard dialog.
Another directory you might want to have available under BASICA_DIST is called ZIPS, although it's not shown in Figure 26.2. I find I like to have copies of the previous distribution files I've sent out-and each of those copies goes into this directory.
Now it's time to run the wizard!
Running the wizard
You can find the Setup Wizard in the same submenu as the rest of the Visual FoxPro wizards- under the Tools, Wizards menu option.
I'll discuss each screen of the Setup Wizard in this section, and then I'll cover some of the options, such as handling ActiveX controls and which distribution options to choose.
By the way, all of the choices you are about to make will be stored in a file called WZSETUP.INI in the VFP HOME() directory. This file will be used to populate the controls of the Setup Wizard when you run it next, on the assumption that you're probably going to rebuild the last application you built. The first time you run the Setup Wizard, it will warn you and ask you if you want to create it. Well, duh.
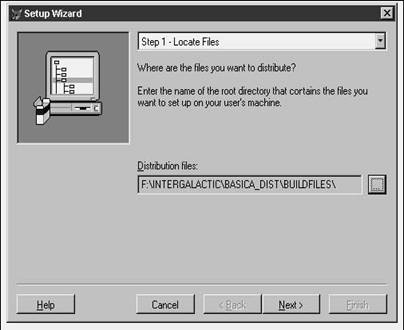
Step 1: Locate files
The first screen asks you to point to the root
directory of the copy of the application from which
you want to build distribution files, as shown in Figure 26.3.
As you can see, I pointed to the BUILDFILES directory under the BASICA_DIST
directory.
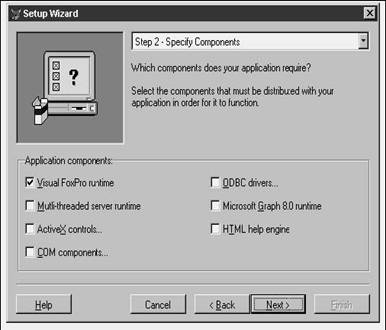
Step 2: Specify components
The second step is to identify which extra goodies you want to include in your distribution files, as shown in Figure 26.4.
Runtimes
The first thing you'll need to do is identify which of the Visual FoxPro runtimes you want to ship with your application. You have the choice of either the Visual FoxPro runtime or the multi-threaded server runtime. Basically, if you're building multi-threaded COM servers, you'll want to include the multi-threaded server runtime. For all other applications, including client/server front ends, out-of-process COM servers (.EXEs) and single-threaded COM servers (.DLLs), you'll want to use the regular VFP runtime.
ActiveX controls
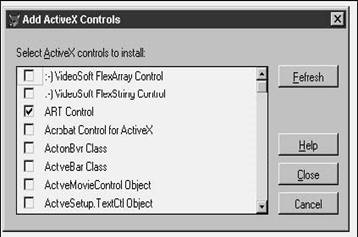
The next check box, ActiveX controls, is yet another example of a stupid user interface. As I've bitched about before, a check box is a control to indicate status of something, but not to initiate an action. However, this one also performs an action-well, sometimes it does. If the check box is unchecked, checking it will open a form similar to the one shown in Figure 26.5. You then use this Add ActiveX Controls form to select (or deselect) ActiveX controls to install. However, once you have selected at least one control and then closed this dialog, the ActiveX controls check box in the Step 3 dialog of the Wizard will be checked.
What's so stupid about this? What if you want to add another ActiveX control? The check box is already checked-clicking on it again simply clears the check box. You have to click it a second time to check the box again and open the Add ActiveX Controls dialog in order to do more work on it. This interface should really have had a command button and another control indicating that one or more ActiveX controls were selected. Anyway, enough whining.
All of the ActiveX controls that are registered with Windows should show up in the dialog-in fact, when you open this dialog, the Setup Wizard will search through the Windows Registry to determine what's available at the current time.
Note that you must do this step to explicitly identify which controls have to be added.
COM components
If you have COM components-either .EXEs or .DLLs-you specify that you want to have their files included in your distribution files by selecting the COM components check box.
When you initially check the box, the dialog shown in Figure 26.6 will open, and the list box will be empty. You'll click the Add command button to add files to the list box. When you close the dialog, the COM Components check box on the Setup Wizard dialog will be checked.
I won't belabor the point about how stupid this check box's interface is-it works pretty much the same as the ActiveX controls check box. The only difference is what is displayed in the Add COM Components list box. When you uncheck the check box, the box will remain unchecked-but when you check it again, any files that you had added to the list box will still be there. Awkward to get used to, but you probably won't be in this dialog a lot, so it shouldn't cause you a lot of stress.
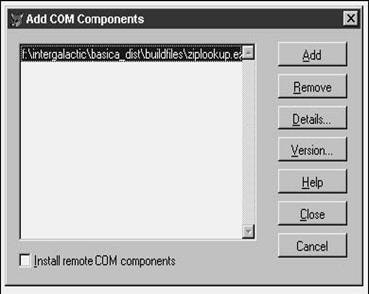
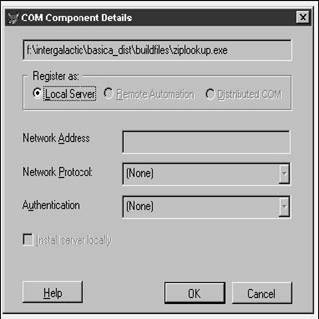
When you click the Add button in the Add COM Components dialog, you'll be able to select either .EXE or .DLL files. If you select a .DLL, it is by definition a local server-one that is running on the user's local machine. If you select an .EXE, however, you can choose to install and run that server on another machine. To do so, click the Details command button in the Add COM Components dialog and open the COM Component Details dialog, as shown in Figure 26.7. This dialog also allows you to identify which machine to use as a target.
You'll need to know the Network Address of the target machine, and then you can choose which Network Protocol and Authentication method to use. You can leave the Network Address, Network Protocol, and Authentication fields empty if you want the user to enter these values during installation.
When you get back to the Add COM Components dialog, you'll want to check the Install remote COM components check box so that the installation routine will automatically register your remote servers.
You can view the version information of a server (as set in the Project Manager's Build Options dialog) by selecting the server of interest, and then clicking the Version button.
ODBC drivers
If your application talks to a data set through ODBC, you'll want to include the appropriate ODBC drivers. Recently Microsoft started shipping a set of data access components all combined into one setup file, MDAC_TYP.EXE, and the company recommends that you use it instead of including individually specified drivers.
You can find the MDAC_TYP.EXE setup in HOME() + "DISTRIB.SRCSYSTEM", or in Program FilesMicrosoft Visual StudioVB98WizardsPDWizardRedist, and you can download the most recent version at www.microsoft.com/data, as shown in Figure 26.8.
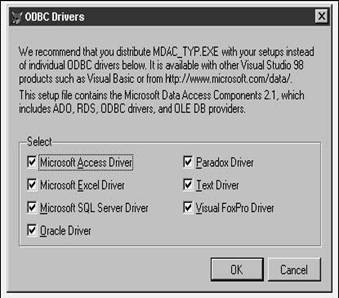
If you choose not to include MDAC_TYP.EXE, you can select individual ODBC drivers you want to include by selecting the ODBC drivers check box in the Step 2 dialog (as shown in Figure 26.4) and then checking the appropriate drivers in the ODBC Drivers dialog, as shown in Figure 26.8.
I can't provide specific suggestions on which way to go because I've only used the individual ODBC drivers up to this point.
Microsoft Graph 8.0 runtime
If your application uses Microsoft Graph, you'll need to include the runtime for it just as you include the VFP runtime for your VFP application. Check this check box if you need it.
HTML help engine
If you include HTML help files (.CHM files) as part of your application, you'll need to include the HTML help engine-which you can think of as a .CHM file runtime. The HTML help engine is comprised of several files, and checking this box is supposed to ensure that all of them get included. I know, I'm making it sound like it doesn't actually do it-I've run into cases where it doesn't, but haven't been able to consistently reproduce the problem. And from the messages posted on the various electronic forums, I'm not alone. These same files are already present on a computer that has Internet Explorer 4.01 or higher. As you know, it's getting increasingly difficult to find a computer that hasn't had IE already installed on it through one means or another. It is an integral part of the operating system, you know.
Nonetheless, some users prefer not to install IE, and so you'll need to include the HTML help engine so that your .CHM files will operate properly.
Step 3: Create disk image directory
The third step is to tell the Setup Wizard where the distribution files-the "disk images"- should go. You can manually enter the directory or use the ellipsis button to navigate to the proper directory. In Figure 26.9, I used the ellipsis button but then scrolled through the text box so you could see where I was pointing. (The text box isn't big enough for a directory structure of more than about 30 characters.) You kind of wonder if the same programmer wrote steps 1 and 3 in this wizard, eh? You can also choose how the distribution files will be packaged, and I'll cover those in the next section.
Step 4: Specify setup options
The fourth step is to customize the dialogs that will appear to your users when they run your installation routine, as shown in Figure 26.10.
When you're entering information into the caption text box, you'll want to be aware of where that text is used. In Figure 26.10, I used a whimsical phrase that you might think of using yourself. However, the description of "Setup dialog box caption" is a bit misleading, because this value is also used as an adjective and as a noun inside paragraphs in the dialogs that your user will see when running your installation routine, as shown in Figures 26.11, 26.12, and
26.13.
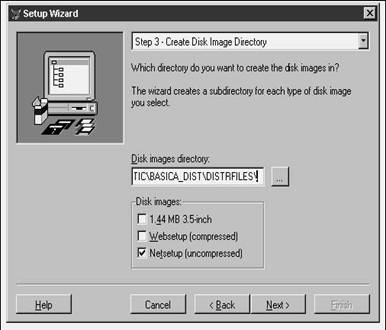
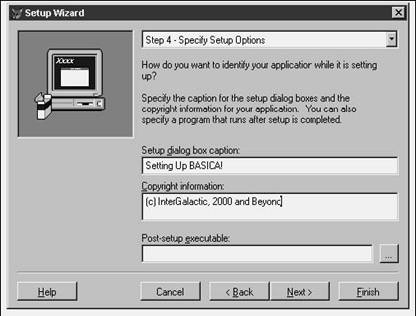
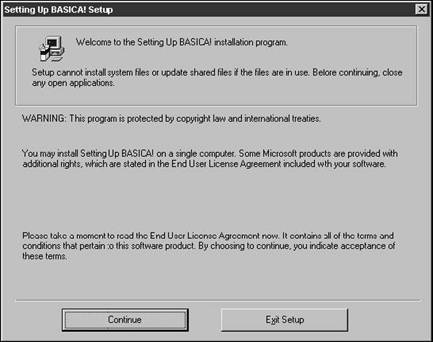
Figure 26.11.The Setup dialog box caption is used as an adjective and as a noun in the Welcome dialog that your user sees when running your installation program.
Thus, as repulsive as it may be to you, I would suggest a safe and boring route-that you use just the name of your application-the most creative you can get is to use an exclamation mark at the end of the name.
I would also suggest, however, that you include the version number of your application in the Setup dialog box caption because this phrase is also placed in the "installed software" list box found in the Add/Remove Programs Properties dialog (found under the Start, Settings menu option). In Figure 26.14, I show you how the caption I used in Figure 26.10 appears. If it is possible that your users could install more than one version of your application, you'll want to be sure to identify which version is which here.
Step 5: Specify default destination
Okay, back to the wizard. It is highly unlikely that your user is going to want to install their program in the same directory structure that you have it in on your development machine. Thus, the Setup Wizard gives you the ability to identify the name of the default directory that the installation routine will attempt to use.
However, when you get to this step, the Setup Wizard will use the lowest level of the directory you specified in Step 1-in this case, BUILDFILES-as the default value for the Default directory text box. In Figure 26.15, you'll see I have already changed the directory to BASICA. I also created a program group for the company name.
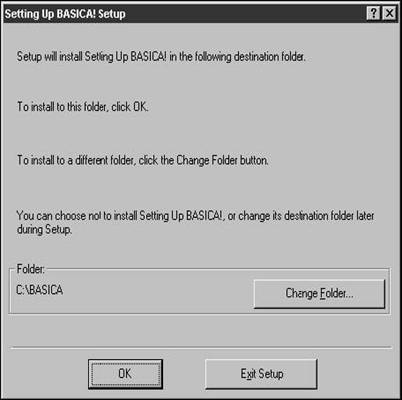
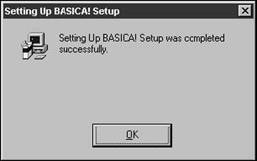
Figure 26.13.The Setup dialog box caption is used as a noun in the Completion dialog that your user sees when running your installation program.
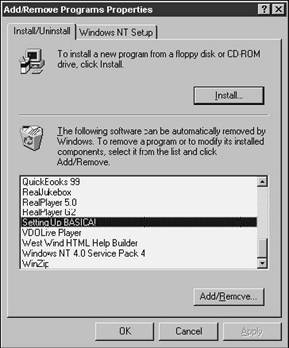
Figure 26.14.The Setup dialog box caption is also used in the Add/Remove Programs Properties dialog.
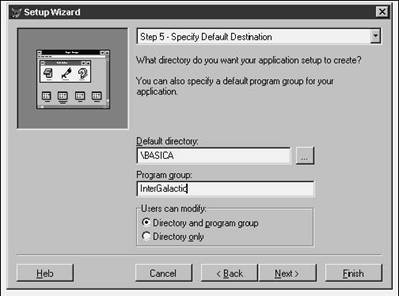
You can control whether or not the user can modify one or both values. Figure 26.12 shows the user's view of the values I used in Figure 26.15.
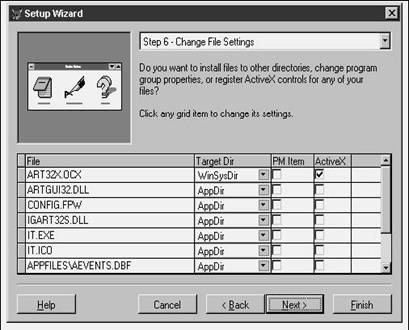
Step 6: Change file settings
The sixth step is to change any file settings for the files you are going to distribute. The grid in the dialog in Figure 26.16 contains every file in your distribution directory, and the wizard has made a guess at (1) where to install the file, and (2) whether or not the file is a Program Manager item or an ActiveX control that needs to be registered with Windows during installation.
I've found this dialog makes pretty good guesses, but you might want review the choices if you've got an unusual or complex set of distribution files.
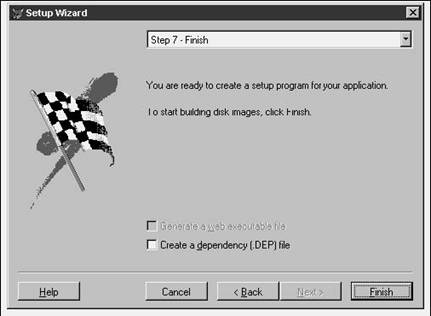
Step 7: Finish
Finally, the last step-in the Setup Wizard, that is-is to click the Finish button, and sit back and wait, as shown in Figure 26.17.
You'll get a WAIT WINDOW message:
Please be patient while files are being compressed.
and a dialog with several items and a thermometer bar scrolling across the dialog for each step. It can take several minutes to the better part of a half hour to build the distribution files, depending on the size of your app and the horsepower of your machine. The process takes longer the first time because the Setup Wizard has to compress a couple of files that it will then cache for future builds.
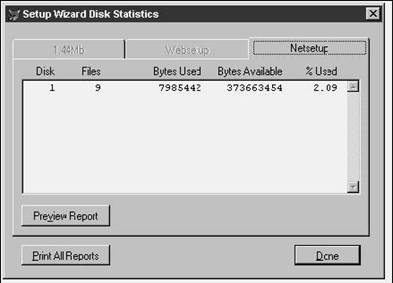
Stats of the build
When the Setup Wizard is done, you'll get a dialog like Figure 26.18. If you've opted for multiple distribution packages, the appropriate tabs will be enabled and you'll see the stats for each.
You can print a report from this dialog if you want to archive the information or use it as part of the documentation for your application.
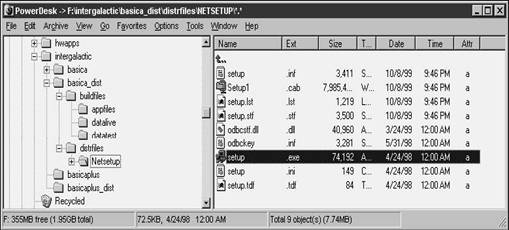
Where are the results?
You'll have one or more directories under the directory that you specified in Step 3. For example, if you selected the Netsetup option in Step 3, you'll have a directory called NETSETUP under the DISTRFILES directory. Those are the files you'll distribute to your users. In Figure 26.19, I've shown the contents of a simple Netsetup distribution directory.
The results vary according to which check boxes you selected in Step 3 of the Setup Wizard. The 1.44 MB 3.5 Disk Images check box will create a series of directories under a main directory, each named DISK01, DISK02, and so on, with each directory full of compressed files up to a maximum of 1.44 MB. You can then copy each of these directories to individual floppies, should you be required to distribute your application this way.
Websetup will create a single directory, with all of the files compressed. This saves time when downloading from a Web site, which can be important for users still using a modem or otherwise slow connection, but the flip side is that the installation time is longer, because the files have to be decompressed during installation.
Netsetup will create a single directory with all of the files, but uncompressed. This allows the user to run the installation from this directory and do it as speedily as possible, since the files don't have to be uncompressed. You can also use this mechanism if you're distributing your distribution files on a CD-ROM (and your application fits on a 650 MB CD).
A new Visual Studio installation routine was released during the Fall of 1999, but it's not quite ready for prime time for VFP apps yet-I suggest you wait until Visual Studio 7.0, when it's more tightly integrated with the development tools.
|
Politica de confidentialitate | Termeni si conditii de utilizare |

Vizualizari: 1438
Importanta: ![]()
Termeni si conditii de utilizare | Contact
© SCRIGROUP 2026 . All rights reserved