| CATEGORII DOCUMENTE |
| Asp | Autocad | C | Dot net | Excel | Fox pro | Html | Java |
| Linux | Mathcad | Photoshop | Php | Sql | Visual studio | Windows | Xml |
The Structure of a LAN Application
By now you've probably got a variety of files that you've played around with in various test directories: programs, forms, menus, class libraries, maybe even a report or two. But now that you're comfortable using each individual tool, it's time to learn how to build an application. There are generally three types of applications you can build with Visual FoxPro. The first is the "monolithic" LAN app that we all know and love, which is built with VFP from head to toe. The second is a two-tier (or, often, "client-server") app where the user interface is separated from the back-end data, and Visual FoxPro is most often used as the front end (but could also be used separately as the back-end data store). The third is a component that is used in a three-tier or multi-tier application-Visual FoxPro is most often positioned as the "middle tier" between a user interface of indeterminate origin and a back-end data store. This middle tier contains the business logic and heavy-duty processing.
In this chapter, I'm going to describe what a LAN application looks like, discuss what each piece is and what tool we'll use to build it. Later in this book, I'll do the same for client-server apps and middle-tier components built with Visual FoxPro. But by the time you're done with this chapter, you'll understand how all of the various tools I've discussed fit in with each other and what part they play in building true Visual FoxPro applications.
All but the most trivial Visual FoxPro applications consist of multiple files. In the olden days, programmers would jam an entire application into a single program file. As this file grew larger and larger, and started to share code with other applications, this single program file referenced a common library of some sort or another.
Then the programmer realized that it was more efficient to have multiple program files that each were responsible for a specific function, so the application became a "main" or calling program, a common library, and multiple program modules.
These days, a Visual FoxPro application consists of one or more program files, perhaps a common library, but also menus, forms, and class libraries. True, you can convert forms and class libraries into program files, but even if you do, many more components in an application can't be converted to a program-such as reports, libraries, tables, and so on. Thus, even if you wanted to, you couldn't convert all of the components into a single program file.
A traditional FoxPro application consists of a "main" program that "sets the stage" for the application, runs a menu, and then goes into a "wait for event" state. The menu stays active, waiting for user input. Each option on the main menu either calls a submenu or a program, form, or report. These programs, forms, and reports may call additional programs, forms, or reports, and may reference other programs in a shared library of common routines. Think of these common routines as "ladies in waiting" or "butlers," available to provide services-of the programming kind-to the rest of the application. For example, do you need a number formatted a certain way? A username and password validated? Data on a standard data-entry form to be inserted into a table? These common routines can be called on by the rest of the application to perform these types of tasks.
A Visual FoxPro application works in much the same way, except that instead of a common procedural library providing "services" to the rest of the application, a series of objects (yes, the type of objects one thinks of when discussing object-oriented programming) that have been created in the "setting the stage" part of application startup provide those services.
You very well may have looked at the sample Tastrade application that comes with Visual FoxPro. (If you can't find it, you'll need to do a bit of spelunking through the directories. Make sure you installed MSDN when you installed Visual FoxPro. Find the MSDN directory, likely under Program Files/Microsoft Visual Studio, and then drill down through 98VSa, 1033, Samples, and finally to VFP98. There you'll find a series of directories for many different samples, including Tastrade.)
If you did, you probably followed these steps:
1. 1. Run the application TASTRADE.APP, under the Tastrade directory, investigate the various menus, and play with the various forms for a while.
2. 2. Investigate the Behind the Scenes forms in various places. (Under the Administration menu pad, there's a Behind the Scenes menu option that allows you to look under the hood in many different places.)
3. 3. Decide to look at the code yourself. Change to the Progs directory and look at the few program files. Then change to Forms and open the forms. Then switch over to Libs and open a few class libraries. Go back to the root and open the project.
4. 4. After finding the top-level program (it's MAIN.PRG under Programs in the Code tab), find code that looks like this:
*-- Set up the path so we can instantiate the application object
IF SetPath()
PUBLIC oApp
oApp = CREATEOBJECT('Tastrade')
IF TYPE('oApp') = 'O'
*-- Release all public vars, since their values were
*-- picked up by the Environment class
RELEASE gcOldDir, gcOldPath, gcOldClassLib
RELEASE gcOldTalk, gcOldEscape
oApp.Do()
ENDIF
ENDIF
CLEAR
DLLS
RELEASE ALL EXTENDED
CLEAR ALL
1. 5. Shake your head, wondering where the application actually launches, since there doesn't appear to be any menu, any foundation read (if you're acquainted with them from FoxPro 2.x), or any other mechanism that "gets things going." But you're sure this is where things have to happen, because near the end of this code snippet you see things being released-the program must be finished by now.
2. 6. Try to weed your way through the class libraries and forms again. Fill page after page with diagrams and maps of programs, forms, and class methods. Finally run out into the street screaming. If you're used to Xbase or other procedural languages, this approach-oApp = createobject("Tastrade") and oApp.Do()-turns the world on its ear.
It's quite a jump to get from Point A, a series of hierarchical programs that call one another off of a menu, to Point B, this set of objects floating around in the ether, hovering at the virtual shoulder of the application, willing to serve as needed. To describe this in one step would be much like discussing the use of a hammer, a saw, and a router, and then building a 10-story office building downtown. How about if I start out a bit slower, so you can see what is really happening when I appear to wave my hands? Good, I'd much prefer to do so as well.
Defining the application
So, it's time to build an application. But what kind of an application am I going to build? What is it going to do, and what is it going to look like? You could write a book on the process of developing an application specification, and, indeed, I have-see the 1999 Software Developer's Guide if you want the full story on specs. For the time being, however, I'm going to assume that the hard work of assembling a specification has been done, and I'll just follow the pictures.
I'm going to start by building a classic order-entry system, with customers, orders, detail lines, and invoices. Though simple, it will have enough pieces in it to demonstrate the different things I need to show you. Furthermore, just about all of you have seen one yourself, so you're not going to have to worry about learning the ins and outs of a new application-you'll be able to pay attention to just how to build it. And, finally, I'll eventually port this same application to a client-server framework, and then to a three-tier, Web-based structure as well. You'll be able to pay attention to the concepts each time.
Deciding on a menu style
While most Windows applications you see these days use the same set of File, Edit, Window, and Help menu pads, this wasn't always true. There are several distinct menu styles floating around, and even now, in late 1999, I've run into menus that are throwbacks from the mid1980s.
Function-centric menu styles
A lot of custom and vertical-market database applications group functional areas and give each area its own menu pad on the main menu. Thus, you'll see an application with menu pads for Customer Service, Purchasing, Inventory, and Estimating, along with, perhaps, pads for System and Exit. Each pull-down menu would then have options that related to that functional area. Often, separate functions would be handled by different menu options and even different screens, so you'd see menu options for Add Customer, View Customer, Delete Customer, and so on.
This style is a legacy of the days when building menu bars was impossible with the tools available at the time. Applications at that point presented a list of choices in the center of the screen. When menu building became a reality through a set of menu commands or through a visual tool like the Menu Builder, applications that used the old style of menu bars were ported over and the selections were just rearranged on the top of the screen. In other words, developers weren't taking advantage of new capabilities-they were just using new tools to do things the old way, much like the lumberjack used a chainsaw to manually saw through trees.
This style, however, may still be applicable in some situations. If you've got a large number of users across multiple departments and functional areas but they cross into each other's paths a lot and thus need access to a large number of menu options, this type of structure could be the best way to keep the myriad of choices organized and easily available to the user base. In fact, as I'm writing this book, I'm building an application that will be used by an entire company, and we're going with this structure for this very reason.
CUA menu styles
"CUA" stands for Common User Access and is the standard for Windows applications. It dictates that the main menu will contain File, Edit, Window, and Help menu pads, each opening to show one or more menu options.
Forms that allow the user to maintain customers, orders, and invoices will be launched from menu options in the File menu. In this drop-down menu, options can be grouped according to function, with all customer-related forms in one section and all order-related forms in another. Or you might choose to group the options according to frequency of use, where the most commonly used forms are launched from a group near the top of the menu, and infrequently used options reside near the bottom, just above the Exit menu option.
Edit provides access to the standard Cut, Copy, Paste, Select All, and Find options.
Every good program provides a number of administrative and system-specific options. These might include the ability to change the configuration and settings of the application (System Preferences), data repair and recovery options, and user maintenance such as User Preferences, Change Password, and User Maintenance. These go under the Tools menu.
The Window menu pad simply contains options to manage a multiplicity of windows open on the desktop-Tile, Cascade, and Close All, for example-as well as a list of all currently open windows.
The Help menu pad provides system-supplied and user-defined help, system diagnostic information, and the traditional "About." dialogs.
Of course, this isn't enough to build a complete application, but these are the standard menu pads. In a database application, you'll probably want at least two more.
The first, Processes, goes to the right of Edit, and is used to hold options that run operations that don't need much or any user intervention. For example, month-end posting routines, data imports, or matching processes would all be found under Processes.
The second, Reports, goes between Processes and Tools, and, obviously, is used for getting data out of the system. Thus, the word "reports" is actually a bit misleading, because you might not want only ad-hoc, custom, and hard-coded reports, but also any other type of output, such as exports to other applications, output to file formats that are picked up by other computers, or even just querying functions that will typically not be printed.
Document-centric menu styles
The Tastrade application demonstrates a third style that has become somewhat popular over the past few years, although it hasn't exactly dominated application design. The view of the computer as a "document processor" has been increasingly espoused over the last few years, and in order to make the view all-encompassing, the definition of a document has been bent out of shape to accommodate all sorts of data structures that normally wouldn't have fit. It used to be that a document was essentially a single file, such as a spreadsheet, a memo, a book report, image, or a presentation. Each of these was a discrete file that could be found through the File, Open menu option, and then manipulated with Save, Close, Print, Send, and so on.
This doesn't work as well when you try to include data from database applications. What, exactly, does a "document" consist of? A record? A field? Multiple fields but not an entire record? Fields from multiple records? Multiple records from a single table? Each of these examples could easily be mapped to a printed document, so it's obvious that none of these is an all-inclusive definition. And what if your database application had to handle non-relational data, such as multimedia, e-mail, and other files? The concept of a "document" becomes more and more difficult to pin down.
The solution is not to define a document independent of the data stored on the computer, but instead along the lines of what a user sees. An invoice, then, could be a "document" even though it probably draws one or more records from up to a half-dozen tables. An e-mail message could be another document even though it's actually stored as sequential text in a BLOB (binary large object). The key is defining the document according to data usage.
Thus, a true document-centric menu system looks a lot like that used by applications such as Word, Excel, and PowerPoint. You'll open a form with function-specific menu options, like those found under the Customer Service, Orders, and Physical Inventory menu pads of an older system, but then you'll use menu options under the File menu pad to manipulate the form and its data. Clicking New will create a new "document" (an invoice, a customer, a shipping manifest), Save and Restore will either commit modifications to the rest or revert to the old data, and Delete will delete the document. Close will close the form, and Print will bring up a print dialog box that provides a number of document-specific choices. The toolbar provides an alternative mechanism to execute many of these functions. Navigation through a table is provided by the functions in the toolbar as well as under a Navigation menu pad (which I think is a little contrived).
A twist on this paradigm is to include an Open menu option under the File menu pad as well, and then display a dialog where users can choose what they want to open: an invoice, customer, shipping manifest, inventory record, and so on, much like in Word you can open an ordinary document, a template, or other document types.
At first I hated this style, but that's often the case with something new, especially when it flies in the face of what you've personally constructed. The more I worked with it, however, the more I began to like certain elements. Still, the interface isn't quite consistent and could be improved. As I mentioned, the navigation seems awkward; it's very clearly a record-navigation tool, but I thought we were using documents.
Nonetheless, this document-centricity is certainly worth looking at-some of you might jump up and down, thinking that at last you've found the Holy Grail to interfaces, while others of you will decide to keep looking.
The key point to remember about selecting and designing a menu, as well as the rest of your user interface, is that your users will learn it faster and make fewer mistakes if it works like something else they know. Remember when you had to remember a dozen different ways to save your work, depending on whether you were using one program or another? Now, Ctrl+S pretty much saves every type of document you could be working on in Windows-you can use your brainpower to remember important things now. If you use a paradigm that is familiar to your user base, they will come up the learning curve easier than if you introduce something radically different. There has to be a significant advantage to a new interface to make it worth your users' while.
A pseudo-object-oriented menu style
One last issue that you might want to think about when determining how you're going to build your menus is reusability. As the trade press has been telling us for years, the real revolution in software will come when object orientation is a reality. Being able to create an object once and then reuse it will greatly enhance your productivity in a number of ways: eliminating repetitive coding, reducing errors by using tried and tested code, eliminating testing of parts that have already been approved, and keeping your adrenaline level high because you're always working on new and existing projects instead of slogging through near-mindless grunt work.
Consider a menu structure where there are absolutely no custom menu options. Instead of listing the various forms under one or more menu pads, place them in an array-perhaps according to availability as determined by the permission level of the user-and then access that array with the File, Open menu option. When users select File, Open, they are presented with a list of available forms, as I described earlier. In other words, you have a menu object that operates on data that is passed to it.
It doesn't matter how the internals of the menu work. You can give this menu object to another developer, along with the explanation of how to pass the names of the forms, and they can build applications without ever seeing the inside of the menu. You can do the same thing yourself-use it in other applications of your own just by passing it different sets of data. No more boring coding of menus!
I'll take this one step further. It is conceivable that an application could have dozens and dozens of forms. At some point, you'll probably need a whole new interface to handle these gazillions of forms. However, there's a middle ground where you don't want to go to that effort, but still can't just list 34 forms in a long list-it would end up looking like the Programs menu list from the Windows Start button. An alternative would be to break the forms into functional groups and then list the appropriate forms under each group, much like a directory/subdirectory hierarchy.
It wouldn't, then, be a terrible reach to change the File, Open mechanism to read either a single list of names or a two-column array that would contain the name of the group in one column and the name of the form in the second column. Selecting the File, Open menu option would list all of the groups, and upon the selection of a specified group, all of the available forms attached to that group would be displayed. It would operate identically to the section of a document in a directory hierarchy, so it's a very comfortable, common interface for the user (well, at least for most users). And this takes our object-oriented analogy one step further. We're now using polymorphism-using the same "verb" to do two different operations, depending on the context in which it's used. If we're in the context of a single-column array, File, Open just means "open the selected form"; if we're in the context of a two-column array, File, Open means "display a list of groups first, and then display the forms for a selected group."
But that's not all, of course. If you decided to go with a document-centric menu style, the same File, Open paradigm would still work. And you could use a different relationship than groups and forms-how about displaying just those forms (or documents) according to which security level the user belonged to? The possibilities are nearly endless.
The Books and Software Inventory Control Application menu structure
As with all parts of this application, before I can write it, I have to describe it. Here's the menu specification.
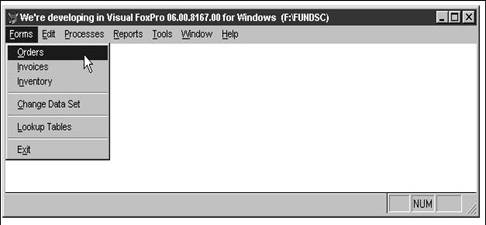
Forms menu
The Forms menu includes an option for each form in the system, a menu option that calls a generic lookup maintenance form, a way to switch from one data set to another, and a way to exit the application. By default, each form can be opened multiple times, and each time it is opened, its name (followed by a number if it's already open) will be placed on the Window menu. See Figure 12.1.
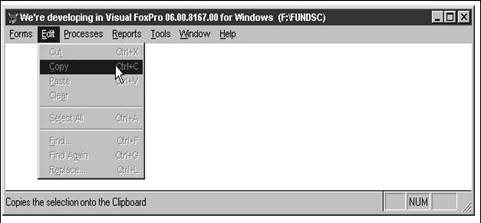
Edit menu
The Edit menu contains the standard Cut, Copy, Paste, Select All, and Find options. The primary reason this menu pad exists is to provide this functionality through shortcut keys within text and edit boxes on forms. You must have the menu defined in order to make the corresponding keyboard shortcuts available. See Figure 12.2.
Processes menu
The Processes menu contains options for a couple of processes that are run on a regular basis. One process is importing e-mail from various customers and vendors who send electronic notification of what they've sold or what they want to order. Instead of retyping this information, the application will automatically import that information as needed.
Reports menu
What good is an application without reports? A few reports are included in this system, as would be expected in any good application.
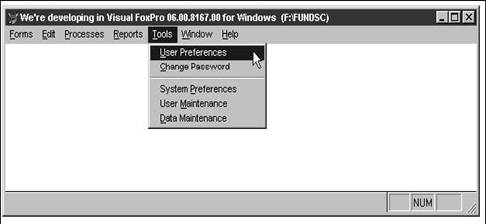
Tools menu
The Tools menu provides access to utilities and tools for both the user and the system administrator. The user utilities include User Preferences, where users can configure the application to their own preferences, such as setting and changing their passwords; and System Info, where the user can display a series of status screens that show various information about the configuration of the machine, software, and application. This option is provided to the user for diagnostic purposes.
The system administrator menu options include System Preferences, which allows the user (usually an administrator) to specify default options for new users and a baseline to which other users can revert their settings. User Maintenance allows the system administrator to add, edit, delete, and lock out users. Data Maintenance allows the user to perform a number of functions relating to the integrity and validity of the data, including reindexing, packing memo fields, removing deleted records from the tables, and validating the primary and foreign keys in the database. See Figure 12.3.
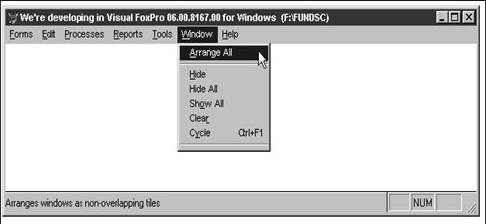
Window menu
The Window menu option contains a list of the open windows, as well as functions to operate on those windows during the execution of the application. If no forms are open, the Window menu pad is disabled (although I've enabled it in Figure 12.4).
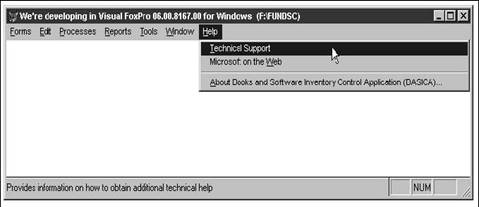
Help menu
The Help menu contains Help-related options. These include a list of Help Topics, User-Defined Help (if you choose to provide it), and the omnipresent "About." dialog boxes that contain copyright notices and generic information about the application such as the version number and registered user. See Figure 12.5.
Before you get too excited, you need to know that I'm not actually going to build every one of these pieces in the application. Rather, I'll stub out many of these options with placeholders. I've gone through each of these descriptions to give you an idea of some of the standard functionality you might want to include in each of your applications. I have built a menu with hooks for each of those functions already built in. I'll build the menu and a few simple forms in the next couple chapters, but that's all. The rest of the work, as they say, is left as an exercise to the reader.
If you're following along on your computer and are ready to start creating your own
![]() menu, I might suggest that you create a dummy
menu by using the Menu, Quick
menu, I might suggest that you create a dummy
menu by using the Menu, Quick
Menu option, and then modify the result as needed, instead of starting with a menu from scratch. If you want a menu that's already been baked and packaged, check out the project, named IT, and the menu, also named IT, in the Chapter 12A source code.
As an aside, I name the project, main menu, and top-level program of every application of mine "IT", so that the source code directory of each application contains the following files:
IT.PJX IT.PJT IT.PRG IT.MNX IT.MNT
There are a number of
different naming schemes around-and I don't like any of them. Some developers
call their top-level program "
MAIN.PRG MENU.PRG MAINMENU.PRG MENU1.PRG MAIN1.PRG MENUTOP.PRG MENUMAIN.PRG
Sure, you can determine which program is the top-level routine by looking in the project- that is, if the project files are still around. But I've further found the following project files in the same source code directory:
MAIN.PJX MAIN.PJT MENU.PJX MENU.PJT MAINMENU.PJX MAINMENU.PJT MENU1.PJX MENU1.PJT MAIN1.PJX MAIN1.PJT MENUTOP.PJX MENUTOP.PJT MENUMAIN.PJX MENUMAIN.PJT
Now what do you do? You have to examine the date/time stamps (hoping they're all correct), or open the files themselves.
The alternative is to use the acronym of the system as the name of the project and top-level program. I always forget the acronyms, and I sure don't like doing a lot of typing. Simply using "IT" clears away a lot of these issues, because no matter which application you are working on or running, you can enter:
modify project it
or
do it
and everyone is happy.
Running a menu
Now that you've got a menu (whether you built the menu yourself or just copied the one provided with the source code), you might be tempted to run it-and indeed you can. First you must generate it, and it's easiest to do that by opening the Menu Builder and then choosing the Menu, Generate command. The Menu Generator creates a program file, called IT.MPR, from the menu files (IT.MNX and IT.MNT). When you execute IT.MPR, Visual FoxPro will compile the program, create an object file called IT.MPX, and execute that. Thus, to run your menu once you've built and generated it, just issue the command:
do IT.MPR
You'll
see the Visual FoxPro menu replaced by your menu. Unfortunately, you'll also
see the
Command window return, along with any other windows that you had open at the
time.
Even worse, you can't get the VFP menu back-what do you do? Issue the command:
set sysmenu to default
Well, that solved the problem of the disappearing VFP menu, but you're still stuck with a fairly useless menu.
Building a main program and an Event handler to hold up the menu
Maybe the problem is that you have to write a program to run the menu! That could be it! Well, actually, it isn't. If you want, you could build a program called, say, ITBAD.PRG, with the following code:
�.* itbad.prg
�.* clean up a bit before we startclose all clear all
�.* run the menudo IT.MPR
If you've tried this, you've found that it doesn't work any better. The menu replaced the Visual FoxPro menu, but the Command window came back, and you're in the same place you were a minute ago.
Here's what's happening.
Think about a macro that you've assigned to a keyboard hotkey. You can think of the macro as a program, but it's not an executing program. It's merely sitting in memory, waiting for you to execute it. How do you execute it? By calling it from a keyboard hotkey or shortcut, like Ctrl+F12 or Alt+S. How did those keyboard shortcuts get set up? You ran some sort of program, possibly even from within the macro builder program, that set up the shortcuts. But the crux of the matter is that the macros aren't running-they're sitting around waiting for you to call them. This situation is called a "wait state" and your computer acts as an "interrupt handler"-it goes and does its thing until, well, until when? Until you press one of the keyboard shortcuts, interrupting the computer from whatever it's doing, and making it run the macro (program) assigned to your keyboard shortcut.
A Visual FoxPro menu is pretty much the same thing. When you ran your menu program, you in essence set up a series of hotkeys-available not only to the keyboard but also to the mouse-and that's it. Executing those hotkeys or mouse clicks will run the programs attached to them, just as executing the macro hotkey described in the previous paragraph will run the macro.
You basically painted a picture at the top of your computer screen and told Visual FoxPro to wait for certain mouse clicks or keyboard shortcuts. Once the picture was painted, control was returned to your regularly scheduled program-that is, Visual FoxPro-via the Command window. Only thing is, now you have a menu with different functionality. Sure, you can run the various forms, reports, and other programs from this new menu, but you can also do anything else you want, via the Command window-and so can your users!
What is needed here is a mechanism to "hold up the menu"-that is, to trap for the events that the menu will process, but keep away from Visual FoxPro's interactive environment, until the user chooses to quit the application. In other words, a "wait state" for menu commands has to be introduced to Visual FoxPro on top of the natural wait state provided by Windows.
In previous versions of FoxPro, the developer had to go through a number of gyrations to accomplish this. With Visual FoxPro, the simple READ EVENTS command is all that is needed.
Including this command after the command that executes the menu program will cause Visual FoxPro to process all of the keyboard and mouse events a user can produce. This is called an "event handler" and that's what it does-it handles all of the possible (computerrelated) events until it's told not to anymore.
The sister command CLEAR EVENTS is attached to the Exit menu option; it tells Visual FoxPro to terminate the event handler-or, in other words, to destroy the wait state and continue processing the program with the line of code that follows the READ EVENTS command.
Enhancing the main program
So now our top-level program, IT.PRG, looks something like this:
* IT.PRGclose all clear all do IT.MPR read events close all clear all
Though necessary, this isn't really a sufficient program. Here's the functionality that a top-level program really ought to contain:
1. 1. Save the current Visual FoxPro environment.
2. 2. Read in the application settings.
3. 3. Check the hardware and operating system environment.
4. 4. Set up the application's environment.
5. 5. Handle user login and set up security.
6. 6. Set up the user interface and run the main menu.
7. 7. Set up the event handler.
8. 8. Upon cancellation of the event handler, set everything back to the way it was.
9. 9. Shut down the application (and Visual FoxPro).
You could write a bunch of procedural code to do all this, and throw it in the top-level program. If you did, here's what it might look like:
�.* it.prg
* top level program
*
�.* set stuff up*
�.* talk is a special case
if set('talk') == 'ON'set talk off m.gcOldTalk = 'ON'
else m.gcOldTalk = 'OFF'endif
�.* save current environmentm.gcOldCent =
set('century')
m.gcOldDele = set('deleted')
m.gcOldEsca = set('escape')
m.gcOldExac = set('exact')
m.gcOldExcl = set('exclusive')
m.gcOldMult = set('multilocks')
m.gcOldProc = set('procedure')
m.gcOldRepr = set('reprocess')
m.gcOldSafe = set('safety')
m.gcOldStat = set('status bar')
m.gcOldHelp = set('help',1)
m.gcOldReso = sys(2005)
m.gcOldOnEr = on('error')
�.* clean out everythingrelease all except g*
close all
clear menu
clear popup
clear window
clear
�.* set up outside resources
�.* (stubbed out for this example)* set classlib to
('MYBASECLASSES')
* set help to ('MYHELP')
set procedure to ('MYPROC')
* set resource to ('MYRES')
�.* initialize various system attributes
�.* by reading in from outside the application
�.* (either an INI file or the Windows Registry)
�.* (GetRegValue is a function in MYPROC)m.glCanGoOn = .t.
m.gcNameSystem = GetRegValue('NameSystem')
m.gcVersion = GetRegValue('VersionSystem')
m.gcDefaultDataLocation = GetRegValue('DefaultDataLocation')
m.gnMinRAM = GetRegValue('MinRAM')
m.gnMinDiskSpace = GetRegValue('MinDiskSpace')
* make
sure the default data set exists and is goodif !DataIsGood(m.gcDefaultDataLocation)
m.glCanGoOn
= .f.
endif
�.* check the hardware and OS
�.* (each of these functions is in MYPROC)m.gnAvailRAM =
GetRAM()
if m.gnAvailRAM < m.gnMinRAMm.glCanGoOn = .f.
endif
m.gnAvailDiskSpace = GetDiskSpace()
if m.gnAvailDiskSpace < m.gnMinDiskSpacem.glCanGoOn = .f.endif
�.* initialize user login parmsm.gcNameUser = 'ADMIN'm.gcPassword = 'ADMIN'm.gcPermLevel = '00001'm.glLoginWasGood = .t.
* get user logindo form LOGIN if !m.glLoginWasGood
m.glCanGoOn = .f.endif
�.* set up On Error and On Escape values depending* on if user has developer-level permissionsif m.gcPermLevel = 'ADMIN'
on error do
DevError
set escape on
else on error do UserError set escape offon escape *endif
�.* define environmentset century onset deleted on set exact off set exclusive off set multilocks on set reprocess to 5set safety off*
�.* set up event handler*
�.* save old menu, run new oneif m.glCanGoOn
*** push
menu _MSYSMENUdo IT.MPR
read events
else
�. * something bad happened so can't run app
�.* (probably want to let the user know what)endif *
�.* clean up and close shop*
�.* upon termination, restore menu***pop menu _MSYSMENU to masterset sysmenu to default
�.* return environmentset century &gcOldCentset deleted &gcOldDeleset escape &gcOldEscaset exact &gcOldExacset exclusive &gcOldExclset multilocks &gcOldMultset procedure to &gcOldProcset reprocess to (m.gcOldRepr)set safety &gcOldSafe
set status bar &gcOldStat
if file(m.gcOldHelp)m.cTemp = ''' + gcOldHelp + '''set help to &cTemprele m.cTemp
endif if file(m.gcOldReso)
set resource to &gcOldResoendif on error &gcOldOnEr
�.* clean out everything elseclose all clear menu clear popupclear programclear window clear set talk &gcOldTalk
�.* from within VFP or from runtime
if version(2) = 0wait window nowait 'See ya later, alligator'clear memoryquit
else @2,0 say 'See ya later, alligator'clear memoryreturn
endif
* <EOF>
And here are the dummy calls in MYPROC:
�.* MYPROC.PRG
�.function GetRegValuelpara m.tcDummy
�.* placeholder for sample function in IT.PRGreturn .t.
�.function GetRAM lpara m.tcDummy
�.* placeholder for sample function in IT.PRGreturn .t.
�.function GetDiskSpacelpara m.tcDummy
�.* placeholder for sample function in IT.PRGreturn .t.
�.function DataIsGood lpara m.tcDummy
�.* placeholder for sample function in IT.PRGreturn .t.
�.procedure DevError
�.* placeholder for sample proc call in IT.PRGreturn .t.
�.procedure UserError
�.* placeholder for sample proc call in IT.PRGreturn .t.
Most of this code is pretty straightforward, but a couple of things bear mentioning. First of all, when I'm done testing an application, I want to return to the Visual FoxPro environment from which I came. In other words, if I started in the interactive environment, I want to return there, but if I started from a Windows executable, I want to return to Windows. In the code for the exit, I check the VERSION() function, and either return to VFP or quit.
Another thing is that I typically modify a few menu options depending on which user is logged onto the system. I'll include a Developer menu pad that is active when a user with a developer permission level logs in. (Actually, it's always there, and I remove it if a non-developer logs in.) I'll also remove the system administrator menu options in the Tools menu if a non-administrator logs in. Here's how.
Suppose you've decided on a permission-level structure where a developer has a permission level of "00000", an administrator has a permission level of "00001", and so on. Open the Menu Builder, and then open the General Options dialog by selecting the View, General Options menu option. Select the Cleanup check box and click OK to open the editing window. Enter the following code into the editing window:
If !(m.gcPermLevel == '00000')
Release pad Developer of _MSYSMENUEndif
If !inlist( m.gcPermLevel, '00000', '00001')
Release bar 3 of Tools
Release bar 4 of Tools
Release bar 5 of Tools
Release bar 6 of Tools Endif
Now save the cleanup code and regenerate your menu. This code will be included at the end of the menu program so that when the menu has finished running, the last thing the menu program does is remove those pads and bars that were previously defined. If you run this program on a really, really slow computer, you can actually see the entire menu being built, and then the Developer menu pad being removed.
The next-to-last step is to put this top-level program and the menu into a project. As you might remember from Chapter 6 on the Project Manager, once you identify the top-level program, you can execute the Build option and have the Project Manager automatically find all of the files. Thus, create a project called IT, add the top-level program, IT.PRG, to the Programs topic in the Code tab, and click the Build button. The IT menu will automatically be included (and regenerated as well).
The last step, then, is to run the program. Because the top-level program is called IT, you can simply execute the command:
do it
And your application will run.
Notice that there isn't any application-specific code in this program, and precious little in the menu either. If you decide to use a File, Open paradigm instead of hard-coding menu options, you might never touch your top-level program or your menu again!
Starting the move to OOP
While this procedural method for application startup works, there's a better way to do this. You can build a series of objects that handle all of these responsibilities-the environment, security, the event handler-and then call these objects. In the rest of this chapter, I'll show you how to move from this huge top-level program to an elegant calling routine that simply sets up the objects and lets them do all the work.
If you recall, at the beginning of the chapter I showed you a chunk of code like this:
*-- Set up the path so we can instantiate the application object
IF SetPath()
PUBLIC oApp
oApp = CREATEOBJECT('Tastrade')
IF TYPE('oApp') = 'O'
*-- Release all public vars, since their values were
*-- picked up by the Environment class
RELEASE gcOldDir, gcOldPath, gcOldClassLib
RELEASE gcOldTalk, gcOldEscape
oApp.Do()
ENDIF ENDIF
So far, I've done nothing that even remotely looks like this. Sure, you've seen the word "environment" a few times, but that's not really close. So how does this procedural menu code relate to this object-oriented style? Well, depending on your frame of mind, it's either a huge jump or just a short hop.
The application framework has a number of generic functions, right? I'm going to turn these functions into classes that belong to a generic application class library. The syntax will change, and the extensibility will expand greatly, but the conceptual jump is fairly straightforward. Each generic function will correspond to a class or a method in the application class library.
Take the issue of saving the environment settings-it's always polite to return what you've borrowed in the same condition. And because the application could be considered to be "borrowing" the Visual FoxPro environment while it's running, it would be nice to return the environment from whence it came. And you could do this in one of two ways.
You see, there are well over 100 SET commands in Visual FoxPro-close to 200 if you include all of the permutations and parameters that come with the SET function. Many of these are used for backward-compatibility or in extremely unusual circumstances. So while you might save the current status of every one of them, and then set each one to the way you want it, that's going to take a few seconds during application startup, and that's a few seconds too many. Instead, being pragmatic, most developers have a "Top 10" list of SET functions that they use. The trouble is, this list gradually expands over time as you run into new situations or as the language grows.
This is a typical example of having 50 versions of the SAVE_SET procedure at various installations and eventually running into maintenance hell. Thus, it's a classic place where you might use this object-oriented stuff instead. Because there's nothing to "see" when you save the current settings and later restore them, it's also a classic "non-visual class" example. I'll show you how to build this class-and how to implement it in the application.
A quick review of non-visual classes
First, remember that you can think of a non-visual class as simply a set of procedures and initialized variables. Next, remember that a class library is a table-with an extension of .VCX-that contains one or more records. And because a class library contains one or more classes, a class is made up of one or more of these records in the .VCX. Visual classes generally have multiple objects, and each of these objects can have many properties and methods-and so each object requires its own record. However, unlike visual classes, non-visual classes are rather compact. All of the properties and methods in a non-visual class are contained in the same record. Therefore, a non-visual class consists, in general, of a single record in a .VCX. And thus, a non-visual class library can contain multiple non-visual classes.
Creating a non-visual class
Okay, that's a lot of words and theory-how about a real-life example? I'm going to create a class library called BASEAPP.VCX, and it will contain several non-visual classes. The class I'm concerned with now will handle our environment saving and restoring, and I'll call it ENV. (Remember, though, that the class library BASEAPP.VCX will also contain other classes, which I'll build later in this chapter.) This class will contain a number of methods (they're just subroutines, right?) that perform the actions of saving the original SETs, changing the SET variables to the values we need for our app, and then, when the app is finished, changing them back.
These methods will be called SaveSets(), DoSets(), and RestoreSets(). Furthermore, I'll need a "place" to store the SETs settings that are captured via SaveSets(). These will be properties of ENV (they're just variables, right?) named "cOldCent", "cOldSafe", and so on. If you look at IT.PRG above, those look familiar, don't they? Thus, the ENV non-visual class will consist of a single record in BASEAPP.VCX, and that record will have fields that hold the various methods and properties of ENV.
Here's how to create the class library BASEAPP.VCX and then create ENV. You can
![]() find the source code to these steps in the
Chapter 12B files for this book.
find the source code to these steps in the
Chapter 12B files for this book.
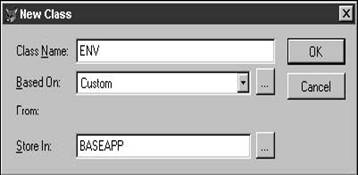
1. 1. Create a new class by issuing the CREATE CLASS command, or by selecting the File, New, Class menu option, or by selecting the Classes node in the Project Manager and clicking the New button. The New Class dialog appears as shown in Figure 12.6.
2. 2. Enter the following:
. . Class Name: ENV
. . Based On: hwcustom
. . Store In: BASEAPP.VCX
Note that if BASEAPP.VCX does not exist, it will be created for you.
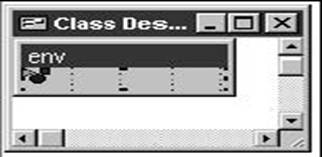
3. The Class Designer will appear and the object in the Class Designer window will be a funny-looking little gizmo with three shapes of various colors as shown in Figure
1. 12.7. This indicates that it's a non-visual class, which just means we're not going to drag controls like command buttons and page frames onto the class.
2. 4. Open the Properties window:
. . Select the View, Properties menu option or select the Properties menu option from the shortcut menu that appears when you right-click on the object in the Class Designer window.
. . Select the Methods tab, and notice that there are only the default methods for a custom class.
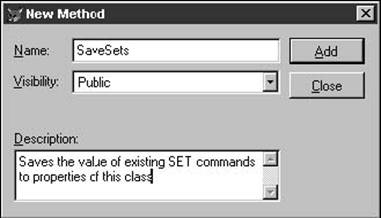
5. Add the SaveSets() method to the ENV class:
. . Select the Class, New Method menu option.
. . Give it a name of "SaveSets."
. . Add a description like "Saves existing SETs" as shown in Figure 12.8.
. . Click Add.
. . Click Close. (In previous versions of Visual FoxPro, you had to choose the Class, New Method menu option each time you wanted to add a property or method, which was quite a nuisance; now the dialogs stay open until you're done.)
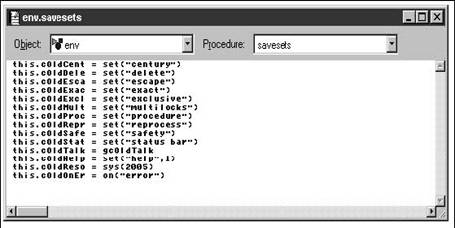
6. Create the code for the method by opening the Code window as shown in Figure 12.9:
. . Select the Code menu option from the shortcut menu that appears when you right-click on the object in the Class Designer window, or select the Methods tab in the Properties window and double-click on the SaveSets() method.
. . Enter the following code:
this.cOldCent
= set('century')
this.cOldDele = set('delete')
this.cOldEsca = set('escape')
this.cOldExac = set('exact')
this.cOldExcl = set('exclusive')
this.cOldMult = set('multilocks')
this.cOldProc = set('procedure')
this.cOldRepr = set('reprocess')
this.cOldSafe = set('safety')
this.cOldStat = set('status bar')
this.cOldTalk = gcOldTalk
this.cOldHelp = set('help',1)
this.cOldReso = sys(2005)
this.cOldOnEr = on('error')
Now you've got a method that grabs the current settings and stores them to-wait, where does it store them? What are these "this.cOldCent" and "this.cOldClas" variables? Well, actually, they're not "variables"; they're properties of this class. Remember that a property is just a variable that is stored along with the methods of the class. So just as you can create a variable inside a subroutine, you can create a property that's part of a class. And we're going to create our own properties-named "cOldCent" and "cOldClas"-to hold the values of the various settings. The "this" prefix in front of each property just tells the method that you're assigning values to the properties with these names that belong to this class, not some other class that also has a "cOldCent" property. So the next step is to create these properties.
7. Create properties for each of the settings we're going to store:
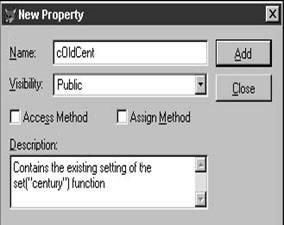
. . Select the Class, New Property menu option to open the New Property window as shown in Figure 12.10.
. . Give it a name of cOldCent.
. . Add a description like "Contains the existing setting of the set("century") function".
. . Click Add.
. . Repeat this process for all the other properties. When you've finished the last one, click Add, then Close.
. . Initialize each property's value to be character as shown in Figure 12.11.
8. Add the DoSets() and RestoreSets() methods in the same way you added SaveSets().
These methods use the existing properties but don't require new properties. The code for the DoSets() method is:
set
century on
set escape on
set clock status
set deleted on
set exact off
set exclusive off
set multilocks on
set reprocess to 5
set safety off
The code for the RestoreSets() method is:
�.* use 'u' because you may be storing either
�.* character or numeric values to luTemp
�.* in your own routinelocal luTemp
luTemp
= this.cOldCent
set century &luTemp
luTemp
= this.cOldClas
set classlib to &luTemp
luTemp
= this.cOldDele
set deleted &luTemp
luTemp
= this.cOldEsca
set escape &luTemp
luTemp
= this.cOldExac
set exact &luTemp
luTemp
= this.cOldExcl
set exclusive &luTemp
luTemp
= this.cOldMult
set multilocks &luTemp
luTemp
= this.cOldProc
set procedure to &luTemp
luTemp
= this.cOldRepr
set reprocess to (luTemp)
luTemp
= this.cOldSafe
set safety &luTemp
luTemp =
this.cOldStat
set status bar &luTemp
luTemp
= this.cOldHelp
if !empty( luTemp )
set help to &luTemp
endif
luTemp
= this.cOldReso
if !empty( luTemp )
set resource to &luTemp
endif
luTemp
= this.cOldOnEr
on error (luTemp)
luTemp
= this.cOldTalk
set talk &luTemp
This seems like a lot of work, but this is the only time you'll ever have to do it.
Implementing a non-visual class
Now that you've got your ENV class, how do you meld it with the application? First, you need to rip out the code in IT.PRG that used to do this, and then you need to have Visual FoxPro use this class to do the functions instead. Ripping the code out of IT.PRG isn't technically or conceptually tough, of course-it's the other part. You're going to perform a function that you might think of as opening a procedure or subroutine library in order to access the ENV class, but the syntax will be a little different.
Now that you've got a class called ENV, you can create an object from this class and then refer to the object and its properties and methods. Here's the code (and you can run this right from the Command window, after you save and close the BASEAPP class library):
set classlib to BASEAPP oEnv = createobject('ENV')
The first command tells Visual FoxPro that you're interested in accessing the class library named BASEAPP. The second command looks inside BASEAPP and creates an object called oEnv. You can think of this as a memory variable-and in fact, you could put "oEnv" in the Debug Watch window and see what shows up when you run the commands. Now that you've got this object instantiated (in other words, you've created an instance of the class and named that instance "oEnv", just as when you create a form from a visual class), you can access its properties and methods.
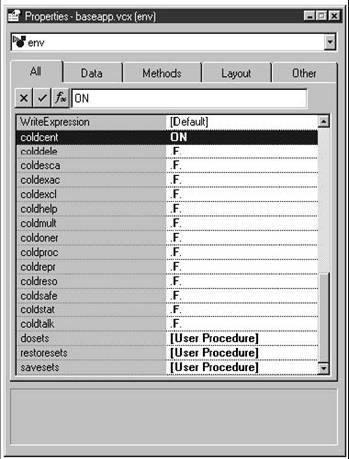
To determine the value of one of its properties, you could enter this in the left side of the Debug Watch window (without the question mark), but it's easier to simply enter it in the Command Window:
? oEnv.cOldCent
You'd see either .F. or ON as the result. Now this is sort of curious, isn't it? Why? Because the value of set("century") is either ON or OFF, not .T. or .F., right?
All you're doing now is evaluating the value of the property, and if you didn't initialize the property as described at the end of step 8 earlier, its value will be its default-which is always a logical false. Thus, if you were going to compare oEnv.cOldCent to ON, you'd get a Data Type Mismatch error. Of course, you'll want to consider carefully how you initialize your properties. If you use a default value that might not be accurate, you could cause worse problems than a Data Type Mismatch error.
Similarly, to execute one of the objects' methods, call it like any other function:
oEnv.SaveSets()
Don't be worried if the method chokes on the line where it attempts to save the setting of a global memory variable, gcOldTalk. This memory variable wasn't created in this interactive session, but it will be in your program. Just ignore the error message and continue.
After you execute the SaveSets() method, each of the cOldXXXX properties of oEnv have been set to their current values in your Visual FoxPro environment. If you want to examine them, you can simply enter the following code in the Command window like before:
? oEnv.cOldMult
You could even change the values of those properties interactively, like so:
oEnv.cOldMult = '3.14159'
This is, of course, nonsense; this has just entered a ridiculous value in the cOldMult property. I just want you to get used to accessing an object's properties and methods.
Now that you've got this environment class and know how to create an ENV object, it's time to replace some of that procedural code in IT.PRG with calls to the various methods of oEnv-after, of course, you instantiate oEnv. Here's what IT.PRG looks like at this stage. I'm not done with this example, but at this point you've turned the corner from procedural programming to implementing OOP in your applications:
�.* it.prg
* top level program
*
�.* set stuff up*
�.* talk is a special case
if set('talk') == 'ON'
set talk off
m.gcOldTalk = 'ON'
else m.gcOldTalk = 'OFF'endif
�.* clean out everythingrelease all except g*close all clear menu clear popupclear window clear
�.* set up outside resourcesset classlib to BASEAPP.VCX
oEnv = createobject('ENV')
�.* (stubbed out for this example)* set help to
('MYHELP')
set procedure to ('MYPROC')
* set resource to ('MYRES')
�.* save current environmentoEnv.SaveSets()
�.* define environmentoEnv.DoSets()
�.* initialize various system attributes
�.* by reading in from outside the application
�.* (either an .INI file or the Windows Registry)
�.* (GetRegValue is a function in MYPROC)m.glCanGoOn = .t.
m.gcNameSystem = GetRegValue('NameSystem')
m.gcVersion = GetRegValue('VersionSystem')
m.gcDefaultDataLocation = GetRegValue('DefautlDataLocation')
m.gnMinRAM = GetRegValue('MinRAM')
m.gnMinDiskSpace = GetRegValue('MinDiskSpace')
* make
sure the default data set exists and is goodif
!DataIsGood(m.gcDefaultDataLocation)
m.glCanGoOn
= .f.
endif
�.* check the hardware and OS
�.* (each of these functions is in MYPROC)m.gnAvailRAM =
GetRAM()
if m.gnAvailRAM < m.gnMinRAM
m.glCanGoOn = .f.
endif
m.gnAvailDiskSpace = GetDiskSpace()
if m.gnAvailDiskSpace < m.gnMinDiskSpace
m.glCanGoOn = .f.endif
�.* initialize user login parmsm.gcNameUser = 'ADMIN'm.gcPassword = 'ADMIN'm.gcPermLevel = '00001'm.glLoginWasGood = .t.
* get user logindo form LOGIN if !m.glLoginWasGood
m.glCanGoOn = .f.endif *
�.* set up event handler*
�.* save old menu, run new oneif m.glCanGoOn
*** push
menu _MSYSMENUdo IT.MPR
read events
else
�. * something bad happened so can't run app
�.* (probably want to let the user know what)endif
�.*
�.* clean up and close shop*
�.* upon termination, restore menu***pop menu _MSYSMENU to masterset sysmenu to default
�.* return environmentoEnv.RestoreSets()
�.* clean out everything elseclose all clear menu clear popupclear programclear window clear if m.glTalkIsOn
�.set talk on endif
�.* from within VFP or from runtime
if version(2) = 0
wait window nowait 'See ya later, alligator'
clear memory
quitelse
@2,0 say 'See ya later, alligator'
clear memory
return
endif
* <EOF>
So what's the deal? This just looks more complex than our old IT.PRG, and certainly harder to track down and maintain, wouldn't you say? Well, here's the advantage. Suppose you just realized that you should be saving the setting of HOURS because some users have been messing with the setting of the clock and you need it to look just so in certain places.
In the olden days (about 10 paragraphs ago), you would have had to put another three lines in IT.PRG:
m.gcOldHour
= set('HOUR')
set hour to 12
set hour to &gcOldHour
That's not too bad, is it? But you'd then have to repeat these three lines of code in every copy of IT.PRG in every application. And, then, finally, supply a new copy of your executable containing this new IT.PRG.
Yes, I'm sure that's how you'd like to spend one of your Saturdays.
If the thought doesn't appeal to you, here's the OOP way. First, you'd modify the ENV class by adding a new property, nOldHour. Then you'd change the SaveSets(), DoSets(), and RestoreSets() methods and include the above lines in the appropriate places. (This is left as an exercise to the reader. Don't you just love it when you see this line?)
And that's it. The next time you run the app with this class, the HOURS setting is automatically handled. Of course, you have to include the new .VCX with your app, but again, it's just one change. And if you're still unsure, note that I also haven't touched on the possibility of subclassing the methods in ENV, for example. I'll get to that later.
Making setting up and cleaning up more automatic
You've noticed that I've basically substituted a function call to a class method in place of a bunch of in-line code. I could have done the same thing with a procedure call, of course. And the same benefits of being able to make a change in one place would also have accrued. However, the potential benefits of subclassing notwithstanding, there's yet another benefit.
In the ENV class, I created three separate methods: SaveSets(), DoSets(), and RestoreSets(). But anyone who uses this class has to remember to call these methods. In this particular case it isn't a big deal, because you're probably only going to call each of them once, but it's pretty easy to imagine some examples of twin "setting up" and "shutting down" functions that would be called all the time. Two that come to mind immediately: opening and closing a table, for example, or using an ActiveX control.
You can put code in the Init() and Destroy() methods of a class, and that code will automatically be fired when the class is instantiated and when its object reference is released. So, instead of having a separate SaveSets() method, put that code in the Init() method, and then move the RestoreSets() code to the Destroy() of the ENV class. Then you could do this instead:
set classlib to BASEAPP.VCX
oEnv = createobject('ENV')
oEnv.DoSets()
*
* bunch of code here, including the event handler* release oEnv
When the ENV object is instantiated, the SaveSets() code will be automatically executed and those values stored to the properties of the ENV object. They will then hang around until you get rid of the oEnv object reference, which, again, is just a memory variable. So the RELEASE oEnv command will "un-instantiate" the ENV object and also fire the code in the Destroy()-the RestoreSets() code. An even more sophisticated method is to leave SaveSets() and RestoreSets() alone, but to call those methods from the Init() and Destroy()-so you can call them from other places in your application if needed.
I've still got a separate DoSets() method, because I might want to call that from elsewhere in the application.
Structuring your class code this way makes it easier to manage and use, and once you get in the habit of doing so, you'll wonder why you spent so much time the old way.
Enhancing the non-visual class
![]() This business of setting
up classes is a lot to handle, considering that in the beginning of this
chapter, you hadn't started programming yet. It's a lot to absorb, and I almost
felt it was too much to handle in the same breath as working with menus, the
event
This business of setting
up classes is a lot to handle, considering that in the beginning of this
chapter, you hadn't started programming yet. It's a lot to absorb, and I almost
felt it was too much to handle in the same breath as working with menus, the
event
handler, and so on. But it's really not that bad when you take it a step at a time, is it? How about another shot at it. The source code in question is in the Chapter 12C directory.
You might have noticed that I've objectified just one small piece of the setup program. Shouldn't it all be handled the same way? Well, that's not going to be too tough, since I can either add to the existing methods or create new methods to handle other pieces. The important thing to remember is that the class library has to be opened as soon as possible, so that the internals can be accessed immediately.
What I'm going to do is create a second class, APP, that also resides in BASEAPP.VCX, and move more of the setup code into methods of that class. Here's what IT.PRG looks like now (you'll notice that I also ripped out the code that handles the menu and sets up the READ EVENTS loop; more on that in a minute):
�.* it.prg
�.* top level program
�.* set stuff up
�.* talk is a special case
if set('talk') == 'ON'
set talk off
m.gcOldTalk = 'ON'
else m.gcOldTalk = 'OFF'endif
�.* clean out everythingrelease all except g*close all clear
�.* set up outside resourcesset classlib to BASEAPP.VCX oEnv = createobject('ENV')oApp = createobject('APP')
�.* (stubbed out for this example)* set help to ('MYHELP')set procedure to ('MYPROC')* set resource to ('MYRES')
�.* call the ReadIni method or set up initial
�.* parms as necessaryoApp.ReadIni()
�.* define environmentoEnv.DoSets()
�.* get the useroApp.Login()
�.* set up event handleroApp.it()
�.* return environment
�.* this releases all objects in memoryrelease all except g*
* clean out everything elseclose all clear menu
clear popupclear programclear window clear set talk &gcOldTalk
�.* from within VFP or from runtime
if version(2) = 0
wait window nowait 'See ya later, alligator'
clear memory
quitelse
@2,0 say 'See ya later, alligator'
clear memory
return
endif
* <EOF>
Especially considering that most of this is comments, that's quite an improvement over the old version, isn't it? And the beauty is that because all of the "work" is being handled inside classes, changes that need to be made will automatically be inherited by the apps that rely on those classes.
I've really done nothing conceptually new over the initial creation of the ENV class and the first couple of methods-all I did was take advantage of the Init() and Destroy() methods of the ENV class and move the SaveSets() and RestoreSets() code there as I talked about in the previous section.
But what about this oApp object?
Creating an application-level non-visual class
If I was to leave IT.PRG as is, with a bunch of calls to the methods that belong to the oEnv object, it would feel kind of like I'm just half done. I talked about all of this object-oriented stuff to get the app ready, and then reverted back to procedural code in order to set up the menu and the event handler. What's wrong here? The APP class contains methods to set up the application itself. These methods will handle the menu and READ EVENTS mechanism, as well as other application-specific functions like opening data files, running a login script, handling the opening and manipulation of forms, and so on. I'm not going to cover all those pieces in this chapter, but I will address those that are needed to get the application running to the point that the menu is available.
Here are the steps required to add the APP class to BASEAPP.VCX:
1. 1. Create a new class by issuing the CREATE CLASS command, or selecting the File, New, Class menu option or selecting the Classes node in the Project Manager and clicking the New button.
2. 2. Enter the following in the New Class dialog box:
. . Class Name: APP
. . Based On: hwcustom
. . Store In: BASEAPP.VCX
Note that this time, you're adding the class to BASEAPP.VCX, which already exists, so click the ellipsis button beside the Store In text box, as shown in Figure 12.12. The Class Designer will appear and our funny-looking, three-color friend will appear in the Class Designer window.

At this point, it's time to add methods and properties to the class. I'm going to add seven custom methods and use one existing method to store code as well. Here they are (I'll explain how they were created once I've laid them all out):
oApp.Init()
this.lCanGoOn = .t.
oApp.readini()
�.* initialize various system attributes
�.* by reading in from outside the application
�.* (either an .INI file or the Windows
Registry)This.cNameSystem = This.GetRegValue('NameSystem')
This.cVersion = This.GetRegValue('VersionSystem')
This.cDefaultDataLocation = This.GetRegValue('DefaultDataLocation')
This.nMinRAM = This.GetRegValue('MinRAM')
This.nMinDiskSpace = This.GetRegValue('MinDiskSpace')
�.* make sure the default data set exists and is good
�.if !This.DataIsGood(This.cDefaultDataLocation)
* in real system, we'd set this flag if the test failed
�.* This.lCanGoOn = .f.endif
�.* check the hardware and OS
�.* (each of these functions is in MYPROC)This.nAvailRAM =
This.GetRAM()
if This.nAvailRAM < This.nMinRAM
�. * in real system, we'd set this flag if the test failed
�.* This.lCanGoOn = .f.
endif
This.nAvailDiskSpace = This.GetDiskSpace()
if This.nAvailDiskSpace < This.nMinDiskSpace
�.* in real system, we'd set this flag if the test failed
�.* This.lCanGoOn = .f.
endif
oApp.login()
�.* initialize user login parmsThis.cNameUser = 'ADMIN' This.cPassword = 'ADMIN' This.cPermLevel = '00001' m.llLoginWasGood = .t.
�.* get user login
�.* user login returns true or falsedo form LOGIN to m.llLoginWasGoodif !m.llLoginWasGood
This.lCanGoOn = .f. endif
oApp.it()
* save old menu, run new one
if This.lCanGoOn push menu _MSYSMENUdo IT.MPR
read events else
�. * something bad happened so can't run app
�.* (probably want to let the user know what)endif *
�.* clean up and close shop*
�.* upon termination, restore menupop menu _MSYSMENU to masterset sysmenu to default
* these methods are placeholders
oApp.GetRegValue()
lpara m.tcDummyreturn .t.
oApp.GetDiskSpace()
lpara m.tcDummyreturn .t.
oApp.GetRAM()
lpara m.tcDummyreturn .t.
oApp.DataIsGood()
lpara m.tcDummyreturn .t.
As you read through these methods, you can see how they tie to the procedural code that made up IT.PRG. Remember that the Init() event is automatically fired when the oApp object is instantiated, so it's a good time to set the value of the lCanGoOn property that indicates whether or not various tests during set up are passed.
The ReadIni() method is moved into the App class so it can be called from anywhere in the app, and can also be subclassed should you need a different way to access an .INI file (such as if you wanted to read values from the Windows Registry). Similarly, the Login() method, which gets the username and password from the user, can also be called from anywhere in the app, and can also be subclassed if you wanted to use a different login screen, or if you wanted to bypass a login screen completely-if your app didn't need security, or if you read login information from the operating system.
Both of these methods have places to set oApp.lCanGoOn to False so that the app terminates before trying to set up the event handler.
The It() method (you knew I was going to call it that, didn't you?) is called from the heart of IT.PRG, and is used to set up the menu and run the READ EVENTS command.
You can also see a number of examples of calling methods from various places in the application, as well as referencing the values of and setting the values of properties of various objects. One of the most common errors when moving into object-oriented programming is forgetting the object! It's a rare programmer indeed that doesn't still forget the reference to "This" preceding the name of a property in the APP class.
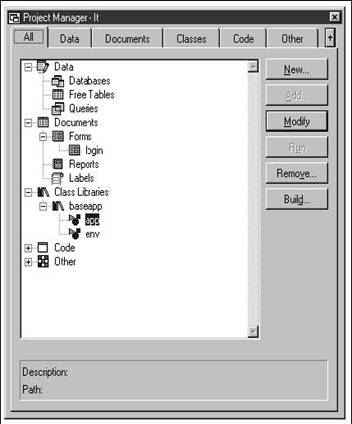
Before I go on, I want to take a step back and review how APP and ENV and IT.PRG all fit into an application. If you're working with the Project Manager, you should be creating and modifying your programs, menus, and classes there as shown in Figure 12.13. As a result, the files will automatically be added as they are created. If you issue commands from the Command window, the components will be added to the project when the application runs.
This question might come up: Why are Login() and ReadIni() part of the APP class, instead of the ENV class? Good question, and the answer is: "Because I said so." In other words, there isn't any hard and fast rule about how to create classes and what to put where, any more than there were a set of rules handed down from high regarding the construction of procedures. Of course, this doesn't mean you should create classes and randomly populate them; leave that for the amateurs. The reasoning I'm using about "what to put where" is along the lines of "where does it most naturally fit?" The Login and ReadIni processes, to me, are really more application-specific than environment-specific. You might choose differently-all applications will have a name and a data location, while it's certainly feasible to conceive of an app that doesn't have a requirement for a login process.
Some developers don't like the idea of an "all-encompassing" application-level object, preferring to create a number of smaller "service" objects. One object would be responsible for data handling, another for managing forms, a third for user login and permission handling, and so on. It's really up to you to decide how you want to do it. Don't worry if you spend a lot of time creating and organizing your set of objects, only to find out you don't like how they ended up, and you have to start all over again-most developers find out they don't like their first pass.
This is a good place to bring up the idea of subclassing the APP class. What if you had an application that had special requirements for, say, logging in? How would you handle that? There are a couple of different approaches.
One would be to subclass the entire APP class, perhaps calling it APPX, and putting it in its own .VCX that belongs just to this application. Remember, BASEAPP.VCX is a general-purpose class library that will go in the COMMON directory-it's just in the current directory in these examples so it's easier for you to work with. Then we'd handle the special situations in the subclass APPX, instead of adding to the APP class. Because you're subclassing APP, any changes you have to make to other parts of the class are still reflected in the APPX class, of course. However, the downside here is that you're essentially duplicating the entire APP class, which can be somewhat of a resource hog.
Another way would be to keep APP as it stands and simply override the Login class. In this situation, you'd do the same for your own classes as you do for the Visual FoxPro base classes: You subclass your own base classes, and then work with those in your application. This can be useful if you need to override or otherwise modify your base classes a lot, but it can be a lot of overhead if you don't need to do so that often. And if you find yourself modifying your own base classes a lot, perhaps that's a signal that you need to redesign them.
|
Politica de confidentialitate | Termeni si conditii de utilizare |

Vizualizari: 1275
Importanta: ![]()
Termeni si conditii de utilizare | Contact
© SCRIGROUP 2026 . All rights reserved