| CATEGORII DOCUMENTE |
| Asp | Autocad | C | Dot net | Excel | Fox pro | Html | Java |
| Linux | Mathcad | Photoshop | Php | Sql | Visual studio | Windows | Xml |
Your First LAN Application:
Building Upon Your Forms
So now you've got not only a menu but also a set of classes for forms and controls, and even a couple of forms based on those classes. In this chapter, I'm going to show you how to integrate those simple forms with the menu and add toolbars. Then I'll show you how to create generic functions for common tasks like Add() and Save(), and place those into your classes. This chapter is where it gets really good, and you start to see the power and flexibility of object-oriented programming.
This chapter has two parts to it. In the first part I'll show you how to make your forms, menus and toolbars all work in concert. Instead of keeping redundant copies of functions in various places, you'll learn how to consolidate code in a generic method. Once you've gotten comfortable with that, it'll be time to enhance your form classes with generic method calls-the classic "write once, use many" style of programming.
Enhancing your form class with toolbars and menus
There's a bit of housekeeping to do before adding toolbars and menus; as you add these components to your application, you'll find you don't want to keep a bunch of files around willy-nilly. You already used the Project Manager in the previous chapter to build your menu- now it's time to resurrect the Project Manager to enhance the menu as well as add more components to the application.
At this point, we'll be working with the code in the CH14A directory of this book's
• source code files.
Putting it all into a project
If your various files are scattered here and there, you'll probably want to create a new directory and copy all of the files there. Then open the project (or create one, if you didn't bother with that in the last chapter) and rebuild it. You'll most likely find that it's a lot easier to modify a class definition by clicking its name in the Classes tab than to find the Command window (it's around here, somewhere, I just saw it a second ago), issue a command, select the right class, and so on.
It's now time to move the code from the Click() methods in the various buttons to generic methods in the form.
Creating a form with its own methods
First you need to modify your form base class and add methods like Next() and Save() to it. Then you're going to add menu options to the menu that also fired those methods, and build a new form from your new form base class. Here's how:
1. Modify hwfrmMaint of HWCTRL62.
. . Issue the MODIFY CLASS command and select the hwfrmMaint class from HWCTRL62.VCX.
. . Select the Add Method menu option from the Class menu pad.
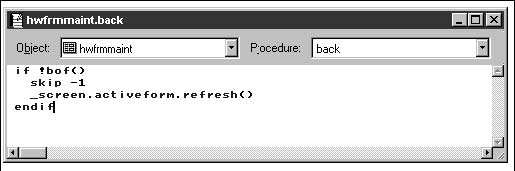
. . Enter "back" as the name of the method and an appropriate description in the New Method dialog box. See Figure 14.1.
. . Click the Add button, and you'll see that the dialog stays open but the contents of all of the controls are cleared. So this form performs a "Save and Add Another" operation. Add methods for Next, Find, List, Add, Delete, Save, and Undo.


2. Add code to the newly added methods, just as you did for the command buttons that the code is replacing.
. . Select the new method in the Properties window and double-click to open the Code window.
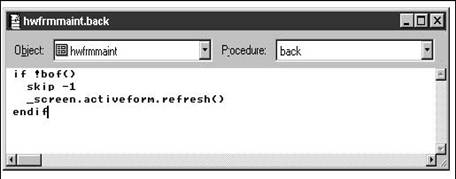
. . Enter code in the newly added methods as shown in Figure 14.2:
* hwfrmMaint.back()
if
!bof()
skip -1
_screen.activeform.refresh()
endif
* hwfrmMaint.hwcmdNext.click()
if
!eof()
skip
if eof()
skip
-1
endif
_screen.activeform.refresh()
endif
�.* hwfrmMaint.find()messagebox('You have chosen the Find
method')
�.* hwfrmMaint.list()messagebox('You have chosen the List
method')
�.* hwfrmMaint.add()messagebox('You have chosen the Add
method')
�.* hwfrmMaint.delete()messagebox('You have chosen the
Delete method')
�.* hwfrmMaint.save()=tableupdate()
_screen.activeform.refresh()
�.* hwfrmMaint.undo()=tablerevert()
_screen.activeform.refresh()
. When finished, save the class by using the File, Save menu option.
3. Create menu options for each method.
. . Make a copy of the IT menu from the previous chapter if you don't already have one.
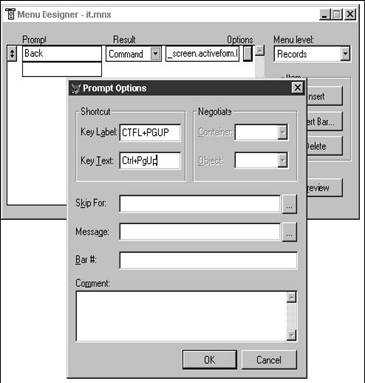
. . Add the following commands to the corresponding menu options as shown in Figure 14.3:
Prompt:
Back
Result: Command
_screen.activeform.back()
Option, Shortcut, Key Label: CTRL+PGUP
Option, Shortcut, Key Text: Ctrl+PgUp
Prompt:
Next
Result: Command
_screen.activeform.next()
Option, Shortcut, Key Label: CTRL+PGDN
Option, Shortcut, Key Text: Ctrl+PgDn
Prompt:
Find
Result: Command
_screen.activeform.find()
Option, Shortcut, Key Label: CTRL+F
Option, Shortcut, Key Text: Ctrl+F
Prompt:
List
Result: Command
_screen.activeform.list()
Option, Shortcut, Key Label: CTRL+L
Option, Shortcut, Key Text: Ctrl+L
Prompt:
Add
Result: Command
_screen.activeform.add()
Option, Shortcut, Key Label: CTRL+A
Option, Shortcut, Key Text: Ctrl+A
Prompt:
Delete
Result: Command
_screen.activeform.delete()
(No shortcut for delete!)
Prompt:
Save
Result: Command
_screen.activeform.save()
Option, Shortcut, Key Label: CTRL+S
Option, Shortcut, Key Text: Ctrl+S
Prompt:
Undo
Result: Command
_screen.activeform.undo()
Option, Shortcut, Key Label: CTRL+R
Option, Shortcut, Key Text: Ctrl+R
. Save the menu by using the File, Save command.
Note that now this same menu can be used for every form with a Next() method. There will be a bit of trickery involved in making sure that this menu option is okay to use on all forms, but that will come later.
Creating a new form based on the new form class
Now that you've got the new form class ready as well as the updated menu, it's time to build a new version of the Order Maintenance form.
1. Modify hwfrmMaint of HWCTRL62. Don't forget to select the hwfrmMaint class as your template class and to register your HWCTRL62 class library.
. . Select the Tools, Options menu option.
. . Select the Form tab.
. . Select the HWCTRL62 class library and the hwfrmMaint class as the Form Template Class (in the bottom half of the Forms tab).
. . Select the Control tab.
. . Add HWCTRL62.VCX by clicking the Add button.
. . You can add your control class and Save As Default, and then set your Form Template class and click OK so that you don't use this class as your template for all new forms.

2. Create a new form with the CREATE FORM ORD command (or select the File, New, Form menu option).
There's actually a quicker way to create a form from a specific base

![]() class, if you
know the name of the class and the class library it's in. (I just didn't bring
it up in the last section because there's only so much I can cover in one
sitting.) Use this command:
class, if you
know the name of the class and the class library it's in. (I just didn't bring
it up in the last section because there's only so much I can cover in one
sitting.) Use this command:
create form ORD as hwfrmMaint from HWCTRL62
You can see that this command uses the class hwfrmMaint from the library HWCTRL62.
3. The Form Designer appears with the caption ORD in the window title bar.
Again, notice that you have a form with a bunch of command buttons and a combo box. If you open the Properties window, you'll see several new methods in the bottom of the Methods tab: Back(), Next(), and so on. However, upon opening up any of the methods, you won't find any code in them. Why? Because the code is in the class definition-not in the forms created from the class.
Continue creating the rest of the form as in the previous example. Why do you have to do this again, instead of just reusing that form? Because I'm the teacher and if you don't do what I say, you'll stay after school for a month! Well, that and also because this form is using a new base class definition.
1. 4. Change the caption of the form to "Order Maintenance."
2. 5. Create a data environment for the form.
. . Select Data Environment from the Form Designer's shortcut menu or select the View, Data Environment menu option.
. . Select the Add Table menu option from the data environment's shortcut menu or the Data Environment menu pad.
. . Select the CUST table.
1. 6. Add fields to the form. You could do this the hard way, by adding them one at a time and then setting the control source. Or you could do it the easy way-by opening the old form, lassoing all of the controls, and copying them to the new form.
2. 7. Save and run the form. Remember that the command buttons in your Order Maintenance form should not contain any code. Why? Because you're creating this form from the hwfrmMaint class-and that's where the code is! The Click() methods in the command buttons-in the hwfrmMaint class-make calls to Next() and Save() methods that are part of the form class by using commands like "thisform.next()" and "thisform.save()".
Once you've successfully run the form, you're only half done. Now you'll want to build the project and run the form from the menu. Here's how:
1. Open the Menu Builder and add the following command to the Forms, Orders menu option:
do form ORD
1. 2. Build the project by clicking the Build button in the Project Manager window. Select the "Rebuild project" option button and make sure the "Recompile all files" check box is checked.
2. 3. Run the application by executing the DO IT command in the Command window. You'll be presented with the Login screen, and after you close that form, the main menu will appear. Select Forms, Orders, and the Order Maintenance form will appear.
But that's not all! Now that you've got your form up and running, you'll see that you can run the form with the command buttons on the form as you would expect. But you can also execute the same functionality by selecting menu commands from the Records menu, as shown in Figure 14.4.
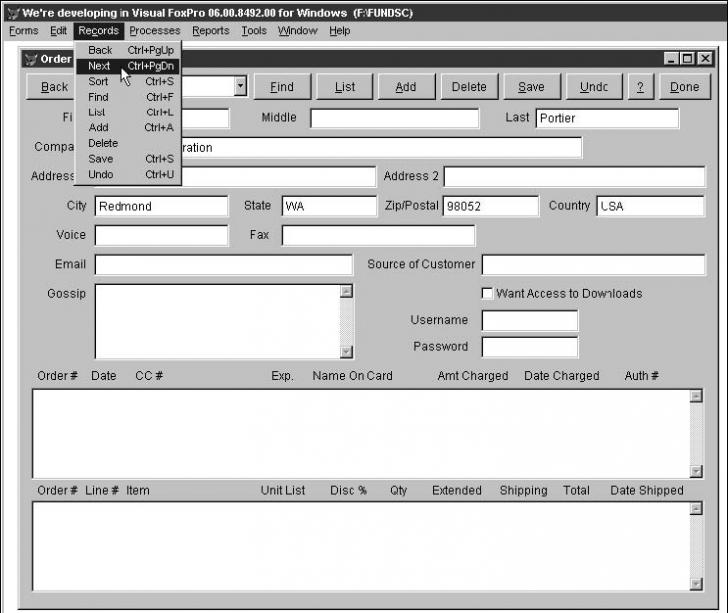
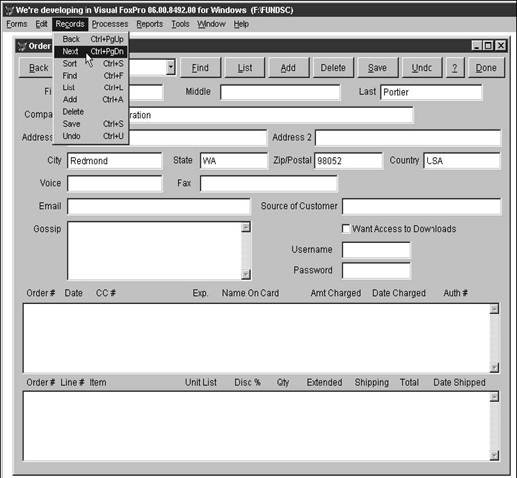
So try this out. You can open the form and then fire off the Back(), Next(), Save(), or Undo() methods, either from the menu or the command buttons. You can fire the dummy Find(), List(), Add(), or Delete() methods through those command buttons as well. And because there are slightly different methods in each, you can tell which action the user initiated-a menu choice or a button click.
Hey, did you hear what I just said? There are different methods in the Find menu option ("You have selected the Find menu option") and the Find command button ("You have pressed the Find command button"). This just doesn't feel right, does it? In fact, it feels downright stupid. This isn't the '80s where excess was considered a virtue.
You could-and should-slim down your code here. Do so by putting _screen.activeform.next() in the command button Click events as well. But remember: You don't open the form and put "_screen.activeform.next()" in the Click event of the command button on that form. Those methods should go in the Click event of your hwfrmMaint class, right? That'll get taken care of shortly.
Then, when you DO IT, you can issue the Forms, Orders command to open the Order Maintenance form. And then you can fire off Next and Previous-from the menu or from the command buttons. The bottom line here is that we're using different mechanisms-a menu option at one point, and a command button at another-to fire the same method in the form. And the method isn't really in the form; it's in the class from which this form was created. Getting the hang of it yet?
Adding a toolbar
It's time to add a toolbar, which is simply another mechanism from which you'll call the form's Next() method. Obviously, you'll create a toolbar, and reference the following command in the toolbar icon Click event:
_screen.activeform.next()
In this section, I'll show you how to have a toolbar open when a form is first opened,
• and keep that toolbar hanging around for as long as the form is open. We'll be working
with the CH14B directory of the source code for this book. You can think of a toolbar as a simple form that is available at the same time as the main form (as well as the menu). And just as you create a form class from which you create your forms, you're going to create a toolbar class from which you'll create your toolbars.
Remember that a form is made up of controls like command buttons and page frames, but instead of using Visual FoxPro's base classes of those controls, you have your own class library that contains your base classes of command buttons and pageframes. This class library is called HWCTRL62.VCX, and the base classes are called hwcmd, hwpgf, and so on. When you created hwfrmMaint, you used your form's base class, hwfrm, as a start, and added some of your own control base classes.
You can think of a toolbar class in the same way as your hwfrmMaint class: It's a form made up of two controls (an empty toolbar and a toolbar button), but these controls come from your own base classes, not straight from Visual FoxPro. Obviously, you're going to need to create these new controls to be used for your toolbar base class. You're going to add both of these controls to your HWCTRL62.VCX library as their own classes, and then create a toolbar class library using those controls.
You could break out your toolbars into a separate toolbar class library, which would eventually contain several toolbars that you would use for different purposes-much like Visual FoxPro contains multiple toolbars for various purposes. Consider the Form Designer toolbar, the Report Writer toolbar, the Standard toolbar, and so on. For the time being, you're just going to put a Navigation toolbar class in your toolbar class library that affords the user the same abilities as the command buttons in the form and the menu options in the Record menu.
So here's what you'll end up with: HWCTRL62.VCX will contain three new classes, hwtbr (the empty toolbar) and hwtbrButton (a toolbar button). These classes will be used to create a third class, hwtbrNav (the navigation toolbar). This class will contain buttons for methods such as Next(), Back(), and Save(). You'll then use the hwtbrNav class to create a toolbar form just as you used hwfrmMaint to create ORD.SCX. Finally, you'll learn how to run the toolbar form at the same time that a regular form is run.
Creating new control classes in HWCTRL62
The first step toward having an integrated toolbar is to create three new classes that belong to HWCTRL62: a toolbar base class and a toolbar button base class are two. The toolbar is the shell-the box around the buttons-and the button is the definition for the actual buttons in the toolbar. You might be wondering what the third class is. I'll bet that you're probably going to want to have spacing between groups of buttons as well, just as you used separator bars in the menu to group certain menu options. You don't have to play fancy games to get this effect; you just place the Separator control between groups of buttons. You might decide not to subclass the Separator control yourself, but for consistency's sake, I'll do it here.
1. Create the toolbar class:
. . Issue the CREATE CLASS command or select the File, New, Class menu option.
�.. The New Class dialog appears. Enter the following information:
. . Class Name: hwtbr
. . Based On: select Toolbar
. . Store In: HWCTRL62.VCX
Remember that "hwtbr" will be a record in the HWCTRL62.VCX table. Using OOP terms, hwtbr is a class contained in the HWCTRL62 class library. (This will be the last time I go through this detail, I promise!) And again, you don't have to include the .VCX extension, but I did it here to make it clear what was getting stored in what.
. . The Class Designer appears with an empty toolbar in it. Note that, unlike other controls, you can't resize the toolbar in the Class Designer. This is because toolbars are auto-sized to fit the controls and docking position.
. Make changes to the control as you desire.
Remember, this toolbar will be the one from which all future toolbars are created. Thus, you'll make changes to this control that you want reflected in all of your toolbars. For the time being, you'll change the caption to "hwtbr" and leave the rest alone. The "hwtbr" caption will remind you that you're using your own toolbar class when creating toolbars so that you can avoid making a stupid error such as using Visual FoxPro's base toolbar when you meant to use your own. This trick has saved my bacon numerous times.
. . Save the class (with File, Save).
2. Create your toolbar button class:
. . Issue the CREATE CLASS command or select the File, New, Class menu option.
�.. The New Class dialog appears. Enter the following information:
. . Class Name: hwtbrButton
. . Based On: select Command Button
. . Store In: HWCTRL62.VCX
. . The Class Designer appears with an empty command button in it.
. . Make changes to the control as you desire.
This command button will be used as the template for all toolbar buttons. If you want big buttons, here's the place to make them big. If you want them to be ugly, well, beauty may be skin deep, but ugly goes straight to the class definition. I suggest you change the caption and size of the class as shown in Figure 14.5:
. . Caption: X
. . Height: 23
. . Width: 23

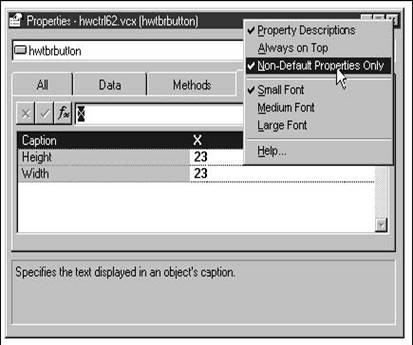
You'll notice I used an "X" for the caption instead of "hwtbrButton"-the toolbar buttons are small, so that long caption wouldn't fit well. Is there any code to attach to a toolbar button? Not yet.
By the way, how did I get just the properties I changed to show up in the Properties window? As Figure 14.5 shows, the context menu for the Properties window (displayed by right-clicking on the title bar) allows you to show just Non-Default Properties.
. Save the class (with File, Save). Here you've created yet another record in the HWCTRL62.VCX table.
3. Create your separator class:
. . Issue the CREATE CLASS command or select the File, New, Class menu option.
�.. The New Class dialog appears. Enter the following information:
. . Class Name: hwsepButton
. . Based On: select Separator
. . Store In: HWCTRL62.VCX
. . The Class Designer appears with a separator in it. Make changes to the control as you desire.
There's not much to change here, really. You might want to cruise the Properties window just to see what a "lightweight" control looks like-no layout properties and virtually no data properties, for example.
And now you've got your three toolbar-related classes. You could also put them into a different library-whatever makes the most sense to you.
Creating your base toolbar class
Now that you've got the components, it's time to create the navigation toolbar itself. Remember that you're going to create a toolbar class-not the actual toolbar-so you're still working in the Class Designer.
1. Create the toolbar outline:
. . Issue the CREATE CLASS command or select the File, New, Class menu option.
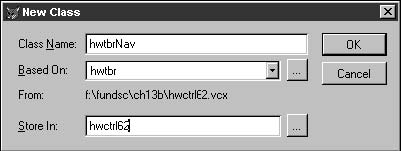
�.. The New Class dialog appears. Enter the following information:
. . Class Name: hwtbrNav
. . Based On: click the Based On ellipsis command button and select the hwtbr class from HWCTRL62.VCX, as shown in Figure 14.6.
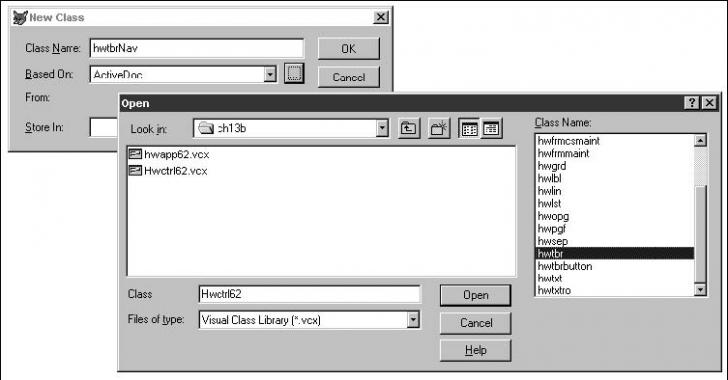
This step is always a tricky one for new programmers-because we're
creating a class from one of our classes, not from one of the Visual FoxPro
base classes that's listed in the drop-down listbox. Don't fret if it takes you a
few times to remember to display your own classes by using the ellipsis
command button-it happens to most people.
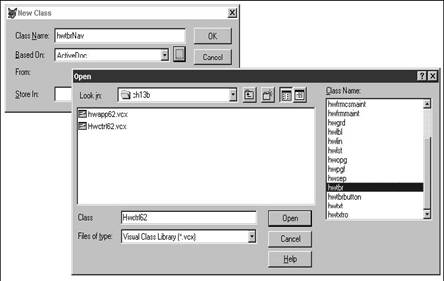
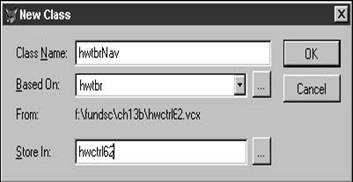
. Store In: HWCTRL62.VCX, as shown in Figure 14.7.
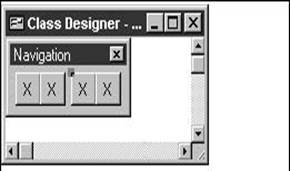
. . The Class Designer appears with an empty toolbar in it. The caption is "hwtbr" and serves as a reminder that that this toolbar came from your own hwtbr class.
. . Change the caption to "Navigation" with the Properties window.
2. Now you're going to add controls to this toolbar, just as we've added controls to a base form in the past. However, the dynamics of a toolbar are a little different than a form, so be prepared to goof around a little bit.
. . Open the Form Controls toolbar and click the View Classes button.
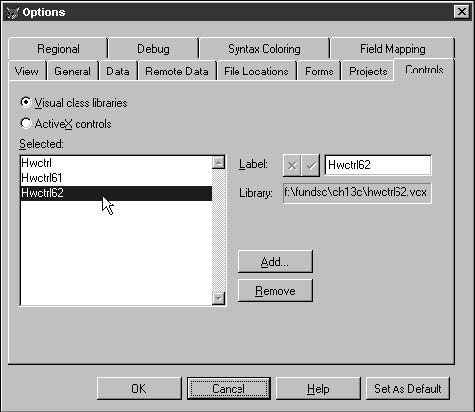
. . Select HWCTRL62 from the shortcut menu (if it's not there, you can click Add and select it at this point, but you really should register your HWCTRL62.VCX library via the Controls tab in the Options dialog). If you've been following along by placing the source code for each part of this chapter in a separate directory, you'll also want to be careful that you're working with the correct version of HWCTRL62. Look in the Controls tab of the Options dialog, and highlight the HWCTRL62 item in the listbox, as shown in Figure 14.8. Make sure the Library read-only text box shows the path of the correct version-not a library from a previous section.

You should see a toolbar that looks much like the one in Figure 14.9. If you don't see the new "toolbar" and "toolbar button" buttons, you're probably still referencing an earlier version. At this point, you're probably thinking that you might want to break out your controls into separate toolbars, or, at the very least, assign different images to the buttons for each of your own classes. It can get pretty confusing with several buttons all carrying the same image.


. Click (don't drag) the toolbar button icon in the Form Controls toolbar and then click in the toolbar.
3. Add separators between certain toolbar buttons:
. . Save the class now, before continuing work. Separators can be tricky at first, and it will be nice to have an intermediate step to come back to if you make a mistake.
. . Click the separator icon. The mouse pointer changes into a cross-hairs icon.
. . Click the button to the right of where you want the separator to be placed. In other words, if you've got five buttons and you want the separator to go between the fourth and fifth buttons, click on the fifth button with the cross-hairs.
After you've added your first separator, you should see something like Figure
14.10.


![]() If you put a separator on
the toolbar by mistake, you need to select it and then press the Delete key (on
the keyboard-remember the keyboard?).
If you put a separator on
the toolbar by mistake, you need to select it and then press the Delete key (on
the keyboard-remember the keyboard?).
It's tricky to select the separator control in the toolbar because it's so thin, so use the Object drop-down list box in the Properties window to select the separator, and then select the Class Designer window. I click on the title bar of the Class Designer window so that I don't accidentally select another control in the toolbar again. You'll see the sizing boxes appear for the separator control. Now you can press the Delete key.
. Add a total of eight buttons and two separators. You can use the button-lock icon in the Form Controls toolbar to lock the toolbar button, and then just click in your toolbar in the Class Designer eight times.
1. 4. Now it's time to goof around with the toolbar a bit. You'll want a bit of patience and a steady hand. You can select a separator and drag it between two buttons; the easiest way is to use the Object combo box in the Properties window to select the separator control. However, I find it's even easier to drag the buttons back and forth in the toolbar instead of trying to minutely maneuver the tiny separator.
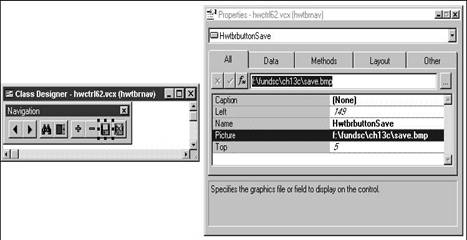
5. Having a toolbar with eight X's is not necessarily the most friendly user interface. You could change the captions to abbreviations like "N", "P", "F", "L", and so on, but because we're in Windows, let's do what the Windows folk do. You can change the Picture property of a button and attach the name of a graphic file whose image will appear on the button.
If you're playing ahead, you might have already tried to grab an image file (such as a .BMP) through the Picture property in the Properties window. And then you were disappointed when the image didn't display in the toolbar. Here's the trick: You'll also have to get rid of the caption for the button: Select the Caption property in the Properties window, and just press Delete. (Make sure you don't delete the button itself!) You can add your own .BMPs if you like, or use the ones included with this chapter's source code.
2. 6. Finally, be sure to change the name of each button, as shown in the Properties window in Figure 14.11. Change the names to tbrbtnNext, tbrbtnPrevious, and so on. The toolbar will work without doing so, but it will be easier to identify each button when you attach code to them; and when you're activating and deactivating the toolbar, you're going to find it easier to work with code like this:
cToolBar.tbrBtnFirst.click()
than like this:
cToolBar.tbrBtnBase5.click()
The end result of your toolbar should look like Figure 14.11.

7. Now that you've got your Navigation toolbar with nine buttons and three separators, how about making it do something?
. Make the calls to the form's Next(), Previous(), and other methods in the corresponding buttons' Click() event.
hwtbrButtonNext.click()
_screen.activeform.next()
hwtbrButtonPrevious.click()
_screen.activeform.previous()
hwtbrButtonFind.click()
_screen.activeform.find()
hwtbrButtonList.click()
_screen.activeform.list()
hwtbrButtonAdd.click()
_screen.activeform.add()
hwtbrButtonDelete.click()
_screen.activeform.delete()
hwtbrButtonSave.click()
_screen.activeform.save()
hwtbrButtonUndo.click()
_screen.activeform.undo()
. Save the class.
Again, remember that this is a navigational toolbar class-not the toolbar itself. You'll be able to use it as the definition for toolbars, but also subclass it as you need. For example, you might find one application doesn't want a List toolbar button, or maybe wants an additional toolbar button for Help. You could subclass hwtbrNav, naming the new toolbar hwtbrNavWithHelp, and simply add another button with a question mark on it.
8. Coordinate the calls in the command buttons, menu options, and toolbar buttons.
Remember how you had different methods in the command button Click event and menu option? Here's the time where it all gets pulled together:
. . Open your maintenance form base class, hwfrmMaint, by double-clicking on the name in the Project Manager.
. . Make sure that you have methods like Next(), Previous(), and so on, that belong to this class, and that you have code in those methods, like so:
next()
if !eof()
skip
if eof()
skip -1
endif
_screen.activeform.refresh()
endif
. Change the code in the Click events of the Next command button on frmBaseMaint from this:
if !eof()
skip
if eof()
skip -1
endif
_screen.activeform.refresh()
endif
to this:
_screen.activeform.next()
and do so with each of the other command buttons as well. When you're done, you should have the same call to the form's method in the command button, menu option, and toolbar button.
And now the toolbar is done. It isn't integrated with the form or system yet, but that'll come in a minute.
Getting your toolbar to work with the app
So now you've got your form, menu, and toolbar all making calls to the _screen.activeform.next() method. Looks like you can run your app and you're all set, eh? Except when you do so, the toolbar doesn't show up. The form appears but the toolbar doesn't. Well, of course not-where did you do anything to actually instantiate the toolbar, or make it appear? Hmmm? Computers aren't smart, or stupid; they simply do what they're told to do- but no more and no less. How can you get the toolbar to be available? Well, because it's a form, you could probably include it with your Order Maintenance form and make that a formset. Then you'd run the formset that consists of the Order Maintenance form as well as the toolbar.
Here's how this would work. While it won't be the optimal solution, you'll be able to demonstrate the idea that you're calling the same method from the toolbar icon, the command button, or the menu option.
1. 1. Open the Order Maintenance form by double-clicking on its file name in the Project Manager.
2. 2. Select the Form, Create Formset menu option.
3. 3. In the Forms tab of the Options dialog box, change the form template to hwtbrNav of HWCTRL62.VCX, and click OK.
4. 4. Once you've got the Form Designer window back, select the Form, Add Form menu option. A new form, based on the hwtbrNav toolbar class, is created. (If you can't see it, it may be hidden under Order Maintenance.)
5. 5. Save the form.
6. 6. Run the application and select Forms, Order Maintenance. You'll see the toolbar appear with the form, and you can use the command buttons, toolbar buttons, or menu options to navigate through the table. You can also click the Done command button, the File, Close menu option, or double-click on the form's close box to get rid of the form.
Consolidating code in a generic method
Well, this triple threat of functionality-command button, menu option, or toolbar button-is nice and all, but isn't it really overkill? Why clutter up the form with these command buttons? The whole reason of having a toolbar was to make more room on the forms-and to be able to use the same mechanism across all forms, instead of repeating the same group of command buttons on every form. That's what's next: getting rid of the command buttons. And it's pretty easy-just remove them from the hwfrmMaint class, and you'll be done with them until you change your mind again.
However, while you were playing around, you might have run into another problem. If you ran more than one instance of the Order Maintenance form (or if you were adventurous and created additional forms, such as Invoices and Inventory), you quickly found that a separate toolbar is created for each form, and all of a sudden you've got five or six toolbars floating around on the screen. Functionally, they work; every toolbar works with every form, but it's still pretty messy, wouldn't you say?
Well, I already started you part of the way toward a solution, since you don't have the name of the form hard-coded in the toolbar. Instead, in the Click() method of a particular toolbar button, a call is made to the appropriate method in the form itself-and, yes, it gets better. You don't even have to know which form is open, as long as it has a method with the right name. And because the methods are attached to the form's base class, and you then created the forms from that class, you know you're going to be in good shape. Finally, because you used the syntax "_screen.activeform", you don't even have to worry abut which form is active, since this is now being handled automatically.
The problem with the multiple toolbars showing up is a result of that decision to make a formset with the form and the toolbar. Bad idea, bad, bad! (Please see Appendix A if you're still a little fuzzy on this "good-bad" thing.) Instead, what you'd like to do is separate the form and the toolbar, and just call the toolbar once, when the first form is being put up on the screen. After that, you don't need to instantiate the toolbar again. It sounds like this procedure should be handled by the form, doesn't it? The first thing to do is add a pair of methods to the hwfrmMaint form. (Why not the hwfrm form? This is left as an exercise to the reader. Well, okay, maybe not. The reason is that not all forms will have navigation toolbars-in fact, the navigation toolbar is specifically made for forms made from the Maintenance class.)
So here's the "to do" list for this section. First, get rid of the command buttons from your maintenance form base class. Then create an "instance handler" that will count the creation of forms and handle the creation (and destruction) of the toolbar when appropriate. This instance handler will eventually be expanded to control the number of instances of a form that can be opened. Finally, I'll show you how to get the toolbar to automatically dock at the top of the screen when it's created.
Getting rid of the command buttons
As usual, I'm starting with the work I finished up with in the previous section, so the

![]() first thing I'll have you do is copy all of
your code into a new directory, or use the code in the CH14C directory of the
source code for this book. Be sure to point to the new version of HWCTRL62 if
necessary.
first thing I'll have you do is copy all of
your code into a new directory, or use the code in the CH14C directory of the
source code for this book. Be sure to point to the new version of HWCTRL62 if
necessary.
1. First, modify your maintenance form base class and get rid of the command buttons in the maintenance form base class:
. . Open the hwfrmMaint class by double-clicking its name in the Project Manager.
. . Delete all command buttons at the top of the form. You can delete the Sort combo box as well. Note that you're not going to be able to delete the Help or Done buttons because they're part of the hwfrmMaint class definition.
. . Save the class.
2. Remove the toolbar form from the Order Maintenance formset:
. . Open the Order Maintenance formset by double-clicking on its name in the Project Manager.
. . Select the Navigation toolbar form. (It might be underneath the Order Maintenance form; you can drag the Order Maintenance form off to the side by its title bar.)
. . Select the Form, Remove Form menu option.
. . Select the Form, Remove Form Set menu option.
. . Save the form.
3. Rearrange the controls on the Order Maintenance form as desired. See Figure 14.12.

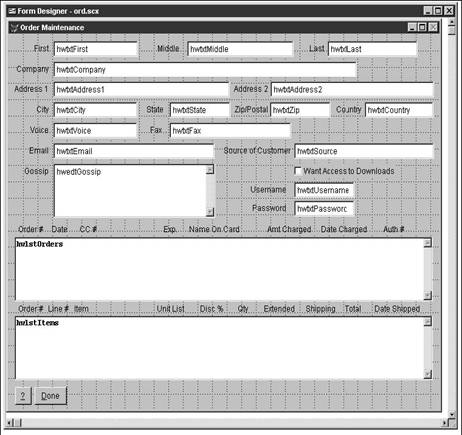
You might think the form looks a little stupid with those two dinky command buttons at the bottom. At the current time, you're certainly correct. You might also be wondering why I didn't put them on the toolbar. Another valid question. Admittedly, you could do that. However, this form will be used to launch other processes, and those command buttons will be located on the bottom of the form next to the Help and Done buttons. You're certainly welcome to design your forms as you like.
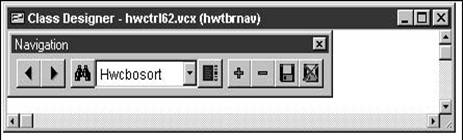
4. Add the Sort combo box to the Navigation toolbar:
. . Open the hwtbrNav class.
. . Drop a copy of your own combo-box class on the toolbar. You might have to futz with it a little bit in order to get the combo box placed in between the buttons you want. I personally put the combo box between the Find and List buttons. See Figure 14.13.
. . Adjust the height of the toolbar buttons to match the height of the combo box.

If you look carefully at your screen, you'll notice that the combo box is slightly larger than the buttons. The default height for the combo-box control is 24 pixels, but I suggested a height (and width) of 23 pixels for the toolbar buttons. You might be thinking that you're glad that the toolbar is a class, because you only have to change the height of each of these buttons in the hwtbrNav class? Ha! Life is even better than that. You actually only have to change the height of the button in the toolbar button class-the height will then be inherited by every button on every toolbar.
Creating an instance handler
I'm going to start out with an instance handler that's modeled after the one used in the Tastrade sample app. However, because this architecture is more compartmentalized than Tastrade, the places that your properties and methods will be located are going to be substantially different than Tastrade.
This instance handler isn't a separate entity in the application. Rather, it's just a few properties and methods. You'll add a couple of properties to the application base class that will track how many instances of forms are running, and which forms are running. You'll also add methods to handle the incrementing and decrementing of these counters, and to actually display and hide the toolbar when it's appropriate.
You might be saying right now, "Whoa! 'Application base class?' Whuzzat again?" The application base class is kinda sorta the replacement for your procedure libraries, in that it is a repository for application-wide data and functions. It's instantiated in IT.PRG, your startup program, and thus is available for the rest of the application. Here's how to create it:
1. Add the nFormInstanceCount and oToolBar properties to the App class of HWAPP62:
. . Open the App class by double-clicking it in the Project Manager, entering the command MODIFY CLASS in the Command window, or selecting the File, Open menu option.
. . Select the New Property menu option from the Class menu pad.
. . Enter nFormInstanceCount as the Name.
. . Enter a description and save the new property by clicking the OK button.
. . Repeat the last three steps for oToolBar.
. . Initialize nFormInstanceCount to 0 and oToolBar to .NULL. in the Properties window.
These are application-specific properties as opposed to form-specific because they will apply to the whole application-not just a specific form.
2. Add the ShowAppToolBar() and RemoveAppToolBar() methods to the App class of HWAPP62.
Once the method has been created, use the New Method menu option from the Class menu pad and the Code window to create the following methods:
ShowAppToolBar()
lparameters tcToolBar
*
�.* this is called when we open a form
�.* if there are no forms already open,
�.* then we want to show the toolbar for this form*
if this.nFormInstanceCount = 0
set sysmenu on
this.oToolBar = createobject(tcToolBar)
this.oToolBar.Show()
activate menu _msysmenu nowait
set
sysmenu automatic
endif
this.nFormInstanceCount = this.nFormInstanceCount + 1
RemoveAppToolBar()
*
�.* this is called when we close a form
�.* if this is the last form available, rid the toolbar*
this.nFormInstanceCount
= this.nFormInstanceCount - 1
if this.nFormInstanceCount = 0
this.oToolBar = .NULL.
endif
So now you've got procedures for handling your instances. The ShowAppToolBar() method displays the toolbar if this is the first form being run, and the RemoveAppToolBar() method gets rid of the toolbar if it's the last form to go away.
But having these methods is one thing-the thing that you're going to find over and over is that the hardest part is figuring out where the methods are called. In other words, these methods don't exist in a vacuum, nor do the application's base class properties like aInstance and nFormInstanceCount. But where are these methods run from?
I could just tell you, but that wouldn't be any fun. Let's try to puzzle this out together. By learning the logic behind the placement of the methods, you'll have an edge when it comes time to look at other Visual FoxPro applications with which you're not familiar-or even your own application after you've been away on vacation for a couple of weeks.
How about that ShowAppToolBar() method? Its purpose is to display the toolbar when a form is loaded-if there are no forms already open. When should this be called? Well, you just said the answer out loud: when a form is loaded.
3. Modify the base form's (hwfrmMaint) Init() and Destroy() methods to handle the toolbar:
. Change the Init() method to this:
if !empty( thisform.cToolBar )
oApp.ShowAppToolBar(
thisform.cToolBar )
endif
. Change the Destroy() method to this:
if !empty( thisform.cToolBar )
oApp.RemoveAppToolBar()
endif
1. 4. Add a cToolbar property.
2. 5. Initialize the form class's cToolBar property with the name of the toolbar that goes along with the form.
You'll notice that your base maintenance form has a property, cToolbar, and expects a value in that property-specifically, the name of the toolbar to be created. The logical place to put a value in this property is in the form class, because all of the forms created from that form class will probably have the same toolbar. However, if you initialize the property in the form class, you can still override it in both subclasses of the form class (for specialized maintenance forms) as well as specific instances of the form.
To do this here, simply open the Properties window of the class and set the cToolbar property to "hwtbrnav" (without the quotes).
6. Save the class.
Getting the toolbar to dock automatically
It would be a nice touch to have the toolbar automatically dock on the top of the screen when it's opened. This can be accomplished simply by calling the Dock() method with a parameter of
1. 0. You'd expect to do this in the toolbar class definition, right?
2. 1. Open the hwtbrNav toolbar class by double-clicking its name in the Project Manager.
3. 2. Open the Init() method in the Code window.
4. 3. Enter the following code in the Init() method:
this.dock(0)
4. Save the toolbar class.
Adding the form name to the Window menu
You know what else would be nice? Having the name of the form that was just opened also show up in the Window menu. If you open multiple forms, the names of each of those would show up in the Window menu-just like when you have multiple documents open in Word or multiple windows open in Visual FoxPro. Because your forms are likely to be pretty big, you're going to more than likely need this to toggle through them.
Here's how to do it. Because this functionality is specific to the opening and closing of a form, you're going to add a pair of methods to your baseform class, hwfrm. The first method will handle adding the form name to the menu, and the second will handle removing the form name from the menu when the form is closed.
1. 1. Modify the class hwfrm by double-clicking its name in the Project Manager. (You are using the Project Manager, aren't you?)
2. 2. Add the following methods to the class by selecting the Add Method menu option in the Class menu and then typing code in the Code window:
AddFormNameToMenu()
Local lnNoMenu, lcNameForm
if cntbar('Window') = 0 or getbar('Window',
cntbar('Window')) < 0
nNoMenu
= cntbar('Window') + 1
else
nNoMenu = getbar('Window',
cntbar('Window')) + 1
endif
define bar nNoMenu of Window prompt thisform.caption ;
after _MLASTcNameForm = thisform.Name on selection bar nNoMenu of Window activate window &cNameForm
RemoveFormNameFromMenu()
local lnBar
for nBar = cntbar('Window') to 1 step -1
if prmbar('Window', getbar('Window', nBar)) = thisform.captionrelease bar getbar('Window', nBar) of Windowexit
endif
endfor
3. Modify the following methods in the hwfrmMaint's Init(), Destroy(), and Activate() methods to handle both the window and the toolbar:
. Change the Init() method to this:
thisform.AddFormNameToMenu()
oApp.ShowAppToolBar( thisform.cToolBar )
. Change the Destroy() method to this:
thisform.RemoveFormNameToMenu()
oApp.RemoveAppToolBar()
. Change the Activate() method to this:
activate menu _msysmenu nowait
. Save the class.
What is going here is fairly straightforward, although the syntax is a pain because it's not often used. In the AddFormNameToMenu() method, I first determine how many bars already belong to the Window menu, and increment that number by one. Then I add the current form's name as another menu bar, and, finally, tell Visual FoxPro to activate that form if the user selects the menu option.
In the RemoveFormNameFromMenu() method, I do the opposite: decrement the number of menu bars under the Window menu and then remove the menu bar for the form as well.
In the Init() method of the form, I actually run the AddFormNameToMenu() method, just as when the toolbar was displayed.
Finally, when the form is closed, you're going to want to get rid of the form's name in the Window menu, and that's when the RemoveFormNameFromMenu() method is called.
There are a couple of important tips to point out. First, if your Window menu pad is called something other than "Window," you'll want to use that name instead of "Window" in the code above. Second, if you use the standard "_msm_Windo" Window menu from the Visual FoxPro menu, this functionality comes along for the ride for free! In fact, if you include these two functions in your forms when you are also using "_msm_Windo", you'll end up with two menu commands for each open form in the Window menu. The code for this section demonstrates this-you can comment out the AddFormNameToMenu() and RemoveFormNameFromMenu() functions to see what I mean.
Enhancing your form class with generic methods
This chapter has been about creating a framework upon which you can hang your data-entry forms. It's covered a lot, and if you're feeling overwhelmed, don't worry. Of course, I'm not done yet. I've left hooks or starting points for a number of features that have been left unfinished (or even unstarted) in the interest of not getting sidetracked.
Now it's time to take care of some of those things. You've got a calling program, a main menu, a foundation for handling toolbars and window menus, and some classes to handle standard navigation and maintenance functions. All that's left is to add a few forms and a report or two, and you can ship it!
I'm reminded of the cartoon where a scientist is showing off a mathematical proof on the blackboard to a number of colleagues. There are a host of complex equations all over the board, but between steps 5 and 7, a small box reads, "Step 6: A miracle occurs." And one of his colleagues says, "I think you need more details in Step 6."
Here are the details
An introduction to MessageBox() and #INCLUDE
I'm going to be using the MessageBox() function heavily in the next few sections, so it's worthwhile to explain some of the details here. I'm synopsizing here, so you might want to take a minute and check it out in the Language Reference.
The first parameter is a custom message of your own choosing that will display in the message box. The second, optional parameter indicates what types of actions the user will be able to perform. This parameter is a numeric value, and various values can be added together so the message box can allow multiple behaviors.
The values 0 through 5 in the second parameter determine the buttons that appear in the message dialog box. For example, if there is no second parameter or if it has a value of 0, just an OK button will appear. A value of 4 will cause Yes and No buttons to appear.
The values 16 through 64 (in increments of 16) determine which icon will appear. A value of 16 will cause a stop sign to appear, a value of 32 corresponds to a question mark, and so on. All of these values are described in Visual FoxPro Help under MessageBox().
The values 0, 256, and 512 correspond to which button is the default in the dialog. 0 (or no parameter) means the first button is the default, 256 corresponds to the second button, and 512 corresponds to the third.
If you've been watching carefully, you'll notice that none of these values overlap. This means that these values can all be added to create a unique characteristic for the message box. For example, a second parameter of 276 can only be created one way: 4 (Yes/No buttons) + 16 (stop sign icon) + 256 (second button as default).
It would be a good exercise for you to memorize every value that can be passed as a second parameter. You can never tell when a stranger is going to stop you as you're driving by and ask what the value 537 corresponds to. However, if you're not so inclined, you might want to use a shortcut.
The file FOXPRO.H includes definitions of a number of constants as English words. Thus, the constant MB_OK ("MB" stands for "message box" or "message button," if you like) is assigned the value 0, and as long as you include the file as part of your application, you can then refer to English constants instead of having to remember the numeric values.
You can include the FOXPRO.H file in your app in several different ways. You can use the following line in each program that uses these constants:
#INCLUDE FOXPRO.H
You can add an Include file to a specific form with the Form, Include File menu command, or automatically add it to every form and class by specifying a Default Header File in the Default File Locations tab of the Tools, Options dialog.
You can find FOXPRO.H in the main Visual FoxPro directory, and I encourage you to open it up and look around to see what has already been defined. Here are a few of the constants I find handy:
Toolbar positions
|
Position |
Setting |
Description |
|
#DEFINE TOOL_NOTDOCKED |
-1 |
Not docked |
|
#DEFINE TOOL_TOP |
0 |
Docked on top |
|
#DEFINE TOOL_LEFT |
1 |
Docked to the left |
|
#DEFINE TOOL_RIGHT |
2 |
Docked to the right |
|
#DEFINE TOOL_BOTTOM |
3 |
Docked on bottom |
MessageBox parameters
|
Parameters |
Setting |
Description |
|
#DEFINE MB_OK |
0 |
OK button only |
|
#DEFINE MB_OKCANCEL |
1 |
OK and Cancel buttons |
|
#DEFINE MB_ABORTRETRYIGNORE |
2 |
Abort, Retry, and Ignore buttons |
|
#DEFINE MB_YESNOCANCEL |
3 |
Yes, No, and Cancel buttons |
|
#DEFINE MB_YESNO |
4 |
Yes and No buttons |
|
#DEFINE MB_RETRYCANCEL |
5 |
Retry and Cancel buttons |
|
#DEFINE MB_ICONSTOP |
16 |
Critical message |
|
#DEFINE MB_ICONQUESTION |
32 |
Warning query |
|
#DEFINE MB_ICONEXCLAMATION |
48 |
Warning message |
|
#DEFINE MB_ICONINFORMATION |
64 |
Information message |
|
#DEFINE MB_APPLMODAL |
0 |
Application modal message box |
|
#DEFINE MB_DEFBUTTON1 |
0 |
First button is default |
|
#DEFINE MB_DEFBUTTON2 |
256 |
Second button is default |
|
#DEFINE MB_DEFBUTTON3 |
512 |
Third button is default |
|
#DEFINE MB_SYSTEMMODAL |
4096 |
System Modal |
MsgBox return values
|
Value |
Setting |
Description |
|
|
#DEFINE IDOK |
1 |
OK button clicked |
|
|
#DEFINE IDCANCEL |
2 |
Cancel button clicked |
|
|
#DEFINE IDABORT |
3 |
Abort button clicked |
|
|
#DEFINE IDRETRY |
4 |
Retry button clicked |
|
|
#DEFINE IDIGNORE |
5 |
Ignore button clicked |
|
|
#DEFINE IDYES |
6 |
Yes button clicked |
|
|
#DEFINE IDNO |
7 |
No button clicked |
Cursor buffering modes
|
Mode |
Setting |
Description |
|
DEFINE DB_BUFOFF |
1 |
No buffering |
|
DEFINE DB_BUFLOCKRECORD |
2 |
Pessimistic record buffering |
|
DEFINE DB_BUFOPTRECORD |
3 |
Optimistic record buffering |
|
DEFINE DB_BUFLOCKTABLE |
4 |
Pessimistic table buffering |
|
DEFINE DB_BUFOPTTABLE |
5 |
Optimistic table buffering |
By the way, you can create your own constant definitions as well. For example:
#DEFINE HOURS_IN_A_DAY 24
However, you probably don't want to add your own constants to the FOXPRO.H file. Instead, you can create your own Include file (it's just a text file), and then use the command:
#INCLUDE YOURSTUF.H
if the text file that contains your constants is named YOURSTUF.H.
You can't specify more than one Include file at a time, so if you want to include constants from both FOXPRO.H and YOURSTUF.H, include this line in YOURSTUF.H in order to incorporate the FOXPRO.H constants in YOURSTUF.H:
#INCLUDE FOXPRO.H
Data handling-buffering and multi-user issues
The way Visual FoxPro handles the movement of data between forms and tables is different than in FoxPro for Windows or DOS. Up to this point, I was rather blas

![]() about data handling-I just did a TABLEUPDATE()
or TABLEREVERT(), and
about data handling-I just did a TABLEUPDATE()
or TABLEREVERT(), and
hoped I got lucky. Well, one of these days, we're not going to be so lucky. What if the TABLEUPDATE() or TABLEREVERT() fails? The code used in this section can be found in the CH14 source code downloads for this book.
The first option is to do things "the old way"-in other words, to create memory variables for each field on the form, and then allow the user to edit against those variables. You would either lock the record when the user started to edit, or lock it when the user attempted to save, and handle conflicts with other users at that point. Well, that's actually a lot more work in Visual FoxPro because of the way that controls work now. Furthermore, Visual FoxPro provides a number of tools that enable a more robust strategy.
Visual FoxPro allows you to edit against a buffer that it automatically sets up. When the user goes to save, Visual FoxPro takes care of locking the record and moving data back to the table. The only thing you have to worry about is error messages that Visual FoxPro generates when conflicts occur. Unlike earlier versions, you don't have to trap for the conflicts yourself.
You have four choices as far as buffering goes. These are the four combinations of optimistic and pessimistic locking and row and table buffering:
. . Pessimistic row buffering
. . Optimistic row buffering
. . Pessimistic table buffering
. . Optimistic table buffering
I'm going to concentrate on row buffering to start, because the sample form works on just one record at a time, and then I'll discuss the differences with table buffering as they pop up. Table buffering works similarly except that you need to scroll through all of the possible records involved in changes, instead of just paying attention to one.
A simple error handler
Visual FoxPro handles all of the data transfer between the buffer and the table. If user actions create contention (say, a user tries to edit a locked record), Visual FoxPro will handle the situation and generate the appropriate error. All that's left to do is provide a friendly interface for the user so they understand what happened, and then let them decide what action they want to take.
I'll demonstrate this capability by modifying the dummy error handler that was called in the instantiation of the ENV class during program startup. The following code was in the DoSets() method:
if oApp.cPermLevel = 'ADMIN'
on error do DevError with lineno()
set escape onelse
on error do UserError with lineno()
set escape off
on escape *endif
The following procedures are in MYPROC.PRG, which is opened when the application is started, so they're available throughout the application. (If you're wondering, yes, these really don't belong here anymore-I'll discuss converting MYPROC to a class library near the end of this chapter.)
procedure DevError
lparameters lnlineno
local array laError[1]
=aerror( laError )
messagebox('Something bad happened.' ;
�.+ chr(13) + ' in line ' + str(lnlineno) ;
�.+ chr(13) + ' of ' + sys(16);
�.+ chr(13) + ' that said ' + message(1) ;
�.+ chr(13) + ' because ' + laError[2] ;
�.+ chr(13) + ' and the secret code is ' + str(error()), ;
0,'Developer Warning!')return .t.
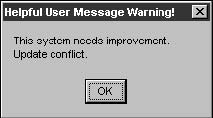
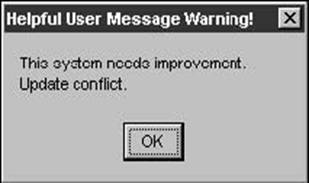
procedure UserError
lparameters lnlineno
local array laError[1]
=aerror( laError )
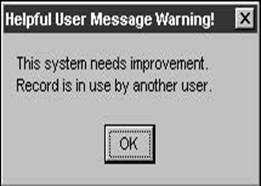
messagebox('This system needs improvement' ;
�.+ chr(13) + ' in line ' + str(lnlineno) ;
�.+ chr(13) + ' of ' + sys(16);
�.+ chr(13) + ' that said ' + message(1) ;
�.+ chr(13) + ' because ' + laError[2] ;
�.+ chr(13) + ' and the secret code is ' + str(error()), ;
0,'Helpful User Message Warning!')return .t.
The first two commands create an array that contains information about the most recent Visual FoxPro error. The array contains seven columns and one or more rows. The type of error that occurred determines the number of rows in the array. AERROR() returns a numeric value that is the number of rows in the array. The contents of the columns vary according to the type of error, but for all errors, the following holds:
|
Column # |
Contents |
|
1 |
The number of the error (same as the value of ERROR()). |
|
2 |
The text of the error message. |
The message box line then displays the standard message-box dialog with the text of the error message and an OK command button.
Once you're comfortable with this technique, you may want to investigate a more robust, but necessarily more complex, error handler. The classic

![]() example is
described in a white paper by Doug Hennig that you can
example is
described in a white paper by Doug Hennig that you can
download at his Web site, www.stonefield.com.
Causing a conflict-pessimistic row buffering
Let's take a look at the possibilities of pessimistic row buffering first. If you're just getting your feet wet, you might find yourself leaning toward this method because it's safe and easy. Since Visual FoxPro will lock the record as soon as the user starts editing, our error handler takes care of everything nicely. The second user will get a message indicating that they can't access the record, and they'll have to try again later.
Specifically, when a user attempts to edit a record that is locked, Visual FoxPro will generate an error saying "Record is in use by another." You can make this happen yourself. First, open the Order Maintenance form and make sure that the BufferMode property of the form is set to 1-Pessimistic and the Data Session property is set to 2-Private Data Session. Then run two copies of Visual FoxPro, open the same form in both sessions, edit (but don't save or move off the edited record) a record in one session, and then try to edit the same record in the other session. (You can also open the form twice in the same session of VFP, but I think using two copies of Fox is less prone to error.) The result should look like Figure 14.14.

Of course, things that are easy usually have their problems, and the problem with this approach is twofold. First, there's the old "out to lunch" syndrome. What if a user starts editing a record but leaves before saving it? As long as he's in the edit process, no one else can access that record. This is a serious problem if the record has a lot of activity, or if the person tends toward long breaks and lunches. The second problem involves large records, in which different segments are edited by different people. For example, the name and address information in a customer record might be edited by the mail room, the phone information could be edited by the telecommunications department, and the credit information would be handled by the finance department. In a pessimistic locking scenario, once the mail room has its hands on a record, the telecommunications and finance departments are out of luck.
How about optimistic row buffering?
Optimistic row buffering
Optimistic row buffering lets everyone and their brother edit a record, and the person fastest to the Save key is the winner. Visual FoxPro is particularly intelligent in this respect, because it will detect when a second user is trying to save changes over the changes of the first person, and warn the second user that there is a conflict.
However, a message like "Update Conflict," as shown in Figure 14.15, might not be the type of message you want your user to see.
So look at the ways this situation can be handled. Here's what's happened: A field in the table originally contains "A", and then users One and Two have at it. User One changes "A" to "B" and saves it. User Two, being somewhat of a slowpoke, enters "C" and attempts to save it after User One is finished.
Visual FoxPro knows that the original value was "A" and that the current value is now "B", but it also knows that User Two still thinks that he is overwriting "A" with his change ("C") and doesn't realize that the table now contains "B." This is a potential problem because "B" might be better data than "C."
At this point, Visual FoxPro takes off the gloves and provides User Two with that oh-so-helpful message.
A generic Save() method
How about intercepting the message with a friendlier message such as "Another user has changed this record while you were editing it. Overwrite those changes with yours?" Then if the user selects "Yes," issue the TABLEUPDATE command with the lForce parameter. This is what the code would look like in the Save() method:
m.lcMessage = 'Another user has
changed this record while you were editing it.
Overwrite those changes with yours?'
if !tableupdate()
if messagebox( m.lcMessage, MB_YESNO ) = IDYES
=tableupdate(.t., .t.)
wait window nowait 'Changes saved'
else
=tablerevert()
wait window nowait 'Changes abandoned'
thisform.refresh()
endif else
wait window nowait 'Changes saved'endif
Let me explain what's happening here. First, I initialized a text message that I'll use in the MessageBox() function. Sure, I could have just placed the text in the MessageBox() function itself, but that often gets hard to read.
Next, I try to do a TABLEUPDATE(). This isn't immediately obvious. The command
if ! tableupdate()
actually issues the TABLEUPDATE() function and gets the return value. If TABLEUPDATE() is successful, it returns .T. And skips the first part of the IF. If it fails, it will process the first part of the IF. If it makes you more comfortable, you could make this a little easier to read, like so:
m.lUpdateWorked = tableupdate()if m.lUpdateWorked
*
* do the code if the update worked*
else *
* do the code if the update did NOT work
* endif
The first half of the IF just confirms to the user that the Save() was successful. It's the second half that's tricky.
The MessageBox line tells the user that he was unlucky in saving, but that he had an opportunity to overwrite the previous user's changes. The MessageBox() function returns a value according to the action he selected. If the value is 6 (the constant IDYES in FOXPRO.H), then we use the TABLEUPDATE() function with two .T. parameters. The first is used when we're dealing with table buffering-it forces TABLEUPDATE() to update all rows-and is irrelevant with row buffering. The second is the lForce parameter that forces Visual FoxPro to overwrite changes made by any other user.
If the user elects not to overwrite the other user's changes, I'll use the TABLEREVERT() function to change back to the current values in the table, and then indicate to the user that his changes have been abandoned. The form will also have to be refreshed, as you might expect.
This mechanism works nicely until a user comes around one day and whines, "I'd like to know what the other user changed" Kinda makes you long to be a mainframe programmer, where you could smile sweetly and say, "Sure, I'll put it in the queue and we should get to it in about 10 years," doesn't it? Well, actually, it's not that bad.
Telling the user which fields have changed
The OLDVAL() and CURVAL() functions describe the current and old values of a field. When the users start, fieldX in the table contains "A." User One changes fieldX from "A" to "B" and User Two changes fieldX from "A" to "C." User Two saves first. When User One tries to save, OLDVAL("fieldX") contains "A" and CURVAL("fieldX") contains "C." Thus, when User One tries to save, OLDVAL and CURVAL can be compared to see if they're different for fieldX. If so, you can grab the name of the field and stuff it into a string that can be made part of the error message the user sees. This way, if more than one field has changed, you can tell users which fields have changed, and let them make their decision based on that information.
Here's what the modified Save() routine would look like:
m.lSaveIsGood = tableupdate()
if m.lSaveIsGood
wait window nowait 'Changes saved'else
*
�. * the save failed, so we need to tell the user that
�.* the data in the table has been changed since they
�.* got their copy - and then we give them the option to*
overwrite or ignore their changes
*
m.cStrToDisplay = ''
for I = 1 to fcount()
*
�. * build a string that consists of all of the
�.* fields that have been changed by the other user*
�. * loop through every field*
�. * compare the current value on the disk with
�.* the old value on the disk *
�. * if another user saved changes,* - curval is their newly
saved value
* - oldval is the value before they saved - the value
�.* that this user is looking at*
m.cNaField = field(i)
if curval( m.cNaField ) <> oldval( m.cNaField )
*
�. * if this field has been changed, concatenate
�.* the name of this field to the existing string
�.* that will be displayed in the Message Box*
�. * add a comma if the string was not empty to begin with*
m.cStrToDisplay = m.cStrToDisplay ;
�.+ iif(empt(m.cStrToDisplay), '', ', ') ;
�.+ m.cNaField
endif endfor
*
�. * if StrToDisplay is not empty, there are differences
�.* and we have to give the user the opportunity to decide
�.* what to do *
if !empty( m.cStrToDisplay )
m.cMess = 'These fields have been changed by another' ;
�.+ 'user: ' ;
�.+ m.cStrToDisplay ;
�.+ 'Do you want to save your changes ' ;
�.+ ' and overwrite the data in these fields? '
if messagebox( m.cMess,
MB_YESNO + MB_ICONEXCLAMATION + MB_DEFBUTTON2 ) ;
= IDYES
*
* if they want to overwrite, use tableupdate
to force*
=tableupdate(.t., .t.)
wait window nowait 'Changes saved'
else
=tablerevert()
thisform.refresh()
wait window nowait 'Changes abandoned'
endif && messageboxelse *
�. * there were no differences so we will just
�.* go ahead and force the save*
=tableupdate(.t., .t.)
wait window nowait 'Changes saved'
endif !empty( m.cStrToDisplay)
endif && m.lSaveIsGood
This is pretty straightforward. If the TABLEUPDATE() isn't successful, I run a looping process to see what has changed. The FOR/ENDFOR routine loops through every field and determines whether OLDVAL and CURVAL for that field are different. If so, the name of that field is added to a string. Once the looping is done, I check to see if the string has anything in it. If it does, I inform the user which fields have been changed and let them decide. The rest works like before, either forcing changes or reverting to the old data.
Telling the user which fields have changed-and what the values are
That method works, and puts a spring in our step for a little while-until the user comes back again and complains that he'd like to know the values in those fields. Some people are never satisfied! Well, a modification to the routine above will let you save the values of OLDVAL and CURVAL as well as the field name, and with this, the user will have enough information to determine if he can save his changes on top of the existing changes:
#INCLUDE 'FOXPRO.H'
m.lSaveIsGood = tableupdate()
if m.lSaveIsGood
wait window nowait 'Changes saved'else
*
�. * the save failed, so we need to tell the user that
�.* the data in the table has been changed since they
�.* got their copy - and then we give them the option to*
overwrite or ignore their changes
*
m.cStrToDisplay = ''
for I = 1 to fcount()
*
�. * build a string that consists of all of the
�.* fields that have been changed by the other user*
�. * loop through every field*
�. * compare the current value on the disk with
�.* the old value on the disk *
�. * if another user saved changes,* - curval is their newly
saved value
* - oldval is the value before they saved - the value
�.* that this user is looking at*
m.cNaField = field(i)
if curval( m.cNaField ) <> oldval( m.cNaField )
*
�. * examine whether or not current user also changed
�.* the field, and if not (=1), update the current
�.* user's value with the new value that has been saved *
�. * note that we're assuming that the other user that
�. * made the changes has more recent data, since they
�.* saw the value that this user is looking at and
�.* still decided to change it*
if getfldstate( m.cNaField ) = 1
replace &cNaField with curval( m.cNaField
)
else
m.cStrToDisplay = '&cNaField
has been changed by' ;
+
' another user. ' + chr(10)do case
case type( m.cNaField ) = 'CM'
m.cStrToDisplay = m.cStrToDisplay ;
�.+ 'Original Value: ' + allt(oldval( m.cNaField )) ;
�.+ chr(10) ;
�.+ 'Your New Value: ' + allt(eval( m.cNaField )) ;
�.+ chr(10) ;
�.+ 'Other User's Value: ' + allt(curval( m.cNaField ))
case
type( m.cNaField ) = 'NF'
m.cStrToDisplay = m.cStrToDisplay ;
�.+ 'Original Value: ' + ltrim(str(oldval( m.cNaField ),20,2)) + chr(10) ;
�.+ 'Your New Value: ' + ltrim(str(eval( m.cNaField ),20,2)) + chr(10) ;
�.+ 'Other User's Value: ' + ltrim(str(curval( m.cNaField ),20,2))
case
type( m.cNaField ) = 'YB'
m.cStrToDisplay = m.cStrToDisplay ;
�.+ 'Original Value: ' + ltrim(str(oldval( m.cNaField ),20,4)) + chr(10) ;
�.+ 'Your New Value: ' + ltrim(str(eval( m.cNaField ),20,4)) + chr(10) ;
�.+ 'Other User's Value: ' + ltrim(str(curval( m.cNaField ),20,4))
case
type( m.cNaField ) = 'D'
m.cStrToDisplay = m.cStrToDisplay ;
�.+ 'Original Value: ' + dtoc(oldval( m.cNaField )) + chr(10) ;
�.+ 'Your New Value: ' + dtoc(eval( m.cNaField )) + chr(10) ;
�.+ 'Other User's Value: '+ dtoc(curval( m.cNaField ))
case
type( m.cNaField ) = 'T'
m.cStrToDisplay = m.cStrToDisplay ;
�.+ 'Original Value: ' + ttoc(oldval( m.cNaField )) + chr(10) ;
�.+ 'Your New Value: ' + ttoc(eval( m.cNaField )) + chr(10) ;
�.+ 'Other User's Value: ' + ttoc(curval( m.cNaField
))endcase
=messagebox( m.cStrToDisplay, MB_OK +
MB_ICONINFORMATION )
endif
&& getfld
endif && curval <> oldval
endfor && I = 1 to fcount()
*
�. * if StrToDisplay is not empty, there are differences
�.* and we have to give the user the opportunity to decide
�.* what to do *
if !empty( m.cStrToDisplay )
if messagebox('Do you want to overwrite the other user's changes with yourchanges?', ;MB_YESNO + MB_ICONEXCLAMATION + MB_DEFBUTTON2 ) = IDYES*
* if they want to overwrite, use tableupdate
to force*
=tableupdate(.t., .t.)
wait window nowait 'Changes saved'
else
=tablerevert()
thisform.refresh()
wait window nowait 'Changes abandoned'
endif && messagebox
else
*
�. * there were no differences so we will just
�.* go ahead and force the save*
=tableupdate(.t., .t.)
wait window nowait 'Changes saved'
endif !empty( m.cStrToDisplay)
endif && m.lSaveIsGood
This routine will inform the user with a message box for each field that has changed, and then ask the user whether he wants to save his changes now that he knows the values that the other user has saved. The clever thing about this routine (and thanks to my friend Robert Green for the original idea) is that we're only saving changes to fields that the current user has changed. Come again, you say?
Suppose that fieldX contains 100 and fieldY contains 200. User One changes fieldX to 150 and User Two changes fieldY to 225. Then User Two saves. FieldX contains 100 and fieldY contains 225. But User One's buffer contains 150 and 200. You don't want to write 200 over the 225 of User Two-you'd like to grab that new value of 225 but still save 150 over 100.
You know that the field has been changed because OLDVAL and CURVAL are different. The GETFLDSTATE() function determines whether the current user changed the field. If so, you need to tell the user that there is a conflict in this field. This information gets stuffed into the cStrToDisplay variable. However, if the other user changed this field, not the current user, you want to grab the value that the other user saved, and that's done with the REPLACE command.
This seems like a lot of code for a simple function, but it executes quite quickly, and notice that it's all completely generic, so you can place it in the Save() method of your frmMaint class and never worry about it again. And it's still a lot easier than manipulating multiple arrays, which was required in earlier versions of FoxPro.
A generic Add() method
Okay, so that's the Save() method. What about Add()? This one's got to be custom, because you're going to be creating a brand new record and probably stuffing it with custom values each time, right? Not so fast. You can write an Add() method that will be placed into the hwfrmMaint class, and then use Visual FoxPro's object-oriented capabilities to execute this parent method as well as a custom method in the form itself when needed.
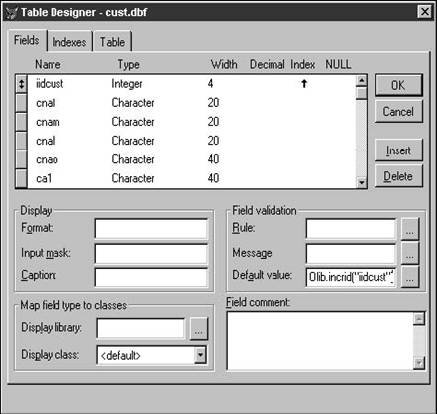
Adding a record is pretty easy-you can either do an APPEND and REPLACE or an INSERT. The trick is having the correct default values ready when you perform one of those functions. If you have a single default value, such as today's date for an order date, you can place that expression in the table's Default Value expression in the Table Designer of the data dictionary. However, the other default value, the primary key, might be a bit more difficult. After all, the name of the key will differ according to what table you're in. How do you make it generic?
The answer is that you don't have to. When you add your tables to a VFP database, you can specify default values for each field when a new record is added. All you need is a routine that will generate a unique primary key. Place a call to this routine in your primary key field's Default Value as shown in Figure 14.16, and the routine will automatically generate a new key each time a record is added.

Then it's just a simple matter of adding a new record with the APPEND command. When this happens, the new record is populated with the default values.
The Add() method
The Add() method is somewhat trivial, actually:
append blankthisform.refresh()
If you don't include the Refresh() method, the record pointer will be positioned on the new record, but the form will still display the data from the previous record that had been populating the form.
I'll make it lots bigger-three or four times as big!-in the next section.
INCRID()-a primary key incrementing method
The basic idea behind this method is to keep a table (I call mine "ITKEY") that holds the last primary key used for every table in the database. When a new primary key value is needed, the routine goes to this table, calculates the next value and stuffs it into the table, and returns that value as the new primary key. The only time this process doesn't work well is if you have a very large number (hundreds per second) of records being added to the same table, because the routine locks the record in the table to ensure that the new primary key is indeed unique.
First things first. You'll need a table with the following structure:
|
Field Name |
Type |
Width |
Dec |
Index |
Collate Nulls |
|
CNAKEY |
Character |
10 |
|
|
No |
|
ILASTKEY |
Character |
5 |
|
|
No |
|
CADDED |
Character |
10 |
|
|
No |
|
TADDED |
DateTime |
8 |
|
|
No |
|
CCHANGED |
Character |
10 |
|
|
No |
|
TCHANGED |
DateTime |
8 |
|
|
No |
This table stores the last key value used for every key field-primary or candidate-in the system. Each key has its own record, and the record consists of two important fields: the name of the key (cNaKey) and the value of the last key used (iLastKey). The other four fields are just standard audit fields that record the name and date-timestamp of the user who added or last used the field.
When you add a record to a table that requires a primary key, simply call a method named INCRID() that will look in this table for a record that contains the name of the key. (In Figure 14.16, you can see that this method is in a class library-I'll address that later in this chapter when I get rid of MYPROC.)
The call looks like this:
Olib.incrid('iidcust')
where "iidcust" is the name of the primary key in the table.
If the record is found, calculate the new key, update the record with this value, and then return the new key value.
If you don't find the record, add a new record to the table on the fly, and populate that new record with an initial key value of 1.
As time has passed, I've found the occasion to stuff a value into the primary key table instead of retrieving one. For this reason, I added some extra code that allows the user to pass a second value to the method; this value will be stuffed into the table as the last value used:
�.* incrid()
�.* if the user passes a value in the second parm,
�.* we want to stuff that value into ITKEY instead of
�.* incrementing ITKEYlpara m.lcNaKey, m.liValueToStuffIntoITKEY
local m.lcNaUser, lcOldWA, llITKEYWasUsed, laBiggestKey, liStartingKey
local llTableWasUsed
if pcount() < 2
�.* for backwards compatibility, we assume
�.* that the user might not have passed a second parm
�.* and if so, we set a flag indicating that
�.* we can assume we're just plain old incrementing
m.liValueToStuffIntoITKEY
= -1
else
* they passed two parmsendif
m.lcOldWA = select()
m.lITKEYWasUsed = used('ITKEY')
if m.lITKEYWasUsed
sele
ITKEY
else
sele 0
* note that ITKEY is opened in the default data session!
Use
ITKEY
endif
* check to see if oApp existsif type('oapp.cnauser') = 'U'm.lcNaUser = 'Interactiv' else
m.lcNaUser = oApp.cNaUserendif
locate for alltrim(upper(cNaKey)) == alltrim(upper( m.lcNaKey ))
if !found()*
�. * couldn't find it - create a new record in ITKEY for this
key*
�. * first, let's see if we can find a table for which this key
�.* is the PK, and then determine what the biggest value in
�.* that table is, so that we don't try to put a tiny value into
�.* ITKEY when the table already has a larger valuem.lcNTable =
subs(allt(m.lcNaKey),4)
m.lcNETable = m.lcNTable + '.DBF'
if file(m.lcNETable) or (not
empty(dbc()) and indbc(m.lcNaTable, 'Table'))
if
used(m.lcNTable)
m.llTableWasUsed = .t.
select (lcNTable)
else
m.llTableWasUsed = .f.
select 0
use (lcNTable)
endif
�. * we have the table open
�.* see if the field exists before we try to do
�.* a SELECT out of it
�. * IMPORTANT NOTE!
�. * if you're selecting a numeric from a table, it
�.* might be > 10 chars (and an integer, which is what* we
stuff back into ITKEY will only be 10 max -
�.* so if the numeric value from the table is > 10
�. * this function will barf
if oLib.FieldExists(m.lcNaKey, m.lcNETable)
declare laBiggestKey[1]
laBiggestKey[1] = 1
select max(&lcNaKey) from (lcNTable) ;
into array laBiggestKey
if _tally = 0
m.liStartingKey = 1
else
m.liStartingKey = laBiggestKey[1] + 1
endif
else
�. * field doesn't exist, so init the key
�.* why would this happen? Well, the programmer
�.* could have passed an incorrectly spelled field name
m.liStartingKey
= 1
endif
�. * shut the table down if necessaryif m.llTableWasUsed
�. * table was already openelse
use in (lcNTable)
endif
else
* table doesn't exist, go with a value of 1
m.liStartingKey
= 1
endif
*
messagebox('Creating Key field for
' + lcNaKey)
insert into ITKEY (cNaKey, iLastKey, cAdded, tAdded) ;values (upper(m.lcNaKey), m.liStartingKey, m.lcNaUser, datetime())m.iRetVal = m.liStartingKeyelse
m.nOldRepr = set('REPROCESS')
set reprocess to 5 seconds
if rlock()
m.iX = ITKEY.iLastKey
�.* check to see that the current value in cLastKey isn't garbageif type('m.iX') = 'N'
�.* hunky dory
else messagebox('The last Key Value is not valid (' + m.iX + ') ' ;+ ' Please call your developer with this message')
return
0
endif
if m.tiValueToStuffIntoITKEY = -1 * the user didn't pass a second parm, so we're incrementing
m.iX
= m.iX + 1
else
* the user passed a second parm, so let's use it!
m.iX
= m.tiValueToStuffIntoITKEY
endif
m.iRetVal = m.iX
replace ITKEY.iLastKey with m.iRetVal
replace ITKEY.tChanged with m.lcNaUser
replace ITKEY.tChanged with datetime()
else
messagebox('Someone else has the Key table locked - try again later')
endif
unlock in ITKEY
set reprocess to (m.nOldRepr)endif
if m.lITKEYWasUsed
* it was already open, so leave it openelse
use in ITKEY endif
return m.iRetVal
Binding a call to this routine to the table's primary key default value has an extra benefit. No matter how you open the table, since it's contained in a database, the Default Value fires when a new record is added with the APPEND command. (You can bypass the Default Value with the SQL INSERT command, but only if you provide a value for any field that has a Default Value rule.)
So what does this mean? It means that the LIB object needs to be instantiated when you append records to the table. Your program would do this automatically, of course, but what about manually? You'd have to do this:
set classlib to HWLIB62
oLib = createobject('lib')
use CUST append blank
This can be quite a pain each time you want to add records manually, but it's the price you pay for keeping your primary keys secure.
Let me mention a couple of other subtle points. First, you probably noted the use of "lparameter" and "local," didn't you? Safe programming practices! I should go back and rename the local variables so they conform to the naming convention of using a leading "L," but you know the story: so many variables, so little time. I've still protected myself by declaring the variables as local.
The next major step is to look for the name in ITKEY. Notice that I used LOCATE instead of SEEK. Because there are only a few records in ITKEY, LOCATE is not noticeably slower than SEEK, and I avoid having to maintain an index tag on ITKEY.
The next step is to either create a new record or increment the value of the key found. It is important to note that this new value gets stored in ITKEY and is not rolled back if the user cancels the Add process. In other words, a table might have holes in the primary key field. I make my primary key fields as type Integer, and that provides room for well over a billion values.
I don't roll back unused primary keys because I want to lock the record in ITKEY for as little time as possible. If you wanted to make sure that you never skipped a key, you could lock the ITKEY record until the user saved, which would essentially create a pessimistic locking situation for every table, and that would likely be unacceptable. (You can't decrement the value if the user later decides to cancel, because someone else could have grabbed another key value in the interim.) However, there is one caveat to this technique. While this example demonstrates the use of primary keys, you can easily use INCRID() to return the keys for other fields that also need to be unique and stored in a separate table, such as a customer number. These other types of keys, however, might have to be sequential, such as check numbers. You'll need to do some special coding to handle this type of situation.
You might be wondering why this method isn't in frmMaint instead of in another class? Well, that would mean that you'd only be allowed to get a new key in a form that was subclassed from the hwfrmMaint base class, right? This might not be an accurate assumption, and so-thinking ahead to the time when you might have a different type of form that either adds records or, at least, needs to get new key values-I made a method of another base class.
You could also put the increment ID code into a stored procedure of the database, but you'll have to duplicate that stored procedure in every database you use.
You'll also notice that a property of the application object, oApp.cNaUser, is used to update the ITKEY table with the identity of the last user. The problem with this technique is that oApp is never around when you need it. In other words, what if you want to open the table manually and plunk in a few records? It starts to be quite a pain-now your manual process looks like this:
set
classlib to HWLIB62, HWAPP62
oApp = createobject('app')
oLib = createobject('lib')
use CUST
append blank
And that assumes there aren't any more dependencies involved! Instead, I added code that reduced the cohesion between the two classes-in other words, so that you could use one without having to have the other open as well. I checked to see if oApp.cNaUser was available, and if not, created a dummy value to use. I'll explore this idea further when I discuss components and multi-tier applications.
A generic Delete() method
If you're going to let the user add records, you're probably going to want to let them delete records, and, as usual, you're not going to want to write that code more than once. The only tough part about deleting is deciding what to do once the user has deleted the record, because you clearly don't want to keep the record pointer on the deleted record.
You have five choices: move the record to the next or previous record, to the top or bottom of the file, or just place it somewhere in the table at random. I've found that the first two choices are the most popular, the next two are somewhat inconvenient, and the fifth choice is popular only with IS departments who hate their users. Personally, I think it makes the most sense to move to the next record, because that most closely matches the paradigm of a file cabinet: If you get rid of a folder, you see the next one in line. Here's the code:
delete
* remember, the table is
buffered!tableupdate()
skip
if eof()
skip -1endif thisform.refresh()
Again, like your other generic navigation and maintenance methods, this is found in the Delete() method of your base class hwfrmMaint.
Adding hooks to generic methods
I'm sure you've already realized that these simple methods-Add(), Delete(), Save(), and so on, aren't going to be sufficient for your needs. It seems that you always have to do some special processing some place or another. For example, you might want to fire off a second routine after a record was added, and yet a third routine if the user decided to cancel the Add() in the middle of it. How would you go about this?
You could simply override the Add() method, and write your own custom code. And with a simplistic Add() method like I demonstrated earlier, that wouldn't be too much trouble. But what about the lengthy Save() method? It would be awful, for any number of reasons, to have to copy that method into a subclass merely because you wanted to run another method after the Save routine was finished.
Here's a better way to incorporate flexibility to satisfy these requirements. You'll add several more methods to your maintenance base class and call those methods from your generic code in that same class. However, there won't be anything in those methods in your base class, so the generic method will run just as it always did. The trick is that you can then put code in those methods in your actual forms, and that code will be executed along with your generic code. Here's an example:
1. Add the three following methods to your hwfrmMaint class:
. . AddBefore
. . AddAfterBeforeSuccess
. . AddAfterBeforeFailed
2. Modify your Add() method code like so:
m.lAddBeforeWasGood = thisform.AddBefore()
if m.lAddBeforeWasGood
append blank
thisform.refresh()
m.lAddAfterWasGood = thisform.AddAfterBeforeSuccess()
else
m.lAddAfterFailed = thisform.AddAfterBeforeFailed()
endif
You'll notice that the guts of the Add() method have stayed the same.
3. Next, open the ORD form itself, and put the following message boxes in the methods listed:
ORD.AddBefore()
messagebox('Add Before ')
ORD.AddAfterBeforeSuccess()
messagebox('AddAfter - Before Success')
ORD.AddAfterBeforeFailed()
messagebox('AddAfter - Before Failed')
4. When you run the form, you'll see that the AddBefore message box displays, then the Append Blank and Refresh commands are executed, and then the AddAfter - Before Success message box displays. You were able to add form-specific code to the Add() method without having to override or duplicate the functionality built into your generic Add() method. Note that I've even provided for the ability to conditionally run the essence of the Add() method, based on whether or not the AddBefore() method returned a true value.
|
Politica de confidentialitate | Termeni si conditii de utilizare |

Vizualizari: 963
Importanta: ![]()
Termeni si conditii de utilizare | Contact
© SCRIGROUP 2025 . All rights reserved