| CATEGORII DOCUMENTE |
| Bulgara | Ceha slovaca | Croata | Engleza | Estona | Finlandeza | Franceza |
| Germana | Italiana | Letona | Lituaniana | Maghiara | Olandeza | Poloneza |
| Sarba | Slovena | Spaniola | Suedeza | Turca | Ucraineana |
Algorithm Editor
User Guide
Version 1.0
Document History
|
Date |
Version |
Description |
Author |
|
08-05-2005 |
.0 |
Original |
Balzs Szathmry |
|
11-25-2005 |
1.1 |
Supplemented |
Balzs Szathmry |
Content
General Information
Definitions
Algorithm statuses
Navigation in the system
Logging
User groups
Administration
Policies
Repositories
Namespace
Static library
Repository
Choose Repository
Browse repository
Import Repository
Export Repository
Development
Edit
The New menu item
The Open menu item
Source code
Single run
Unit test
Felhasznli
Kziknyv
Important: The operation of the Algorithm Editor is based on the strict requirement that in cases where the definition of different input data is needed (e.g. algorithm name, source code, etc.), the users use only characters of the English alphabet, as well as numbers and _-t; this is because the handling of accentuated and special characters is an issue that is not completely solved.
In addition, the user must specify necessarily the input data she/he considers essential, the lack of which might result in unstable operation. (Including for example the name of the algorithm being created, the name of the namespace, etc.)
The user intending to work in the Algorithm Editor also out of the Administration menu has anyway to select a repository under the Choose repository option.
Before editing the source code of the algorithm, the user must make sure she/he has checked out the given algorithm. Without doing so, the user would not be able to perform operations on the source code, including the inability of saving data! Even checking out afterwards might have the consequence that any prior modifications would be lost.
Before compiling the algorithm, the user must save any modifications on the algorithm, because the compile would translate only the saved part!!
In order to register the repository, the user must make sure the repository is conveniently prepared. After an incorrect registration, any deletion would be possible only in the database!
Owing to the delete function currently in effect, the user must ensure that no other persons work is impeded by the deletion of an algorithm and/or namespace.
Repository: The entirety of the database tables belonging to the given product.
Namespace: The entirety of such algorithms that may refer only to each other and/or to the specified namespaces.
Specified namespaces: PUBLIC namespace, Static libraries
The algorithms included in the Public namespace may refer only to this.
Algorithm: A java class that may be referred to by specific conditions. (We store its source code and/or its byte code as well.)
At the current development stage, we distinguish five algorithm states: created, checked out, modified, compiled, stable.
Newly created algorithms have the created state. The only operation that can be performed in this state on the algorithm is the check out.
The state checked out comes about at checking-out, and this state already permits various operations on the algorithm.
The algorithm reaches the modified state when the user saves the modifications performed on the algorithm being in the checked out state.
The compiled state is taken by the algorithm in the case when it has been translated successfully.
Finally the stable state is reached at checking in the algorithm.
Possibly by means of the options indicated on the screens. Due to the specifics of the Internet Explorer the users shall avoid the use of the Back button in the browser, as well as the use of the buttons Enter (except for writing the source code) and Tab.
By entering the user name and the password, as usual.
Repository administrator, Editor
The ADMINISTRATION menu option covers the operations that help the user to customize the repositories, to register them, and to create, delete and clone namespaces.
The administration menu options (Fig. 1) are the following:
Policies
Repositories
Fig. 1
Screen description:
By clicking in the left menu on Policies you get a list (Fig. 2), with the names of the already existing policies. The user can create a new policy by means of the Add button on this screen.
Screen elements:
In the middle, in the Name field, can be seen the names of the already existing policies.
By means of the Add button in the lower right-hand corner a new policy can be added to the list.
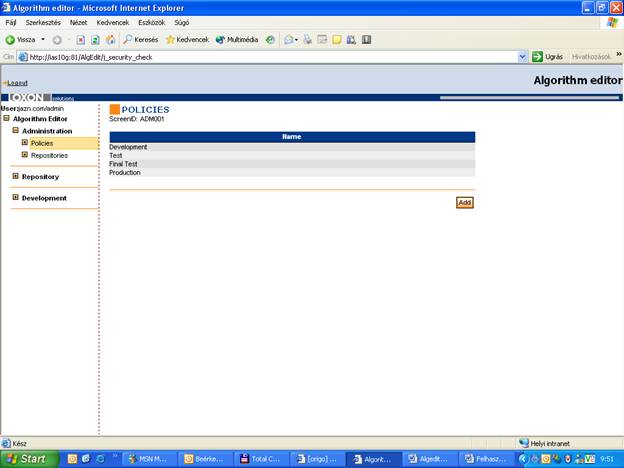
Fig. 2
Screen description:
By clicking on one of the list elements or the Add button the same screen appears, except that when clicking on the list element you will receive a completed screen, and in the second case you obtain an uncompleted screen.
On this screen you can specify the properties of the policy.
Screen elements:
In the textbox beside the Policy inscription you can define the name of the policy.
The checkbox beside the Direct link to the security manager inscription is to set when the user is to be directed, after saving, to the security manager program where she/he can specify the limitations required. (The user not wishing to do so must later reach the program on her/his own and set the necessary limitations.)
The textbox beside the Security manager URL inscription is for entering the URL of the security manager.
The checkbox beside the Enable adding namespace inscription is to permit the addition of the namespaces.
The checkbox beside the Enable editing algorithm inscription is to facilitate the edition of the algorithms.
By clicking on the Save button the modifications entered are saved.
By means of the Remove button the policy selected can be deleted.
Clicking the Cancel' button redirects to the previous screen (the Policy list).
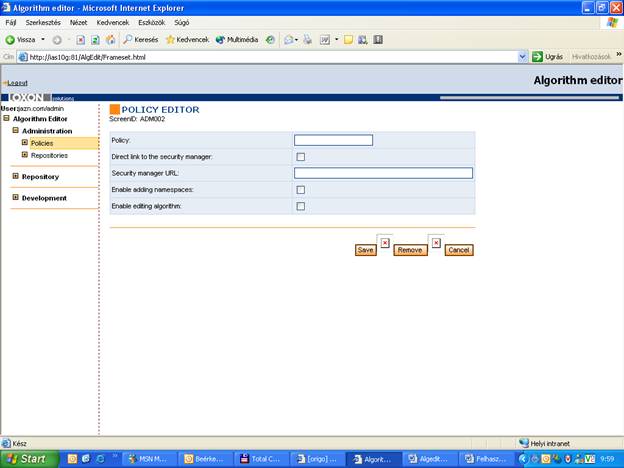
Fig. 3
Note: This function is still not operating.
This menu item permits to perform the basic operations on the repository and the elements included in it.
Screen description:
By clicking on the Repositories menu item the list of the repositories already registered is displayed on the right side (Fig. 4).
Screen elements:
The Name field shows the name of the repository.
The Data source field displays the access place.
The Policy field represents the name of the policy assigned to the repository.
The Description field includes a report on the repository.
By pressing the Add button a new repository can be registered.
By clicking on one of the list elements you can enter into the repository.
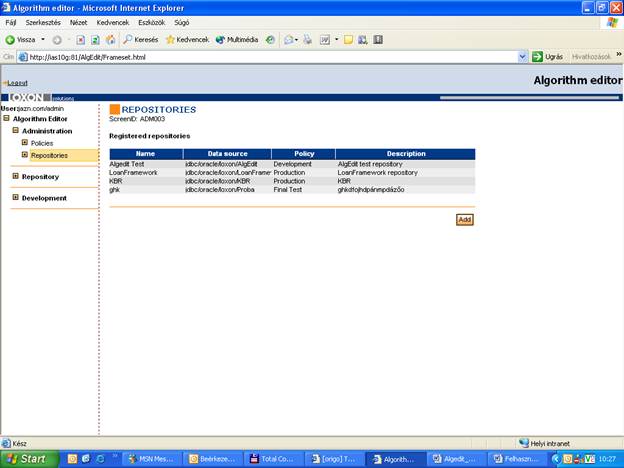
Fig. 4
Screen description:
By clicking on the Add button a new repository can be registered (Fig. 5), which however requires that a repository appropriately prepared is already available.
Screen elements:
In the textbox beside the Name inscription the name of the repository must be defined.
In the textbox beside the JNDI data source inscription the access must be specified.
The textbox beside the Description inscription can be filled in with a short note referring to the repository.
The repository specified can be registered by means of the Register button in the right lower part of the screen.
Clicking on the Cancel' button redirects to the list of the repositories already registered.
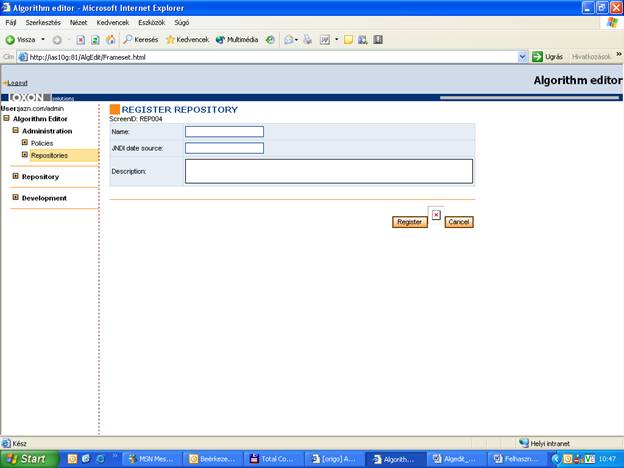
Fig. 5
As the repository must already have a structure which Algedit can manage, you shall NOT register any repository as long as your are not sure whether the relevant preconditions are fulfilled. Repositories once registered can NOT be deleted from the screen, this operation being only possible directly in the database.
Screen description:
By clicking on one of the repositories registered, the user has the option to change the properties of the repository, to delete and to add the namespaces and static libraries to be found in the repository.
The screen can be divided into 3 parts: a, Properties; b, Namespaces; c, Static libraries (Fig. 6)
Screen elements:
At the top, beside the Repository name inscription, you find the name of the repository selected.
a, Properties
In the textbox beside the JNDI data source inscription the access of the repository can be modified.
In the combo box beside the Policy inscription the policy can be selected which the user wants to assign to the given repository.
In the textbox beside the Description inscription the short note referring to the repository can be modified.
By pressing the Store button the changes made by the user can be saved.
b, Namespaces
The Namespace field shows the name of the namespace.
The PackageName field displays the package name referring to the given namespace.
The Owner field includes the name of the user who created the given namespace.
The Locked by field displays the name of the user who checked out one of the algorithms within the given namespace.
And the Locked since field indicates the date of the locking. (Of course, if nobody within the given namespace possesses a checked-out algorithm, then the last two fields are left blank.)
A click on the Add namespace button permits to create a new namespace.
By clicking on one of the elements of the list the required namespace can be reached.
c, Static libraries
The Name field includes the name of the static library (filename, with the .jar extension).
The Path field shows the name and the access path of the library the file of which has been entered into the system.
The Filesize field includes the size of the file in bytes.
And the Description field comprises a report on the file.
By pressing the Add library button the user can add a new static library to the repository.
By clicking on one of the elements of the list the static library selected can be reached.
Clicking on the Back' button redirects to the list of the repositories already registered.
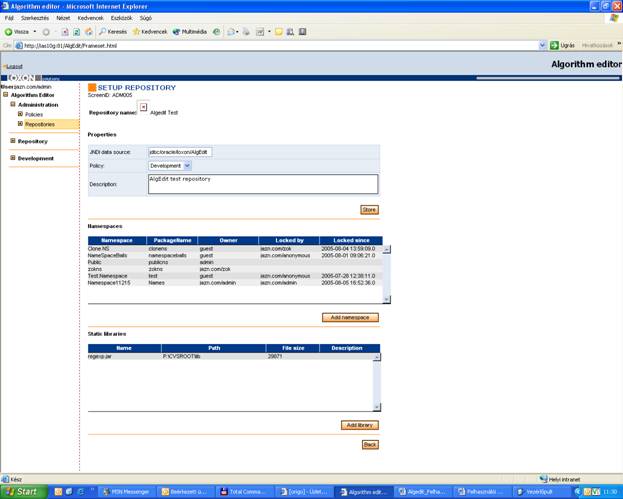
Fig. 6
Screen description:
By clicking on the Add namespace button (Fig. 7) a popup with the header Add new namespace will be shown, where the data of the namespace to be created can be specified.
Screen elements:
In the textbox beside the Namespace inscription the name of the new namespace must be entered.
And the textbox beside the Package name must be filled in with the package name relevant for the namespace.
By clicking on the Add namespace button the required namespace with the specified data can be created.
Move back by pressing the Cancel button.
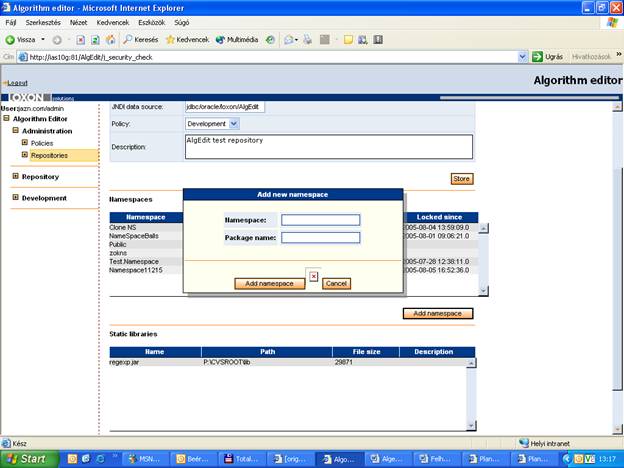
Fig. 7
Screen description:
Pressing the Add library results in a popup with the inscription Upload (Fig. 8), where the file to be uploaded can be selected.
Screen elements:
In the textbox to be seen in the popup you can either enter the desired filename or
select it by means of the Tallzs button next to it.
By pressing the Add library button you can add the relevant file to the static list.
By clicking on the Cancel' button the user can return to the previous screen.
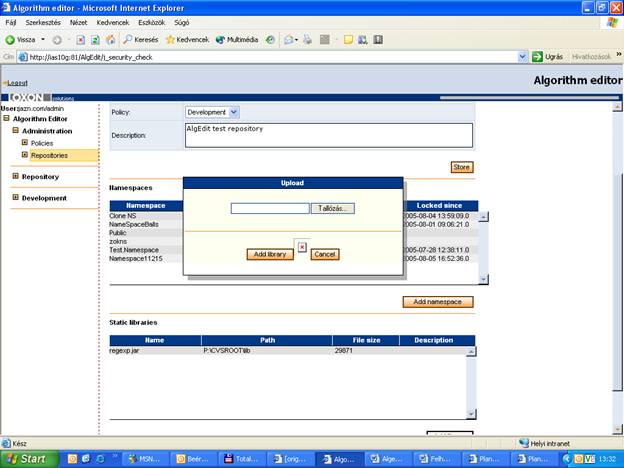
Fig. 8
By clicking on the element to be found in the Namespaces list you reach a screen permitting the execution of the namespace operations and where also the algorithms created in it can be seen (Fig. ).
Screen elements:
In the upper part you see the namespace name, the related package name and the lockers name.
The Algorithm name field shows the algorithm name.
The Status field displays the status of the algorithm.
The Date of check out field indicates the date of the check out.
The Check out by field indicates the name of the person that checked out.
Click on the Clone Namespace button to copy the namespace completely.
Click on the Delete Namespace button to delete the namespace completely. Pressing the button makes a popup visible asking whether you want actually to delete the namespace.
By pressing the Back button the user comes back to the previous screen.
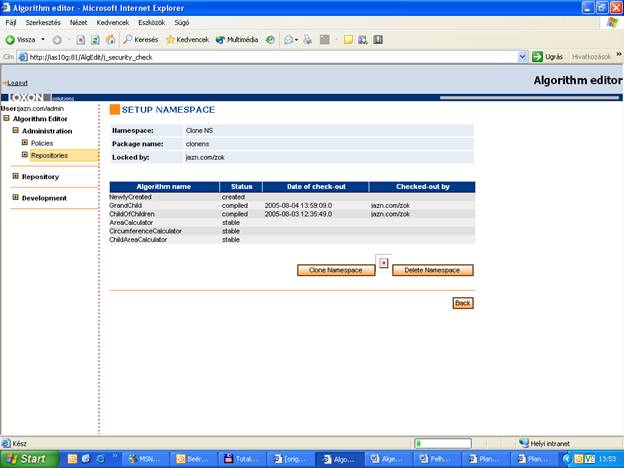
Fig. 9
By the Delete namespace operation the PUBLIC namespace can NOT be deleted!
Screen description:
Clicking on the Clone Namespace button brings forward a popup with the header Clone namespace (Fig. 10) where you can specify the new name, etc.
Screen elements:
In the textbox beside the Clone namespace to inscription the name of the new namespace must be entered.
Enter the name of the new package in the New package name textbox.
You can also click on a checkbox to copy the history of the algorithms into the new namespace.
Click on the Clone Namespace button to create the clone of the namespace.
Clicking on the Cancel' button redirects to the previous screen.
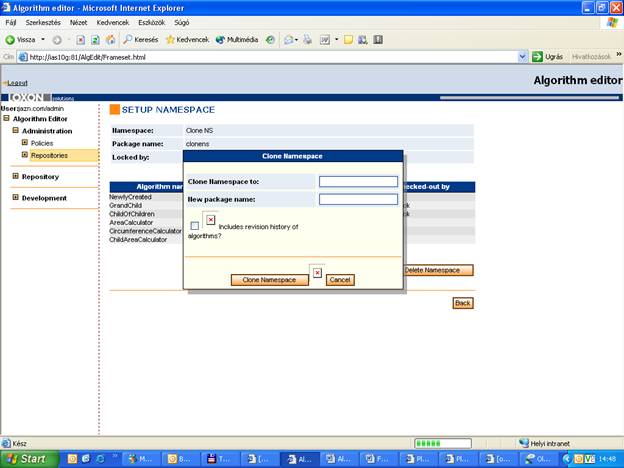
Fig. 10
(The transmission of the clone-related statuses, i.e. of the history, has not yet been solved completely.)
Click on one of the static library elements to reach a screen where the packages of the given static library can be viewed and also the library can be deleted entirely (Fig. 11).
Screen elements:
In the upper screen area the name and the access path of the static library and the file size are displayed.
The Package field lists the package names,
and the Size field their sizes.
Click on the Remove library button to delete completely the static library, resulting in a popup that asks for confirmation of the actual deletion.
By pressing the Back button the user comes back to the previous screen.
By clicking on one of the list elements you can view the content of the given package.
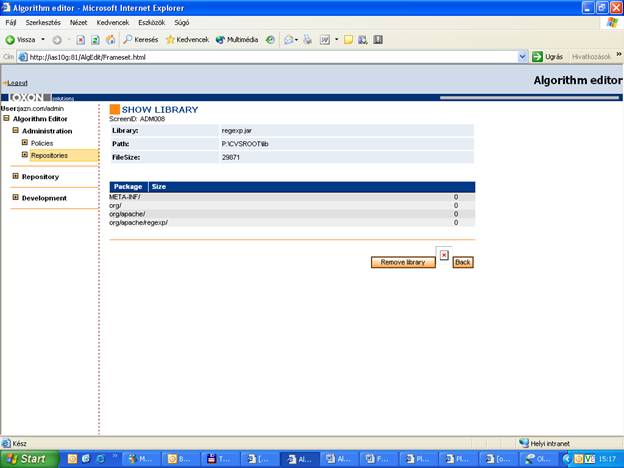
Fig. 11
Screen description:
Click on one of the elements of the package list to read the package content; here the only option is to get back to the previous screen (Fig. 12).
Screen elements:
In the upper screen area the name, the access path and the size of the static library, and the package name are displayed.
The Item field lists the classes included in the package.
By pressing the Back button the user comes back to the previous screen.
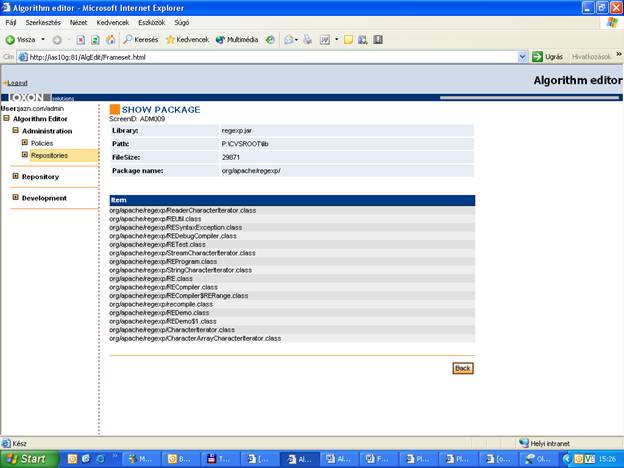
Fig. 12
The REPOSITORY menu item (Fig. 13) includes the repository menu options. They are in subsequent order is as follows:
Choose Repository
Browse Repository
Import Repository
Export Repository
Fig. 13
The Choose repository menu item allows the user to select the repository she/he wants to work on. Operations defined subsequently in the document can only be performed on activated repositories, so if you want to work on algorithms of a different repository, you have to change the active repository under this menu item.
Notice that you will have to select the repository after logging in, even if only a single repository exists in the algorithm editor.
Screen description:
By clicking on the Choose Repository option of the leftmost menu, a combo box is displayed to the right where the existing repositories can be selected (Fig. 14).
Screen elements:
In the middle, next to the Repository name, a combo box appears where the appropriate repository can be selected.
By means of the Select button in the lower right-hand corner the repository selected can be activated.
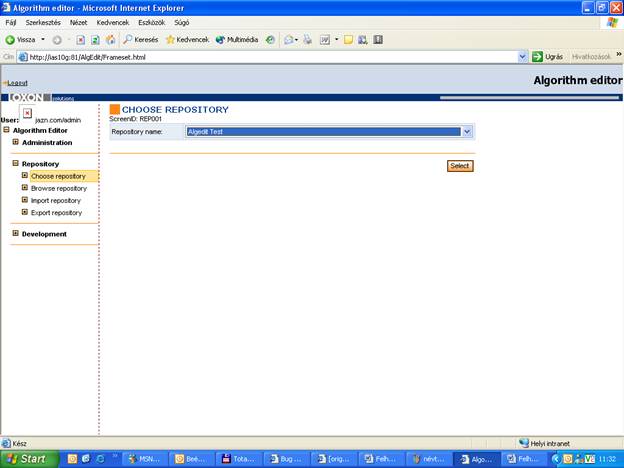
Fig. 14
Important: If the user, after logging in, did not select any active repository, however wishes to perform operations on it, the error message shown in Fig. 15 will appear (except for the operations that can be chosen under the Administration menu item).
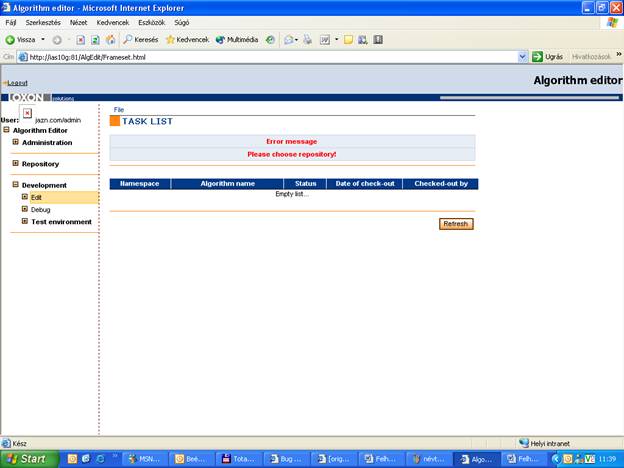
Fig. 15
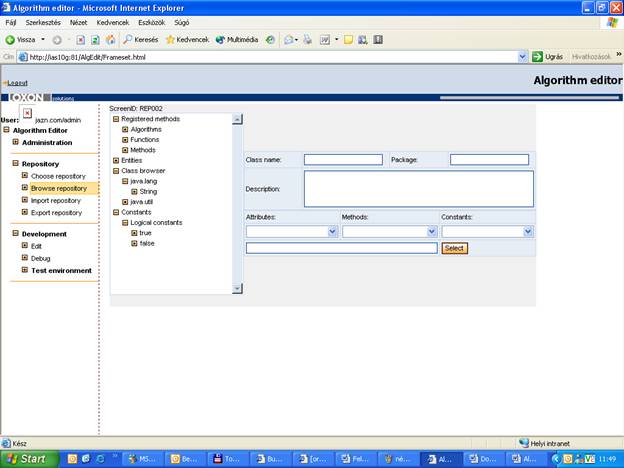
Fig. 16
This function is still not operating.
The Import repository menu item permits to import namespaces already exported (export file) into the active repository. The import operation will not be executed in the case where the file contains a namespace being locked in the active repository.
Screen description:
Click on the Import repository menu item to open an already existing export file and then to import it again (Fig. 17).
Screen elements:
By pressing the Tallzs button the user can seek and then select the file to be imported.
Press the Preview import button in the upper right-hand part of the screen to display the algorithms to be found in the file selected and some information related to them.
The tag name is displayed next to the Export method inscription.
Beside the Source repository inscription you see the original repository of the algorithms.
The version of the export is displayed next to the Export version inscription.
The date of the export is shown beside the Date of export inscription.
The Conflict fields refer to the fact whether the import of the given algorithm causes some conflicts in the target namespace. If any conflict exists, a red X is shown in the field, otherwise you see a green check mark.
The Namespace field represents the namespace of the given algorithm.
The Algorithm field shows the algorithm name.
Click on the Import button to let the program perform the import operation (if no conflict exists). Depending on the algorithm, the process can run in two different ways. A new algorithm will be created with the version number 1, if the algorithm does not exist in the namespace of the active repository.
In the second case, the algorithm is already available in the target namespace, and then a new version of the algorithm will be created (the history and the previous version will naturally remain).
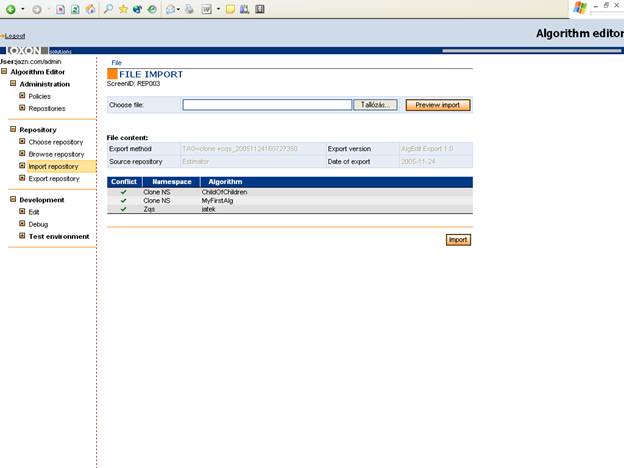
Fig. 17
After the import is performed successfully the following system message appears: Import terminate successful.
If however the import can not be executed, the error message shown in Fig. 18 is displayed.
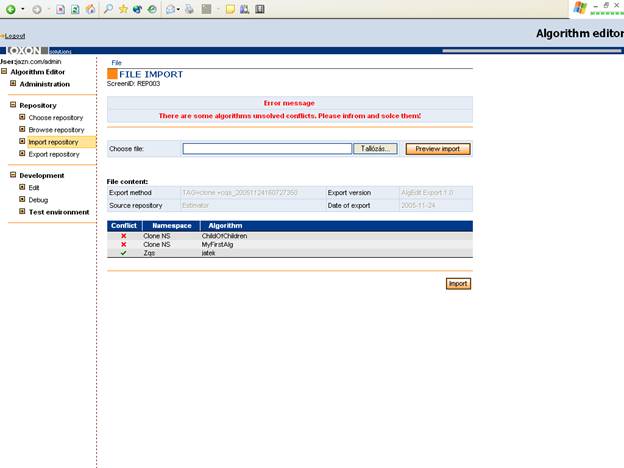
Fig. 18
The Export repository menu item permits to export the content of the active repository. Based on this function the user can define her-/himself the individual namespaces and their contents to be exported.
Screen description:
The Export repository menu item provides the decision whether an already existing tag is to be exported or a new one has to be created. By default, the program offers the export of an already existing tag (Fig. 19).
Screen elements:
The radio buttons next to the Export method inscription permit to define whether an existing tag has to be exported or a new one has to be created. The following figure shows the export of an existing tag.
The combo box beside the Use selected tag inscription allows the selection of the name of an existing tag.
Clicking the Export selected button finishes the export operation.
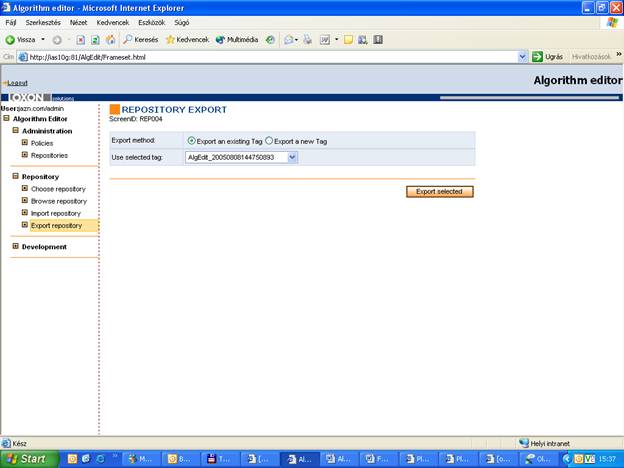
Fig. 19
Screen description:
To create a new tag, click on the Export a new Tag radio button (Fig. 20).
Screen elements:
The radio buttons mentioned above (now the Export a new Tag button is active).
In the textbox beside the Tag name inscription the user must specify a tag name (for this tag name the program will automatically generate also a date, e.g. xyz_20050808163445).
Under the Select namespace inscription you see two tables, the left-hand one with the namespaces of the repository that would not be exported, and the right-hand one with those to be exported by the program. Moving the elements between the two tables is possible by selecting and dragging the namespaces by means of the arrows.
The export of the public namespaces of the repository is possible by clicking on the checkbox beside the Includes Public namespace inscription.
Pressing the Export selected button finishes the export operation.
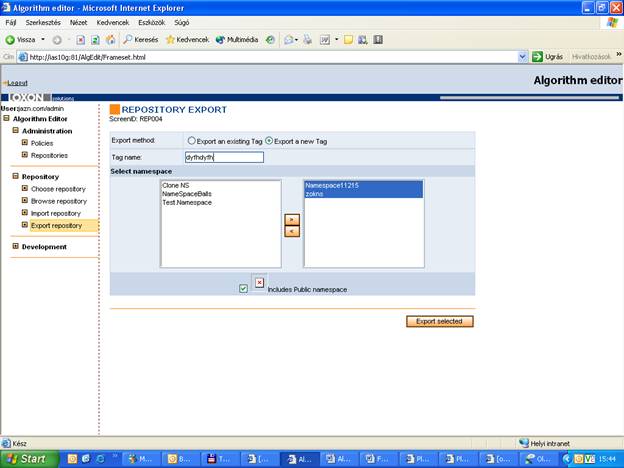
Fig. 20
Screen description:
By clicking on the Export selected button the user enters a screen (Fig. 21) where the export file created can be saved on her/his computer. (This screen is reached anyhow, independently whether the user has exported an existing tag or has created a new one.)
Screen elements:
The upper part of the screen displays the export tag, the source repository and the date of the export.
By on clicking the Download export file button the user can save the export file prepared on her/his computer. By default, the file has a server-specific name without extension, thus it is worth renaming it. (As for the type, the file is a zip file.)
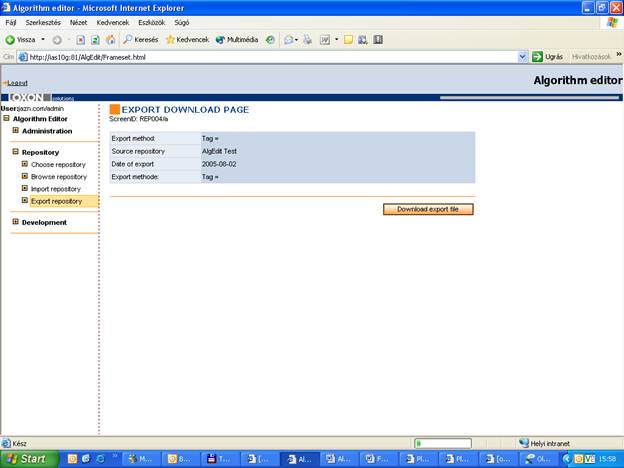
Fig. 21
It is important to note that while the present program development phase permits to export only and exclusively the stable algorithms, it is envisaged however to make it possible to export not only such algorithms, but also the last stable algorithms as well.
The Development menu item covers functions by means of which the user is able to perform different operations (facilitating to edit, test etc. the algorithms). The menu items which can be selected are in actual order (Fig. 22):
Edit
Debug
And within the Test environment:
Unit test
Stress test
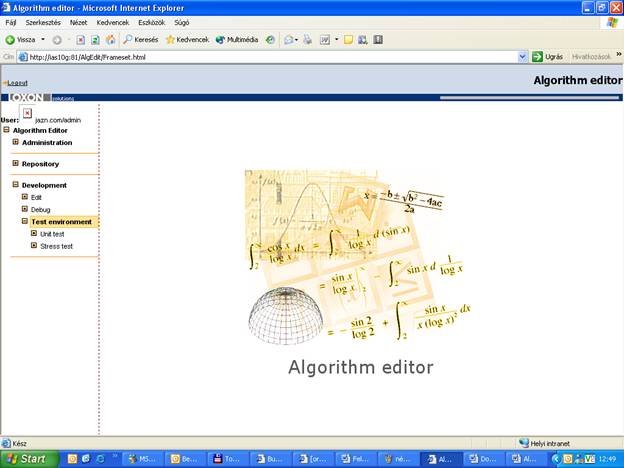
Fig. 22
Screen description:
By clicking on the Edit item you will see a task list on the right-hand side featuring the algorithms checked out by the given user (Fig. 23).
The same task list can also be seen when activating one of the namespaces at Choose repository.
Screen elements:
The Namespace field displays the namespace of the algorithm checked out.
The Algorithm name field shows the name of the algorithm checked out.
The Status field shows the status of the algorithm (this may be in this case an algorithm either checked out, modified or compiled).
The Date of check out field indicates the date when the relevant algorithm has been checked out.
The Checked-out by field refers to the name of the editor who has initiated the check-out process (here this can be only the user logged in).
Clicking then on the Refresh button produces an updating of the list displayed.
In addition, there is an upper menu bar (here only the File with the following elements:
o By means of the Task list the user can come back to the task list.
o By pressing the New menu item a new algorithm can be created.
o The Open menu option permits to open an already existing algorithm.)
By clicking on an algorithm shown in the table the source code of the relevant algorithm will appear.
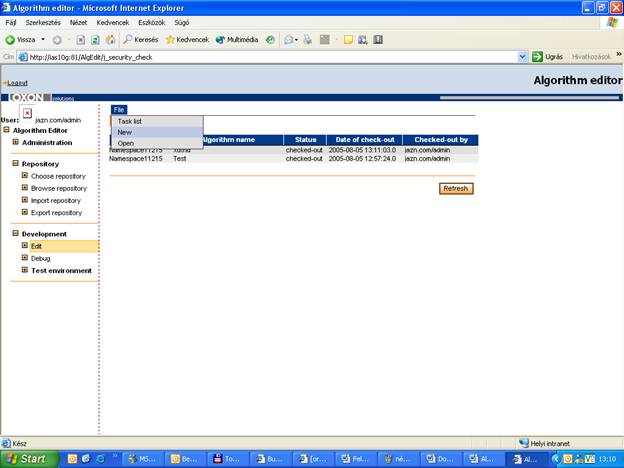
Fig. 23
Screen description:
In this screen you can create the algorithms and also enter the relevant input data (Fig. 24).
Screen elements:
The combo box next to the Namespace inscription lets select the namespace where you want to create the algorithm.
In the textbox beside the Algorithm name inscription the name of the planned algorithm must be defined.
The textbox beside the Description can be filled in with the description of the algorithm.
By clicking on the New button the desired algorithm is created.
In addition, there is an upper menu bar whose elements are identical with those of the upper menu bar mentioned in 4.1.
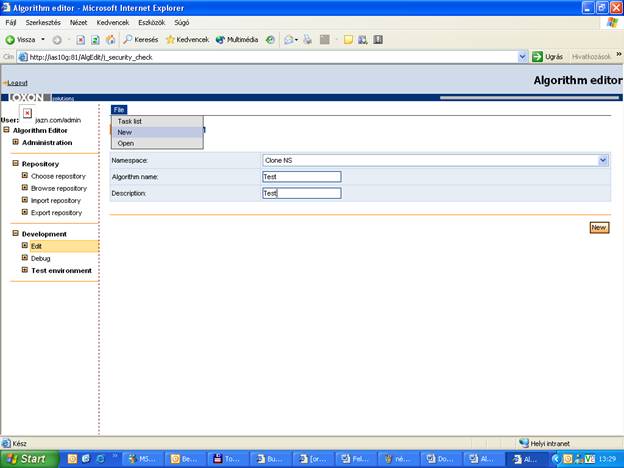
Fig. 24
Important: After an algorithm has been set up, its state is
created and its version is
Screen description:
This screen enables to open the algorithms to be found in the repository (Fig. 25).
Screen elements:
The combo box beside the Namespace inscription allows to select a namespace of the active repository where the algorithm to be opened is contained.
The Algorithm name field shows the algorithm name.
The Description field comprises a report on the algorithm.
The Status field displays the status of the algorithm.
The Latest version field refers to the last algorithm version.
By means of the Load button you can load the algorithms of the chosen namespace.
In addition, there is an upper menu bar which is described in 4.1.
By clicking on one of the list elements you reach the source code.
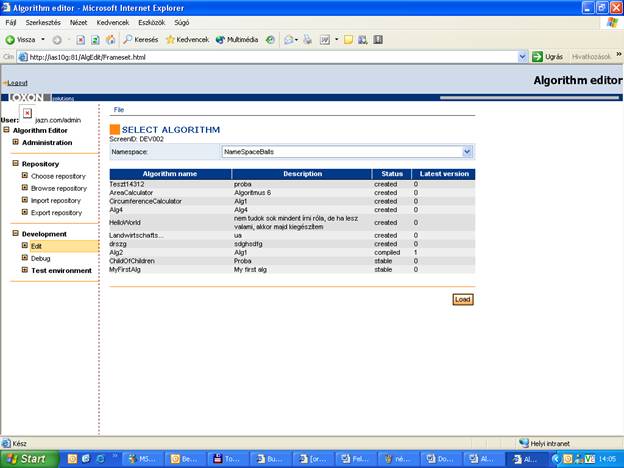
Fig. 25
Screen description:
This screen makes it possible to view the source code of the chosen algorithm and to edit the algorithm itself (Fig. 26).
In this screen, you can read, in addition to the source code of the algorithm, the most important information related to the algorithm and can perform the operations in connection with most of the algorithms (save, parse, compile, etc.).
Screen elements:
The textbox beside the Algorithm name features the name of the algorithm which can be modified as required.
The textbox beside the Package' inscription includes the name of the package.
You see next to the Status inscription the current status of the algorithm and
next to the Revision the current version number.
Locked by indicates the user working on the given algorithm (i.e. the person that has checked it out).
Locked since however represents the time when the check-out operation has been carried out.
There are 3 combo boxes below the Declarations inscription:
The combo box below the Methods inscription indicates the methods sorted out of the code.
The combo box below the Constants inscription reveals the constants sorted out.
The combo box below the Variables inscription displays the variables sorted out.
On opening the algorithm, the program performs automatically the parsing, so these data elements will be available at once.
Notice that in this case the local variables will not be sorted out, but only the global ones.
Source code:
The algorithm code can be edited in the large field below the inscription Source code (the tab key does not operate correctly due to the Explorer scheme).
In the blue part below the field you see the various error messages and the results of the execution of the individual functions, respectively.
The program shows in the two rectangles in the lower right-hand part the position of the cursor within the source code. (The rectangle on the left refers to the line number and the rectangle on the right to the column number.)
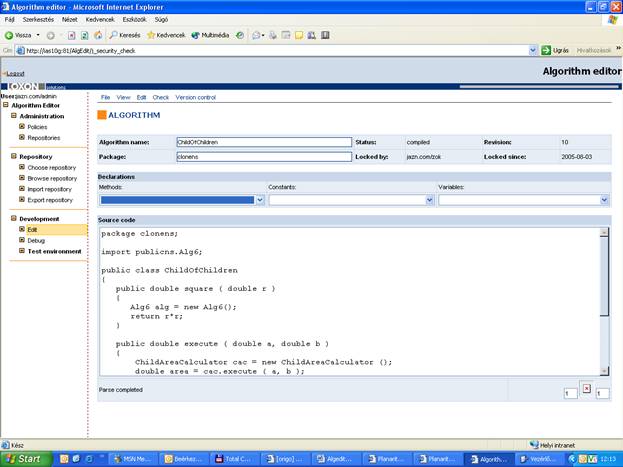
Fig. 26
Viewing the rather large dimension of the upper menu bar, its description is divided into several clauses.
By means of this menu bar you can perform certain operations on the source code and can also get additional information related to the given algorithm.
The menu bar includes five menu items which are in sequential order as follows:
File
View
Edit
Check
Version Control
The File menu supports the basic algorithmic operations, i.e. delete, save and open algorithms (Fig. 27). The first three items of the menu cover such functions which have already been described in previous clauses (4.1, 4.1.1, 4.1.2):
Task list
New
Open
With the Save item the user can save the source code created, provided however that he/she has been the person who checked out the given algorithm. (Are these conditions not fulfilled, the save operation of the user will not be executed.)
When pressing Delete, the program prompts for confirmation and then deletes permanently the algorithm.
Because currently this function allows any user to delete any algorithm (regardless of its state), it is important that before deleting the user makes sure he/she does not destroy the work of others!!!
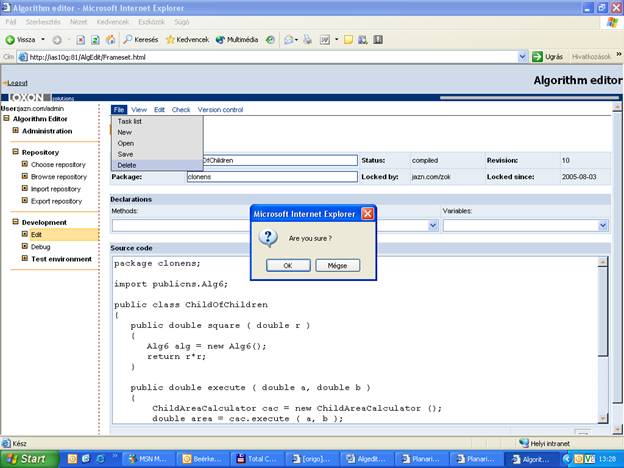
Fig. 27
The functions covered by the View menu facilitates to get additional information in connection with the source code (Fig. 28). The menu items are the following: Source, Highlight syntax, Constants, Variables, Preconditions, Postconditions.
Currently only the first two function are operable: the Source and the Highlight syntax.
The Source permits to get back to the source code shown in the screen, but this feature has at present no relevance, because this more detailed upper menu can only be accessed from this screen.
When activating the Highlight syntax function, a more profound view of the code appears in a new window (Fig. 28).
Notice that the execution of this function is only possible if the code is suitable for parsing. Is this not the case, the new window includes the same code, without highlights and with an error message saying that the algorithm is unprepared for parsing.
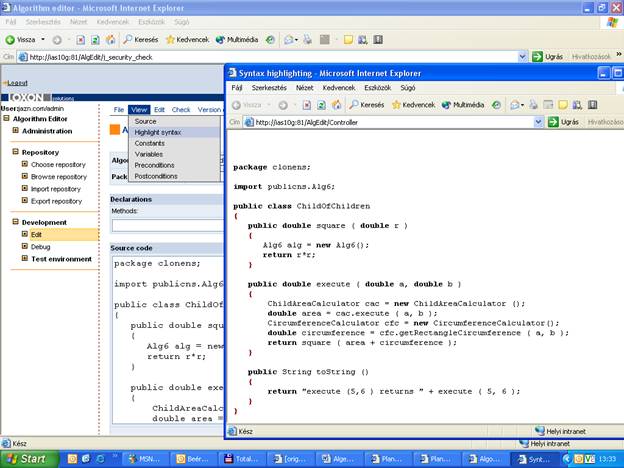
Fig. 28
The development of this menu is underway; a click on the Browse option directs the user to the same screen as by the Browse repository menu item, except that in this case the Browse will be shown in a separate window (Fig. 29).
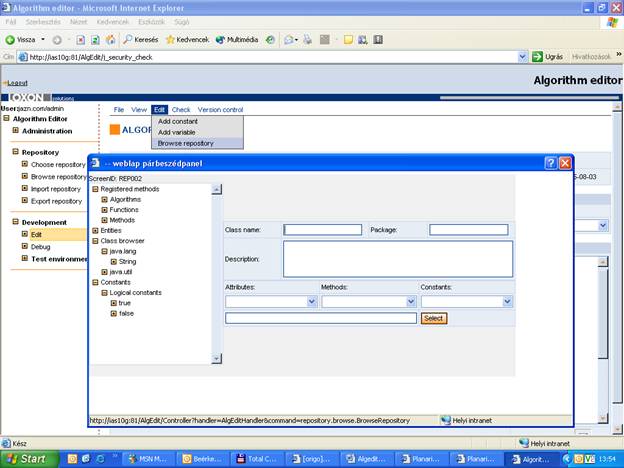
Fig. 29
This menu includes the functions that support various checks etc. to be carried out on the algorithm. The menu items are the following (Fig. 30): Check, Compile source, Dependencies and Run.
The Check menu item performs parsing of the source code, resulting either in a message at the bottom of the screen that reveals any possible bugs or a Parse completed message in the case where no bug was detected in the algorithm. On any bug in the algorithm, the parse function stops continuing the check, independently of any additional bugs of the algorithm. Then the exact location of the bug is displayed at the bottom of the source screen (xth line yth column), and the function highlights also the faulty line (Fig. 30).
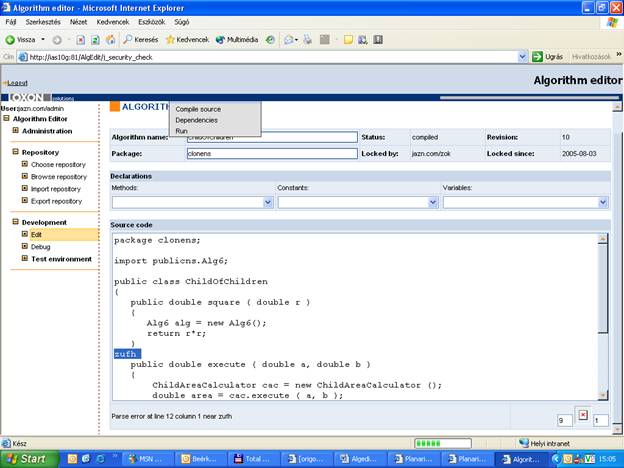
Fig. 30
The Compile source option translates the algorithm into computer code (and saves it in the database) and switches the status of it to compiled.
An error message is displayed in the bottom line if the algorithm can not be translated.
Surely, the algorithm can not be complied if the parsing operation indicates a bug.
Important!: Before starting the compile operation the use must save the algorithm anyway, because the compile operation translates only the saved part of it!!!
Dependencies
Screen description:
By clicking on the Dependencies menu item the user can view the dependency table. All dependencies of the algorithm are shown in this screen, independently whether the algorithm is a parent or a child (Fig. 31).
Screen elements:
In the upper part of the screen are shown the name and the namespace of the algorithm as well as the name of the package.
The Parent namespace field represents the namespace of the algorithm that plays the role of a parent in the given relation.
The Parent algorithm field shows the name of the algorithm that plays the role of a parent.
The Child namespace field represents the namespace of the algorithm that plays the role of a child in the given relation.
The Child algorithm field shows the name of the algorithm that plays the role of a child.
The Relation field refers to the role of the algorithm that has been opened.
By pressing the Back button the user comes back to the Source screen.
The list can be updated by pressing the Refresh button.
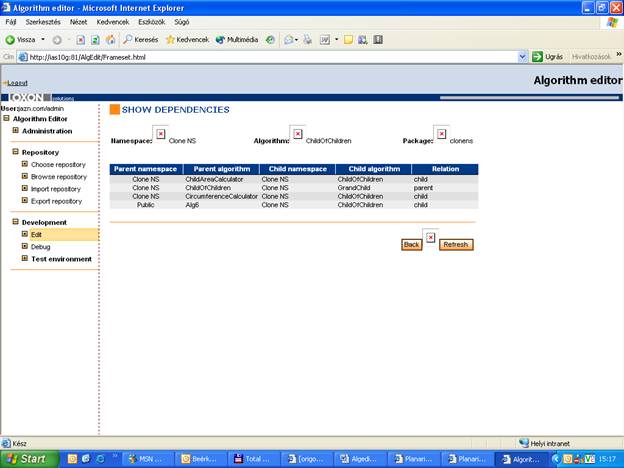
Fig. 31
Regarding the dependencies it is important to note that an algorithm of a given namespace can invoke algorithm methods only from its own namespace and/or the public namespace (i.e. it can have a parent in the own namespace and/or in the public namespace as well, but a child can originate only from its own namespace).
An algorithm in the public namespace can only refer to an algorithm method to be found in an other public namespace (i.e. it can have a parent stemming only from the public namespace, but its child can be in any other namespace).
Run
Through the Check and Run options the user can run the algorithm that has been opened, but this is only possible when it has already been translated successfully.
The result of the run is shown at the bottom of the screen (where also the error messages are displayed).
The options of the Version control menu are the following (Fig. 32): Check out, Check in, Undo check out, Show history
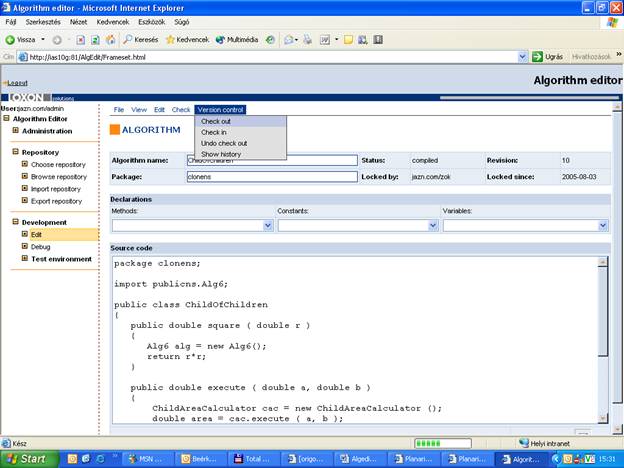
Fig. 32
Check out
After clicking on the Check out option the user can check out the open algorithm, so he/she is the only person to work on it. Simultaneously the namespace will also be locked, thus no other user is able to edit any other algorithm within the given namespace.
At the moment of the check-out a new algorithm version is created.
Obviously this operation will not be executed in the case where the algorithm or the namespace has already been locked by an other user.
Important: The user should not begin editing the algorithm before checking it out, because otherwise all completed work would be lost.
Check in
By clicking on the Check in option the user can check in the algorithm he/she has finished. A click on this option lets a popup with the Check in comment heading appear, providing the user the possibility to add remarks to the given algorithm version and then, either by clicking on the Perform check in, to validate or by clicking on Cancel to revoke her/his decision.
Important: Here the program still executes the function, even if the algorithm is faulty, not complied, etc. Then, however, the algorithm will not be able to operate during the tests.
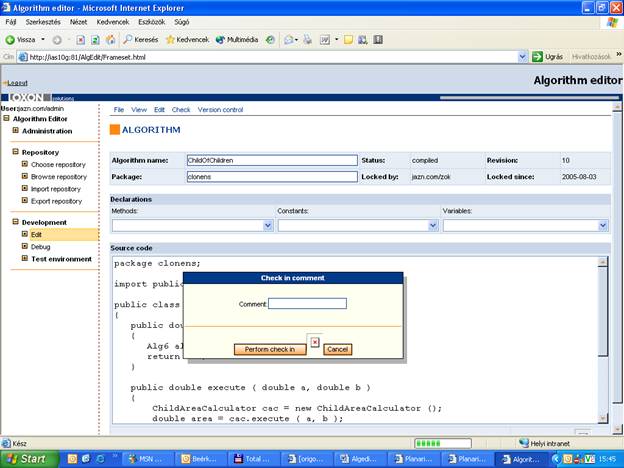
Fig. 33
Undo check out
Clicking on this option permits the user to restore the last state of the algorithm it had before the check-out, i.e. the locking of the algorithm will be released. Any previous modification will then be lost!
After pressing the button, a popup prompts for confirmation, after which the process will be completed.
This function is of course only operable if the initiating user is identical with the person who has checked out the algorithm.
Show history
Screen description:
Clicking on this option directs the user to a screen where the prior history of the algorithm can be viewed (Fig. 34).
Screen elements:
In the upper part of the screen the namespace and the name of the algorithm are shown, as well as the name of the package relating to the algorithm.
The Version field shows the version number.
The User field indicates the name of the user checking in (is the last version checked out, then the name of the user checking out is shown in this field).
The Date field displays the date of checking in (and, in the above case, that of checking out).
The Comment field shows the comment appended to the algorithm at checking in and, in the case of checking out, the checked out inscription.
Below the Tag field the tag relating to the given version is placed.
By pressing the Back button the user comes back to the Source screen.
The actual history list can be updated by clicking on the Refresh button.
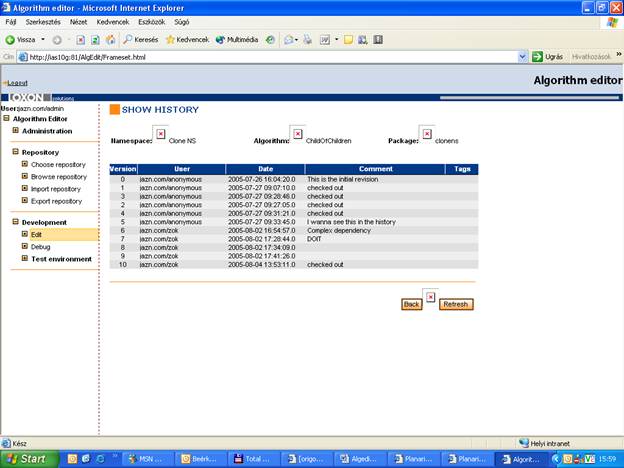
Fig. 34
Screen description:
By clicking on the Single run option of the leftmost menu the user has the possibility to test the operation of the methods of stable or compiled algorithms by specifying different parameters (Fig. 35).
Screen elements:
By means of the combo box beside the Select algorithm inscription the user can choose the name of the algorithm to be tested. This list permits the selection only of the stable algorithms. (It may still occur that the algorithm is in the stable state, but it is not compiled. Then the user receives the following error message: Algorithm is not yet compiled.)
From the combo box beside the Method name inscription the user can choose a method of the algorithms that have been selected before.
Press the Next button to reach the test screen, but before specify an algorithm name and a method.
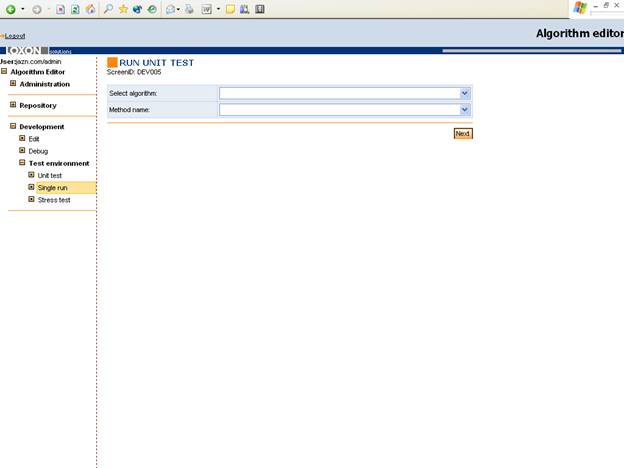
Fig. 35
Screen description:
Press the Next button on the previous screen to arrive to a screen where different parameters for testing the selected algorithm method can be specified (Fig. 36).
Screen elements:
In the upper part of the screen you see the name of the selected algorithm, the package name and the selected method name.
The matrix contains always 3 columns.
The first column (Param) shows how many input parameters the method has (in reality only a serial number).
The second column (Parameter type) visualizes the type of the input parameter to be specified (double, String, etc.).
The third column (Parameter value) makes it possible to define the actual values of the given parameters.
By means of the Run button in the lower right-hand corner the user can run the algorithm method selected with the specified parameters.
By clicking on the Back' button the user can return to the previous screen.
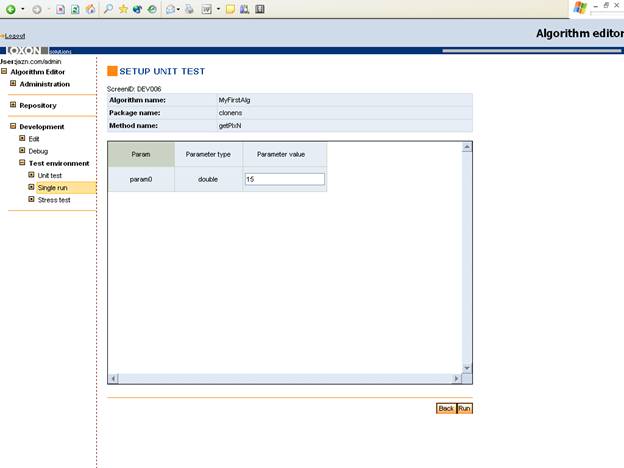
Fig. 36
Screen description:
Clicking on the Run button lets the program run the method with the specified parameters and returns with the end result of the run (Fig. 37).
Screen elements:
The elements on the screen are mostly identical with those of the previous screen.
The differences are:
The Run button disappears in the lower right-hand corner.
The input parameters can not be specified in the Parameter value column.
A return line is inserted in the matrix, where the parameter value column represents the end result of the run (and the adjacent column, the type of the output parameter).
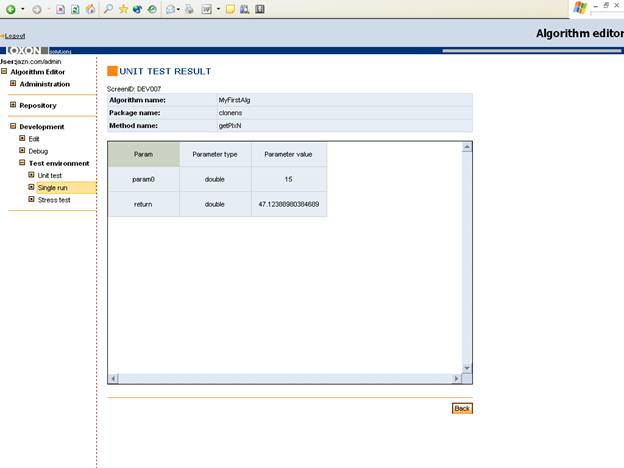
Fig. 37
Screen description:
By clicking on the Unit test option of the leftmost menu the user has the ability, as with the Single run, to test the operation of the stable or compiled algorithms by specifying different parameters, but here an arbitrary number of tests can be defined (parameterized) for the individual algorithms. These are stored by the system, and their simultaneous run is then possible.
Accordingly, the methods of the algorithm can be tested easier during the algorithm changes (Fig. 38).
Screen elements:
From the combo box beside the Namespace inscription in the left upper part of the screen the user can select the desired namespace.
Pressing the Load button on the right-hand side of the page permits to load the stable and/or compiled state algorithms located in the selected namespace.
Beside the Package' inscription the package name of the selected namespace;
Beside the Locked by inscription the name of the user locking the namespace;
In the Algorithm name field the algorithm name;
In the Status field the status of the algorithm;
In the Latest version field the last version of the algorithm; and
In the Test case count field the number of the test cases created for the given algorithm is shown.
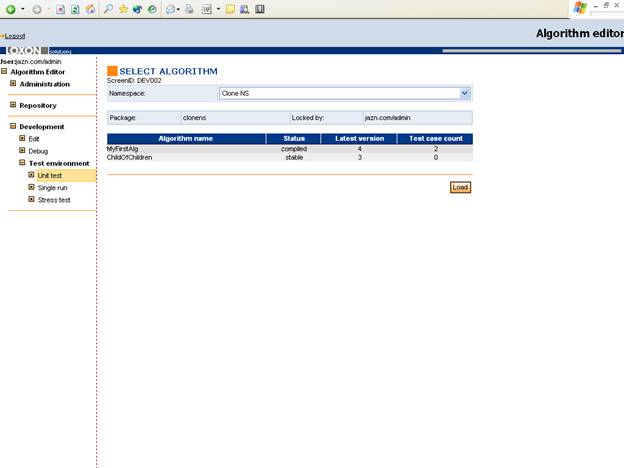
Fig. 38
Screen description:
Click on one of the elements of the algorithm list to visualize the test cases already created and belonging to the selected algorithm, as well as to create new tests (Fig. 39).
Screen elements:
The Test case name field shows the name of the test case;
The Method name field the method tested;
The Status field the state of the test;
The Message field the message relating to the test case (e.g. in case of an error, its type); and
The Return value the end result returned after running the test.
Click on the Add unit test case button to specify a new test case.
Click on the Run all button to run again all tests included in the list.
By pressing the Back button the user comes back to the previous screen.
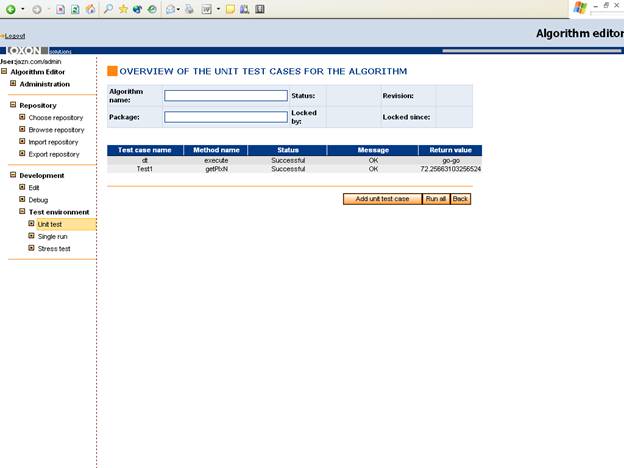
Fig. 39
Screen description:
Clicking on the Add unit test case button opens a popup with the header Add new unit test case where the user can specify data relating to the new test (Fig. 40).
Screen elements:
From the combo box beside the Method name inscription the algorithm method to be tested can be selected.
The textbox beside the Test case name inscription permits to enter the name of the new test case.
Click on the Add button to add the new test case to the list.
Pressing the Cancel' button redirects to the previous screen.
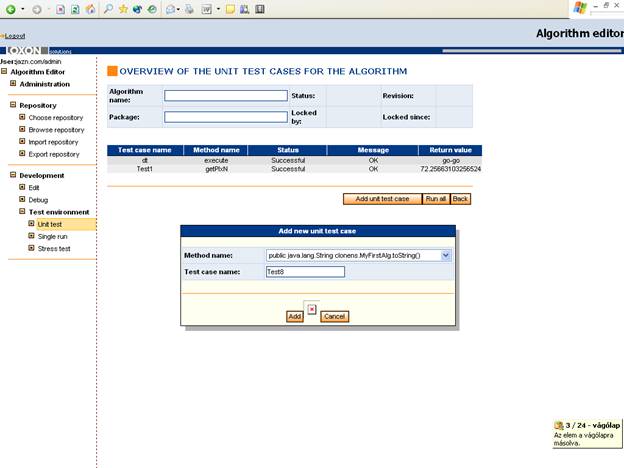
Fig. 40
Screen description:
Click on one of the list elements to add test values to the method selected. The parameter screen is identical with that shown in Fig. 36.
|
Politica de confidentialitate | Termeni si conditii de utilizare |

Vizualizari: 1457
Importanta: ![]()
Termeni si conditii de utilizare | Contact
© SCRIGROUP 2025 . All rights reserved