| CATEGORII DOCUMENTE |
| Bulgara | Ceha slovaca | Croata | Engleza | Estona | Finlandeza | Franceza |
| Germana | Italiana | Letona | Lituaniana | Maghiara | Olandeza | Poloneza |
| Sarba | Slovena | Spaniola | Suedeza | Turca | Ucraineana |
![]()
VisionShape, Inc.
TiffSurfer 4.
User Manual
Table of Contents
General Information
Plug-in Description
System Requirements
What is TiffSurfer?
Downloading TiffSurfer
Evaluating TiffSurfer
Image Specifications
Technical Support
Uninstalling TiffSurfer
TiffSurfer Versions
Installation
Viewing Images
Testing TiffSurfer
Batch Viewing
The TiffSurfer Window
Cursors
Scaling modes
Navigation buttons
Other buttons on the general toolbar
Annotations
Internal vs. External Annotations
Buttons on the annotation toolbar
Image Processing
Thumbnails
Thumbnail Navigation Window
Thunbnail Selection Window
Preferences
Save Images Dialog
PDF Creation
Printing
Email an Image
Scanning
Barcode Recognition
OCR
Text Extraction
Creating a MIME Association
Displaying Image Information
Troubleshooting
Installation
General
Printing problems
Installing on Windows 2000 or XP
A plug-in is a program that allows a web browser to transparently handle a specific task not included in the original browser program. A plug-in can do just about any specific task the browser does not. TiffSurfer is a specialized program that allows the viewing of certain image files. Netscape and Internet Explorer contain a registry that lists all of the 'objects' it can view when an HTML page is displayed. The browser itself currently supports certain standard image files, such as JPEG and GIF files. Some graphics files require a plug-in or instructions on how to handle the file within the browser program. The TiffSurfer plug-in is designed to display graphics formats, i.e. tiff images, which are not handled by the browser program. Some of the advantages of plug-ins include seamlessly writing directly to the window displaying the HTML page and incorporating itself into the browsers window. If a plug-in is designed to display images, HTML code can be written to account for and activate any plug-ins installed on your computer that could view the image. This HTML page can then be loaded with the image viewable by activating the plug-in to produce the image on the page. The plug-in is only loaded and executed when the user looks at a page that has an appropriate object, i.e. tiff image, coded within the page. When the user leaves the page, the plug-in is temporarily deactivated. VisionShape's TiffSurfer plug-in allows your browser to view tiff images on the web or from your computers or networks hard drive(s) in this manner.
When the web page author designs a page in HTML, he or she must include a tag that will call the browsers plug-ins (EMBED or OBJECT). This tag will have the location of the image as a parameter. When the browser sees this tag, it checks to see if it has a plug-in that can handle this kind of data. If it doesnt, the image on the HTML page will not be visible and will appear as a broken image icon. If the browser locates the plug-in, the plug-in is loaded and the image is displayed in the browser by the plug-in. The plug-in receives all the information contained in the tag. If that information is the URL of a tiff file, the plug-in can use some of the browser's APIs to grab the tiff data and display the image. This is very transparent to the user. It is possible to put the URL location of TiffSurfers install file into the tag. Thus, if TiffSurfer is not installed on the users computer, the browser can automatically link to TiffSurfers download page and allow the user to download and install TiffSurfer immediately.
Operating Systems: Windows 98SE, Windows ME, Windows 2000, and Windows XP.
Windows 95, the first edition of Windows 98, and Windows NT 4.0 are not supported.
Internet Browsers supported: Internet Explorer 4.x and higher, and Netscape 4.x, 7.x, and 8.x. Netscape 6 is not supported.
TiffSurfer is a powerful plug-in that provides complete document imaging and handling functions directly in the web browser. When TiffSurfer is installed on your computer, your browser will automatically load it when a tiff image is viewed. A multi-function toolbar at the top of the viewing window allows users to easily access the many functions of TiffSurfer. The toolbar provides a selection of tools to view, annotate, rotate, add notes, zoom, magnify, print, enable thumbnail views, OCR, create a PDF file, and image cleaning. TiffSurfer is fully compatible with Microsoft and Netscape browsers. VisionShape created the TiffSurfer plug-in to help individuals view tiff images on the Internet and help web site and Intranet managers present documents and images attractively and efficiently without having to consider utilizing expensive web authoring personnel. This saves managers time, energy, and costly resources.
You can download TiffSurfer by going to VisionShapes web site at https://www.visionshape.com.
TiffSurfer has a 15-day evaluation period. After 15 days you will need to either purchase or uninstall TiffSurfer. TiffSurfer will become nonfunctional after the evaluation period has expired. Please see TiffSurfer Uninstall for information on uninstalling
TiffSurfer and On-Line Purchase for information on purchasing TiffSurfer.
The following images are supported:
TIFF
Single and Multi-page TIFFs
Compressed
Group 3 Modified Huffman
Group 3 Fax
Group 3 2D
Group 4 2D
Uncompressed
LZW
Old JPEG (TIFF 5.0 Specification)
JPEG Gray
JPEG RGB
JPEG YCBCR
CALS
JPEG
JPEG2000
GIF
PCX
PBM
Windows Bitmap (BMP)
We do not currently support the compression type CCITT Group 5 or higher. Tiff images have a .tif or .tiff extension. The MIME type for a tiff image is image/tiff.
During the installation, you will be given the option of using TiffSurfer as the default viewer for JPEG and GIF file formats.
You may use our on-line FAQ site for support questions with TiffSurfer. (This site can be reached by going to the VisionShape web site and clicking Support.) Technical support is provided to certain purchases of TiffSurfer. Please consult your salesman at sales@visionshape.com for questions regarding obtaining a support contract.
Prior to running the uninstall program, close all your browsers. After all browsers are closed, run the unwise32.exe program located in the TiffSurfer directory to uninstall TiffSurfer. You may also choose Uninstall TiffSurfer by clicking on Start Programs VisionShape TiffSurfer or double-click on the Add/Remove Programs icon located in your computers Control Panel window and locate TiffSurfer in this window to uninstall it.
TiffSurfer has three versions: Basic, Advanced, and Complete. Each version contains the features of the previous one and some additional options and features. TiffSurfer Advanced allows the use of the image processing functions. TiffSurfer Complete allows access to the OCR Images dialog and the ability to create a searchable PDF on the Create PDF dialog.
Close all Internet browsers before running the installer. If any Internet browsers are open, your computer might need to be rebooted at the end of the installation. You will be prompted to reboot if it is necessary. Using Windows Explorer, go to the directory in which TiffSurfer was downloaded to and double click on the installer. If you are not familiar with Windows Explorer, use the Start button on your desktop to choose Run and locate the installer by browsing your hard drive(s). You can click on the Cancel button to exit the installation process at any time during the TiffSurfer installation.
Figure is the first window of the install. We have provided you with a step-by-step guide to installing TiffSurfer on your computer. Please read the following material closely and follow the steps listed to correctly install TiffSurfer.
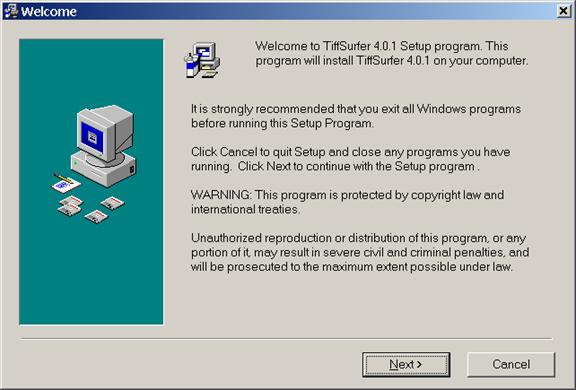
Figure .
Click on the Next button to continue or the Cancel button to exit the installation process.
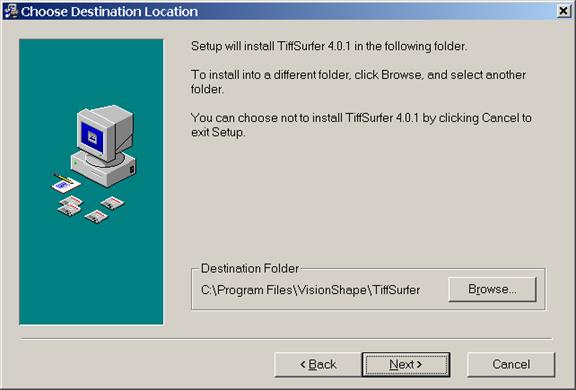
Figure .
This step allows you to change the installation directory name and location to one of your choice or leave the default installation directory to C:Program FilesVisionShapeTiffSurfer. Do not install TiffSurfer to your browsers plug-in directory. It is always recommended to install TiffSurfer into the default directory. Click on the Next button to continue, the Back button to return to the previous window, or the Cancel button to exit the installation process.
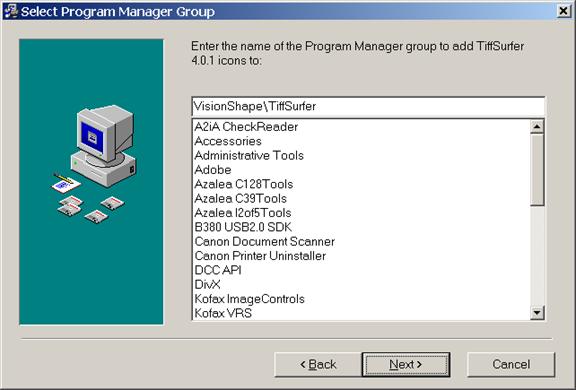
Figure .
This step allows you to choose the Start menu location that will contain TiffSurfers shortcuts.
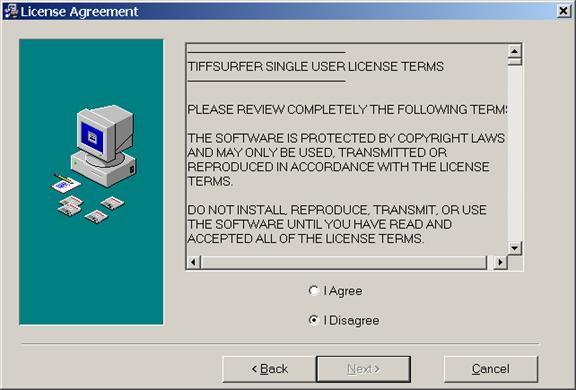
Figure .
After reading the licensing agreement, you must click on the I Agree radio button and then the Next button to continue, the Back button to return to the previous window, or the Cancel button to exit the installation process.
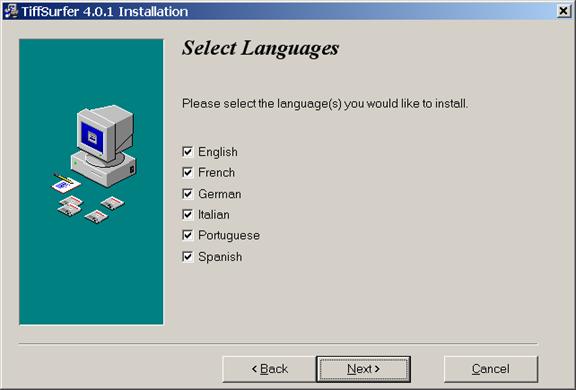
Figure .
You will only see Figure if you have installed the Complete version. This window allows you to select (checked) the languages you wish to install by clicking on their checkboxes. The default language is English. The language data files allow the OCR Engine to correctly interpret the text on an image. The language choices are not designed to convert text from one language to another, i.e. English text will not convert to French by selecting French as the recognition language. Click on the Next button to continue, the Back button to return to the previous window, or the Cancel button to exit the installation process.
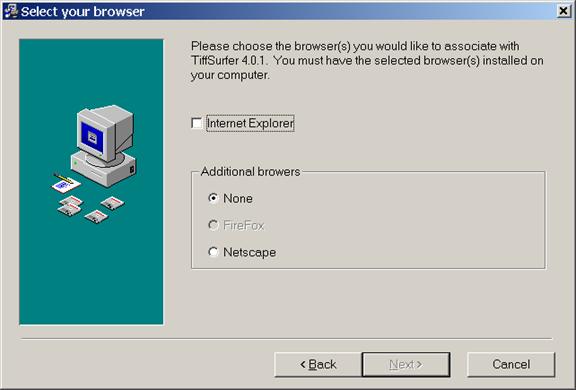
Figure .
The next window allows you to decide which of the web browsers installed on the computer will use TiffSurfer to view images. If you have both Netscape and FireFox installed on your computer, you can only associate TiffSurfer with one or the other.
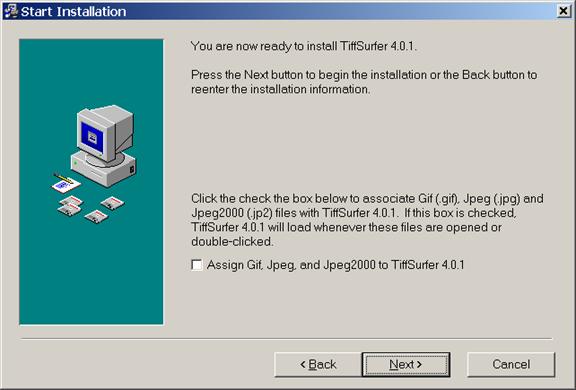
Figure .
TiffSurfer can be used as the default viewer for JPEG and GIF images. You may select this functionality by putting a checkmark in the checkbox in Figure . If the box is not checked, TiffSurfer will not be the viewer for JPEG or GIF images, and these image types will be handled by whatever was displaying them before.
Click on the Next button to continue, the Back button to return to the previous window, or the Cancel button to exit the installation process.
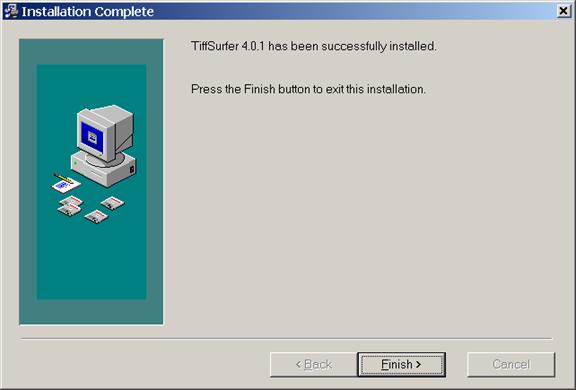
Figure .
Congratulations! Figure shows that you have finished installing the TiffSurfer plug-in. Click on the Finish button to exit the installation process.
If any browsers were open during the installation process, you may be prompted to reboot. If you are prompted to reboot, click on the OK button to reboot your system. Please make sure all other programs are closed and your work is saved before rebooting your computer.
You can test TiffSurfer by clicking on your Start button and going to Program Files VisionShape TiffSurfer Images Single Page Tiff. In order to open the tiff files from your Internet browser, launch your Internet browser and choose Open Page (for Netscape) or Open (for Internet Explorer) from the File drop down menu. Once you have the Open window, type the location of the image into the file name text box. (This depends upon where you installed the plugin during installation; normally it will be C:Program FilesVisionShapeTiffSurferImagessingle page.tif.) This will open the tiff image and load TiffSurfer. You can also open a tiff image from Windows Explorer. Move your mouse pointer over the Start button and click your right mouse button once. This will open a small menu. Click once on the word Explore. You may also click on the Start button and go to Programs Windows Explorer. Once Windows Explorer has opened, find the Images subdirectory in the directory you chose during the installation of TiffSurfer. Double click on single page.tif in this directory. Your browser will load with TiffSurfer inside it.
You may also view a batch of images that are on you computers hard drive. These are the following steps to view a batch of images on your hard drive:
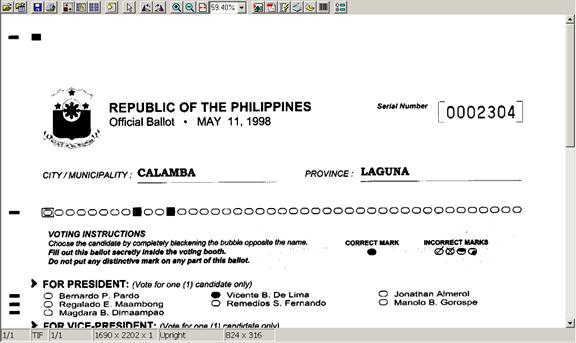
Figure .
Figure 6.1 shows the layout of the TiffSurfer window. In most situations, this window will fill up the web browsers entire viewing area. However, if the plugin is being used to view an image that is embedded in a web page, the window might only occupy a portion of the viewing area.
At the top of the window is the general toolbar. This toolbar contains buttons which can be used to open images, display the thumbnails views, change the way the image is displayed, bring up the programs processing dialogs (OCR, etc), and some miscellanous functions. The general toolbar is always visible.
At the bottom of the window is the status bar, if it is being displayed. By default, the status bar is shown, but it can be turned off on the Preferences dialogs Show/Hide Features tab. From left to right, the panes in the status bar show the following information:
The current and total number of individual files in the listfile that is being viewed. (If you opened an individual file, rather than a listfile, this will always be 1/1.) If a plus sign appears to the right of the numbers, it means that the plugin is still in the process of determining how many files are in the listfile, and the numbers may not be accurate.
The file type of the image that is being viewed TIF, JPG, etc.
The current and total number of pages in the individual file that is being viewed. If a plus sign appears to the right of the numbers, it means that the plugin is still in the process of determining how many files are in the listfile, and the numbers may not be accurate.
The width (in pixels), height (in pixels), and color depth of the image that is being viewed. A color depth of 1 is a bitonal (black and white) image, a color depth of 4 is a 4-bit grayscale image, a color depth of 8 is an 8-bit grayscale image, and a color depth of 24 is a 24-bit color image.
The orientation at which the image is being viewed.
The image coordinates (in pixels) of the mouse cursor.
If the current listfile has more than one individual file, double-clicking on the status bars leftmost pane will display the dialog shown in Figure , which allows you to jump to the first image in an individual file.
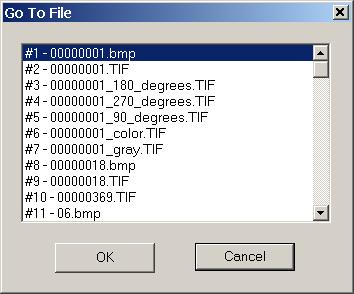
Figure .
Right-clicking on the image will display a pop-up menu containing most of the features on the general toolbar. There are also several items under the menus Help submenu which are only available through the menu, and do not have buttons on the toolbar: displaying the current images properties, creating a MIME association, and displaying the plugins about box.
If you click on the Change Cursor button on the toolbar, a menu will appear allowing one of the cursor types to be selected. The graphic that is shown on the Change Cursor button indicates the cursor that is currently in use.

Figure .
![]()
Zoom This cursor allows dragging over a section of the image to zoom in. Available in all versions.
![]()
Hand Panning Allows the user to hand pan the image with the mouse. This is commonly used when the image is not sized to Fit to Page.
![]()
Copy to Clipboard Allows the user to drag over a section of the image to copy the selected area to the clipboard as a bitmap image.
![]()
Magnifier While this cursor is active, a small magnifier window will be open to magnify the image. Select the location to magnify by clicking on the image.
![]()
Selection Allows the user to drag over a section of the image to select that area. The selected area can be used by image processing functions and the processing dialogs.
![]()
Annotation While this cursor is active, the annotation toolbar will be visible. See the Annotations chapter for more information.
If you click on the Change Scale button on the toolbar, a menu will appear allowing one of the cursor types to be selected. The graphic that is shown on the Change Scale button indicates the scaling mode that is currently in use.
Figure .
![]()
Fit to Width Fits the image horizontally to the window so you do not need to scroll left or right to see the entire width of the image.
![]()
Fit to Height Fits the image vertically to the window so you do not need to scroll up or down to see the entire height of the image.
![]()
Fit to Page Fits the image horizontally and vertically to the window so you do not need to use the scrollbars to see the entire image.
![]()
Actual Size Shows the image at a zoom factor of 100%.
![]()
Custom Zoom This mode is selected automatically if you type a scaling factor into the combobox to the right of the Change Scale button.
The combobox to the right of the Change Scale button allows a specific scaling factor to be entered.
A navigation button will only be shown if it has some use in the current listfile. For example, if there is only one file in the listfile, the file navigation buttons will not be shown.
![]()
Figure .
![]()
Previous File Goes to the previous image file.
![]()
Next File Goes to the next image file.
![]()
Previous Image Goes to the previous image in the current image file.
![]()
Next Image Goes to the next image in the current image file.
The combobox between the Previous Image and Next Image buttons allows a specific page number to be entered.
The following list shows the rest of the buttons which can potentially be on the general toolbar. Some of the buttons are only available in certain versions of the plugin. Also, if a function group has been turned off on the Preferences dialogs Show/Hide Features tab, the buttons that relate to the function group will not be on the toolbar.
![]()
Open an Image Opens the open dialog window to select an image to open.
![]()
Open a Directory Opens all of the files in a directory as if you had created a listfile containing all of them.
![]()
Save Opens the Save Images dialog.
![]()
Toggle Thumbnail Selection Window Enables or disables the thumbnail selection window. See the Thumbnails chapter for more information.
![]()
Print Displays the print window. See Printing for more information.
![]()
Navigator Window Opens a small Navigator window to navigate the image. Click on and hold the left mouse button and drag the black block inside the Navigator window to move around the image.
![]()
Toggle Thumbnails Enables or disables a thumbnail view of the currently viewed listfile. See the Thumbnails chapter for more information.
![]()
Toggle In-Line Thumbnails Enables or disables a thumbnail view of the currently viewed listfile, side-by-side with the current image. See the Thumbnails chapter for more information.
![]()
Show/Hide Annotations Allows user to hide or show annotations on an image. Click the button to toggle between annotations shown or hidden.
![]()
Rotate Left Rotates the image 90 degrees to the left.
![]()
Rotate Right Rotates the image 90 degrees to the right.
![]()
Zoom In Allows the user to zoom into the image.
![]()
Zoom Out Allows the user to zoom out from the image.
![]()
Toggle Image Processing Toolbar Enables or disables the image processing toolbar. See the Image Processing chapter for more information.
![]()
Convert to PDF Allows the user to convert images to a PDF.
![]()
OCR Images Allows the user to perform OCR on images. Available in the Complete version only.
![]()
Scan an Image Displays a dialog that allows you to scan images into TiffSurfer from a TWAIN data source.
![]()
Email Image Starts your default email application and creates a blank email with the currently viewed image as an attachment.
![]()
Barcode Recognition Allows the user to perform barcode recognition on images.
![]()
Preferences Displays the Preferences dialog.
Annotations allow the user to emphasize or cover a specific area of an image. The annotation features included in TiffSurfer are highlighting, freehand drawing, lines, blocking (via redaction or rectangle) and stamping (via image or text).
To draw an annotation, you must first display the annotation toolbar. The annotation toolbar can be displayed by selecting the annotation cursor from the cursor dropdown list. Click on the annotation toolbar button that corresponds to the type of annotation you want to draw, then click and hold your left mouse button while dragging your mouse pointer across the image.
After drawing an annotation, that annotation is automatically selected. To select a different annotation, left-click on it.
If an annotation is selected, you can drag a corner of the annotation to resize it, or drag its center to move it around. Right-clicking on the selected annotation will display a menu allowing you to change its properties or delete it.
Internal annotations (also called Wang annotations) are only allowed for TIFF files. They are saved directly within the TIFF file itself. You must have write access to the TIFF file to be able to save internal annotations. TiffSurfer cannot write internal annotations to images that are located on web sites, only to images that are stored on the local file system.
External annotations are saved to the annotations directory that is configured through the Preferences dialog. You can use external annotations with any type of image file, and with files that are located on web sites. The name of the annotation file is based upon the name of the original file and the page number within that file. For example, the external annotations for page 32 in the image file test.tif would be stored in an annotation file named test-32.ann.
The following list shows the buttons on the annotation toolbar.
![]()
Highlight Allows the user to draw a highlight annotation on the currently viewed image.
![]()
Freehand Allows the user to draw a freehand annotation on the currently viewed image.
![]()
Line Allows the user to draw a straight-line annotation on the currently viewed image.
![]()
Rectangle Allows the user to draw a rectangle outline annotation on the currently viewed image.
![]()
Red Action Allows the user to draw a solid rectangle annotation on the currently viewed image. This is usually used to hide part of an image from view.
![]()
Image Allows the user to draw an image annotation on the currently viewed image.
![]()
Text Note Allows the user to make a text note annotation on the currently viewed image. This type of annotation will obscure the image data behind it.
![]()
Text Stamp Allows the user to make a text stamp annotation on the currently viewed image. Within certain limits, the text size will scale up or down to match the size of the drawn rectangle.
![]()
Regular Text Allows the user to make a regular text annotation on the currently viewed image. This type of annotation will not obscure the image data behind it.
![]()
Save Annotations Allows you to save the annotations as either internal or external annotations.
![]()
Add Annotations From File Adds the annotations in an external annotations file to the currently viewed image.
![]()
Annotation Preferences Displays the Annotations page of the Preferences dialog.
Image processing is available in the Advanced and Complete versions.
The Toggle Image Processing Toolbar button displays or hides the image processing toolbar. With this toolbar, you can use various image processing functions to alter the displayed image. These changes will not be saved unless you use the Save And Replace toolbar button.
Normally, the image processing functions will affect the entire image. However, if the selection cursor is active and a selection has been drawn, the function will process only the selected area. The Preferences dialog has a setting, restrict operation to selected area, which affects whether or not the changes from the image processing function can spill out to other parts of the image.
An edit box (shown in Figure ) is located between the Rotation Options and Save And Replace buttons. By typing a number into this editbox and hitting the enter key, you can rotate the image that many degrees. Positive numbers result in counterclockwise rotation. Negative numbers result in clockwise rotation.
Figure .
The plugin maintains an undo list with the image processing functions that have been applied to the current image. (This list is discarded if you open a different image.) The Save Images, Create PDF, and OCR Images dialogs each have a checkbox that can be used to apply the image processing functions in the undo list to each image that the dialog processes. This can be used to apply a set of image processing functions to a large number of images at one time. For example, if you rotate the current image 7 degrees and then invert it, and create a PDF file which applies the undo list operations, you will end up with a PDF file where all of the images have been rotated 7 degrees and inverted.
The following list shows the buttons on the image processing toolbar.
![]()
Deskew Deskews or straightens an image that has been misaligned from a scanner or other processing.
![]()
Despeckle Removes interference or
noise an image might have obtained during scanning or other processing.
![]()
Invert Inverts the colors in the
image.
![]()
Crop Preserves all of the
image data within the selection area and discards the rest. This function can only be used after a
selection area has been drawn.
![]()
Reformat Resizes the image and/or changes its color depth. You can only change the color depth if the entire image is being processed.
![]()
Rotation Options Displays a menu allowing you to mirror the image (rotate it around a vertical axis), flip the image (rotate it around a horizontal axis), or rotate it 90, 180, or 270 degrees.
![]()
Save And Replace Replaces the image in the
original image file with the modified image.
![]()
Undo Clicking on the left side of this button will go to the previous entry in the undo list. Clicking on the arrow on the right side of this button will display a menu allowing you to go to a particular image in the undo list, or to Undo All. Undo All restores the original image and clears the undo and redo lists.
![]()
Redo Clicking on the left side of this button will go to the next entry in the redo list. Clicking on the arrow on the right side of this button will display a menu allowing you to go to a particular image in the redo list.
![]()
Image Processing Preferences Displays the Image Processing page of the Preferences dialog.
TiffSurfer has two different ways to make use of thumbnails.
The Toggle Thumbnails and Toggle In-Line Thumbnails buttons both display a thumbnail navigation window. The difference between the two buttons is that the window from Toggle Thumbnails occupies the entire TiffSurfer window, whereas the window from Toggle In-Line Thumbnails is shown side-by-side with the current image.
You can do the following things in the thumbnail navigation window:
Left-click on a thumbnail to open the image associated with the thumbnail.
Right-click on a thumbnail (and hold down) to display the filename and page number where the image is located.
The thumbnail selection window allows you to select one or more of the thumbnails in the currently loaded image or list file, and allows access to preview mode. If a processing dialog or the print dialog is displayed while in thumbnail selection mode or preview mode, the dialogs Pages field will be preloaded with the list of selected pages.
You can do the following things in the thumbnail selection window:
Left-click on a thumbnail to select that thumbnail. (Any other thumbnails that are currently selected will be unselected.)
Control-left-click on a thumbnail to select that thumbnail without unselecting any other thumbnails.
Shift-left-click on a thumbnail to select all thumbnails between that one and the last selected thumbnail.
Right-click to bring up a menu offering selection commands and access to preview mode.
If you choose to enter preview mode, the thumbnail selection window will disappear and you will be switched to a modified version of the normal TiffSurfer interface. Preview mode has the following major differences from normal mode:
You can only navigate to the images that you selected in the thumbnail selection window. The Next Image and Previous Image navigation buttons will automatically move to the next or previous image that was selected.
Right clicking will bring up a menu offering to remove the current page from the selection list or to return to the thumbnail selection window.
Some of the toolbar buttons are not shown.
You can exit preview mode either by using the right-click menu to return to the thumbnail selection window, or by pressing the thumbnail selection window button on the general toolbar.
TiffSurfers Preferences dialog allows you to configure many of the programs features. This section provides a brief overview of each of the pages in the Preferences dialog. Each control on the dialog has a tooltip that provides detailed information on the controls settings.
Each page has a button that can be used to restore the settings on that page to their defaults.
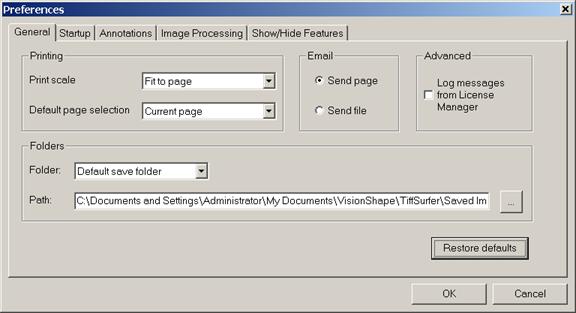
Figure .
The General tab allows you to configure printing, email, and change the locations where files will be stored.
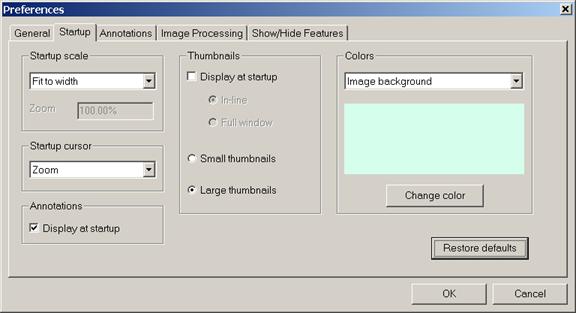
Figure .
The settings on the Startup tab are only used by the plugin when it is opening an image. Any changes you make here will not take effect until a new image is opened.
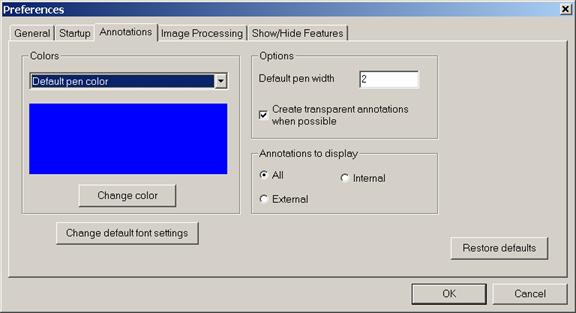
Figure .
The Annotations tab contains settings that affect drawing and displaying annotations.
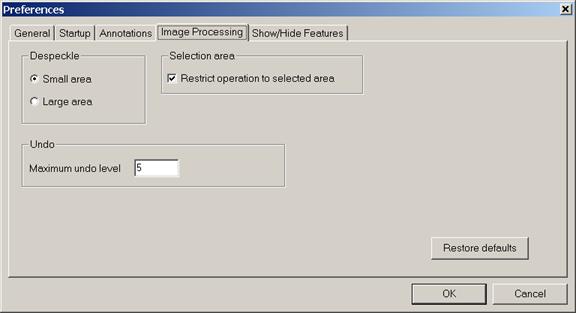
Figure .
The Image Processing tab contains settings that affect the image processing functions.
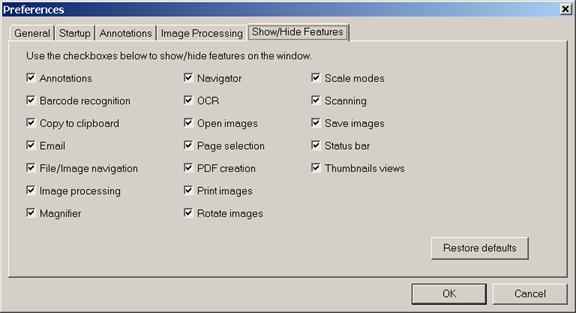
Figure .
The Show/Hide Features tab allows you to hide certain features that are normally available. The buttons and menu items associated with the feature will no longer be visible on the toolbar or pop-up menu. For example, if you turn off File/Image Navigation, you will no longer see the buttons or editbox that allow you to move from one image to another in the listfile.
If a particular feature is not present in the version of the program that you purchased, the checkbox controlling that feature will be grayed out.
This dialog allows you to create a new image file based upon one or more of the images in the listfile.

Figure .
TiffSurfer allows you to convert images into a searchable or non-searchable PDF file by clicking on the PDF toolbar icon. Searchable PDF creation is only available in the Complete version. Annotations will not be shown in the PDF file.
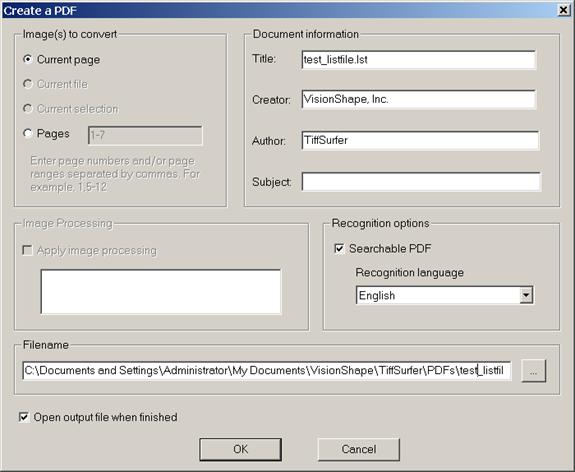
Figure .
The Print function allows you to print one or more of the images in the listfile. When you select the Print button, the operating systems standard print dialog will be displayed.
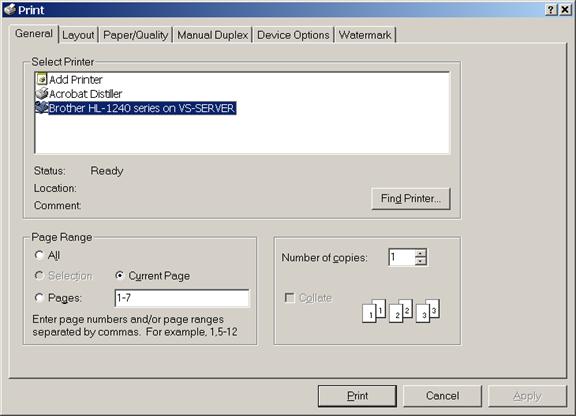
Figure .
Figure shows the print dialog that is part of the Windows 2000 and XP operating systems. Windows 98 and ME have a different print dialog which is somewhat more limited.
You may email the currently viewed image or file by clicking on the Email button in the toolbar. (Whether the image or the file will be emailed is controlled by a setting in the Preferences dialog.) This will start your default email client and create a blank email with the image or file as an attachment.
TiffSurfer has the ability to scan images from any scanner that has a TWAIN driver. All you need to do is hook up the scanner to your computer and install the software supplied by the scanner manufacturer. Click on the Scanner icon in the toolbar to display the following window.
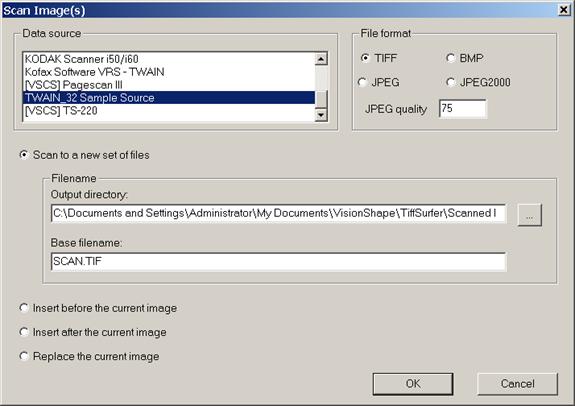
Figure .
When you install your scanners TWAIN software, it creates a data source that all TWAIN-based scanning applications can use. The scanning dialog lists all of the data sources installed on your system. Locate the data source that corresponds to the scanner you want to use and select it.
If you choose to scan to a new set of files, the names of the image files that will be created are based upon the base filename you type into the dialog. If the base filename is SCAN.TIF, the image files will be named SCAN-0001.TIF, SCAN-0002.TIF, SCAN-0003.TIF, and so on.
The other three choices insert before, insert after, or replace the current image cause the image file that is being viewed to be modified. If the plugin does not have the ability to modify the file (for example, because the file was accessed through a URL), the radio buttons will be grayed out.
When you select OK on this dialog, the next window you see will be the data sources user interface, which is provided by the scanner manufacturer. Typically this dialog will have buttons to scan, preview, change scanning settings, and exit back to TiffSurfer.
TiffSurfer can recognize barcodes on the currently displayed image. This feature is only available in the Complete version.
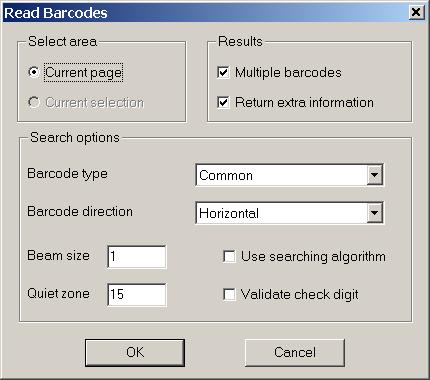
Figure .
After you click OK, a window will pop up showing the results of the barcode recognition attempt.
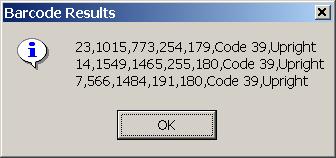
Figure .
For each barcode, the window will show the barcodes value, its left edge (in pixels), its top edge (in pixels), its width (in pixels), its height (in pixels), the type of barcode, and the orientation of the barcode (in 90 degree increments). The example in Figure shows three barcodes being successfully recognized.
TiffSurfer can perform OCR on a set of images and create an output file containing the results. OCR is only available in the Complete version.
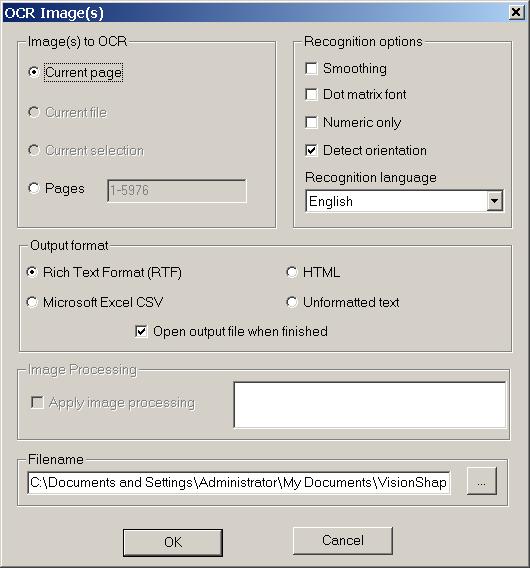
Figure .
The success of the program at recognizing the text is very dependent upon the quality of the text. Good quality text has very few torn, stuck together, smudged or distorted characters. A person would not have to make any special visual effort to read these texts, i.e. this manual. Bad text is difficult to read because of low contrast, i.e. insufficient difference between black and white areas and very light or dark documents. Typically bad text comes from dot-matrix printers, typewriter carbon copies or worn out ribbons, bad photocopies or scanned images, and text with characters that are distorted, torn, or stuck together.
The text extraction feature is a quick way to perform OCR and copy the results to the system clipboard. These results can then be pasted into other applications such as Notepad. There is no options dialog associated with this feature; the plugin always performs English language OCR using reasonable default settings.
You can perform text extraction by right clicking on an image while in normal mode and then selecting Text extraction Unformatted text or Text extraction Excel CSV from the pop-up menu. This function can only be reached by using the right-click menu; there is no button on any toolbar to perform text extraction.
If you have selected part of the image with the selection cursor, only that area will be OCRed. Otherwise, the entire image will be OCRed.
When you are using Internet Explorer, you can create a MIME association in the registry which links a particular file extension with the image/tiff MIME type. This is intended for users who have images with unusual file extensions, and most users will not need to use this feature. Netscape does not use the registrys MIME associations, and so the Create MIME Association dialog is not available in the Netscape version of the plugin.
You can create a MIME association by right clicking on an image while in normal mode, and then selecting Help Create a MIME association from the pop-up menu. This dialog can only be reached by using the right-click menu; there is no button on any toolbar to create a MIME association.
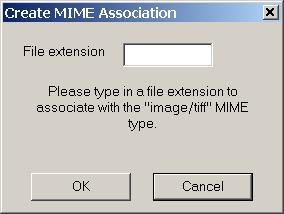
Figure .
Type in a file extension and click OK, and TiffSurfer will create a MIME association linking that file extension to the image/tiff MIME type. That means that when Internet Explorer tries to open a file with that file extension, it will load the plugin which is associated with image/tiff, which will normally be TiffSurfer.
MIME associations only affect Internet Explorer and other applications that are specifically written to be aware of MIME associations. They do not affect what happens when you double-click a file in Windows Explorer. If you want TiffSurfer to be loaded when you double-click a file with a particular file extension, then in addition to creating a MIME association, you must also set Internet Explorer as the application that handles that file type.
You can set Internet Explorer as the handler for a file type by right-clicking on the file in question in Windows Explorer, selecting Open With Choose Program, selecting Internet Explorer as the program to use, and putting a checkmark in the always use this program to open these files checkbox. (Under Windows 98, you may need to hold down the left shift key while right-clicking on the file to get the Open With menu item to appear.)
You can display useful information about the current image by right-clicking on an image while in normal mode, and then selecting Help Image Properties from the pop-up menu. This dialog can only be reached by using the right-click menu; there is no button on any toolbar to display the images properties.
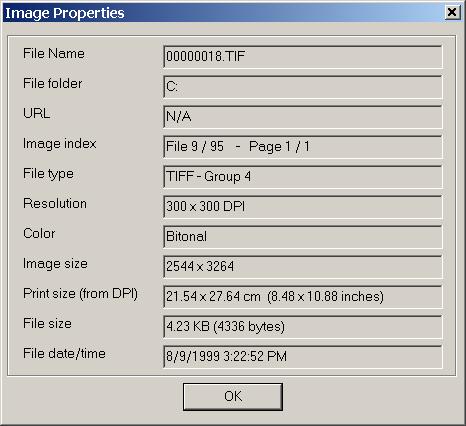
Figure .
How do I download and install TiffSurfer?
Go to our web site at https://www.visionshape.com and follow the links for TiffSurfer.
How do I know if TiffSurfer was installed correctly?
Provided you have used the default directory, you should have a C:Program FilesVisionShapeTiffSurfer directory on your computer. Otherwise, check the directory you had specified during the installation of TiffSurfer. If this directory is not found, run the install program again.
When I try to view an image, I get a broken image icon.
The broken image icon usually means a plug-in for the tiff file could not be found. You may not have installed TiffSurfer correctly. Re-install TiffSurfer by running the installer again. Another viewer being installed prior to TiffSurfer can also cause this problem. Remove the previous viewer, if any, and re-install TiffSurfer.
I get the error plug-in not found, could not load plug-in, or Could not load plug-in for mime-type image/tiff.
There are several reasons for these errors. TiffSurfer could have been installed incorrectly. You may have changed the browsers location on your hard disk, upgraded your internet browser to a newer version, reinstalled your internet browser, tried opening a tiff file with an internet browser other than the one you chose during the install, or your computers hard disk might be full. This error means the TiffSurfer could not be found or is not responding to the request by the Internet browser to view a tiff image. You should re-install TiffSurfer to restore the program.
Is it possible to customize TiffSurfer?
We frequently make custom versions of TiffSurfer. This includes but is not limited to different toolbar and/or pop up menu options and different image formats. Requests for modifying TiffSurfer can be made directly to our sales department at sales@visionshape.com.
Is it possible to add additional file formats?
Support for additional file formats can be added to TiffSurfer. Please contact our sales department at sales@visionshape.com for more information.
What are the distribution rights of TiffSurfer?
TiffSurfer cannot be copied or distributed without written permission from VisionShape. If you are interested in distributing this product over the Internet, an intranet, or via CD-ROM or other medium, please contact our sales department at sales@visionshape.com for more information.
I want to use TiffSurfer on multiple computers. How can I do this?
You may purchase individual copies of TiffSurfer as you need them, a site license for a certain number of copies, a server license for large numbers of TiffSurfer, a CD publishing license, and/or a Internet publishing license. Please contact our sales department at sales@visionshape.com for more information.
I selected No during the install when I was asked if I wanted to have TiffSurfer view JPEG and GIF images. How do I turn this on?
You must run the installer again to enable support for these file formats.
When I select an annotation and press the Delete Key on my keyboard, the annotation does not delete.
Sometimes the delete key feature will lose focus on the image after the Magnifier and/or Navigator window has been closed. Click on Refresh/Reload to reset the delete key feature.
When I try to Zoom In/Out with the + and - keyboard buttons, it doesnt work.
Sometimes the keyboard features will lose focus on the image after the Magnifier and/or Navigator window has been closed. Click on Refresh/Reload to reset the keyboard features.
Why are my images not filling the entire page when I print?
Incorrect printer drivers can commonly cause this problem. Try re-installing the correct drivers for your printer. You should also check your print settings in the Preferences dialog. You may have not correctly specified the correct Print Scale option. Setting the Print Scale to Fit to Page will print images so they fit to the size of the page.
I cannot print by selecting Print on the File drop down menu at the top left corner of the browser?
In order to print images with TiffSurfer, you must use the printer icon on the toolbar or select File Print Image from the right-click menu.
I get a blank page when printing an image.
Some printers do not have enough memory to print tiff images. The more memory a printer has the better its ability to print the image. If your printer does not have enough memory, you will get a blank page. Try switching to a printer with more memory and/or check to see if your printers drivers are installed correctly.
Installing TiffSurfer on Windows 2000 or XP could possibly interfere with security issues for the operating system depending on the users access level. Companies will typically not allow their users to install programs that interact with Internet browsers. In the event you are unable to install TiffSurfer on your system, contact your system administrator for help on installing the plug-in. TiffSurfer must be installed when an administrator has logged into the computer. After the administrator has installed TiffSurfer, it will work for all other users regardless of whether they are logged in as an administrator or a guest.
|
Politica de confidentialitate | Termeni si conditii de utilizare |

Vizualizari: 2135
Importanta: ![]()
Termeni si conditii de utilizare | Contact
© SCRIGROUP 2025 . All rights reserved