| CATEGORII DOCUMENTE |
| Bulgara | Ceha slovaca | Croata | Engleza | Estona | Finlandeza | Franceza |
| Germana | Italiana | Letona | Lituaniana | Maghiara | Olandeza | Poloneza |
| Sarba | Slovena | Spaniola | Suedeza | Turca | Ucraineana |
ePrint 5 Professional Help
Table Of Contents
XE 'What LEADTOOLS ePrint 5 Professional Can Do ' * MERGEFORMAT What LEADTOOLS ePrint 5 Professional Can Do
LEADTOOLS ePrint 5 Professional allows you to:

![]() Convert
and save your files, using any application that supports printing, to any of
over 140+ file-supported formats. These include:
Convert
and save your files, using any application that supports printing, to any of
over 140+ file-supported formats. These include:
Document file formats such as searchable PDF, DOC, RTF, HTML, and Text;
Raster file formats such as TIFF, JPEG, GIF, PNG, and non-searchable PDF;
Vector file formats such as DXF, DWF, PCL, and CGM.
![]() Save
one or more printed jobs, whether they are document files, vector files or
raster images, using any of the supported file formats.
Save
one or more printed jobs, whether they are document files, vector files or
raster images, using any of the supported file formats.
![]() Combine
multiple documents or images into one single document file (such as PDF) or
image file (such as TIFF).
Combine
multiple documents or images into one single document file (such as PDF) or
image file (such as TIFF).
![]() Create
PDF documents with enhancements like PDF watermarks, bookmarks, or security.
Create
PDF documents with enhancements like PDF watermarks, bookmarks, or security.
![]() Redirect
your printed job(s) to one or more physical printers at the same time.
Redirect
your printed job(s) to one or more physical printers at the same time.
![]() Manipulate
your printed job(s) using ePrint's 'Enhanced Printing' features.
Manipulate
your printed job(s) using ePrint's 'Enhanced Printing' features.
![]() Add
annotation objects to the printed document through the LEADTOOLS ePrint 5
Workstation.
Add
annotation objects to the printed document through the LEADTOOLS ePrint 5
Workstation.
![]() Add
stationery or forms to the printed document to customize the appearance of the
document pages.
Add
stationery or forms to the printed document to customize the appearance of the
document pages.
![]() Configure
the Email settings and access the contact list from the default or user
specified MAPI client.
Configure
the Email settings and access the contact list from the default or user
specified MAPI client.
![]() Control
the file naming and renaming options when saving multi-page files with each page
as a separate file.
Control
the file naming and renaming options when saving multi-page files with each page
as a separate file.
![]() Add
Task Printers that can perform complex batch processing from any application
that can print, with or without user interaction.
Add
Task Printers that can perform complex batch processing from any application
that can print, with or without user interaction.
![]() In
addition to all of the above, LEADTOOLS ePrint 5 Professional provides all the
standard features of a windows printer driver.
In
addition to all of the above, LEADTOOLS ePrint 5 Professional provides all the
standard features of a windows printer driver.
Supported Environments:
LEADTOOLS ePrint 5 Professional comes in WIN32 and x64 editions that can run under the following environments:
![]() Microsoft
Windows ME
Microsoft
Windows ME
![]() Microsoft
Windows 2000
Microsoft
Windows 2000
![]() Microsoft
Windows XP (32 and 64 bit)
Microsoft
Windows XP (32 and 64 bit)
![]() Microsoft
Windows 2003 (32 and 64 bit)
Microsoft
Windows 2003 (32 and 64 bit)
![]() Microsoft
Windows Vista (32 and 64 bit)
Microsoft
Windows Vista (32 and 64 bit)
For full details regarding all ePrint components and platforms, refer to:
ePrint Documentation
XE 'References ' * MERGEFORMAT XE 'Documentation ' * MERGEFORMAT ePrint Documentation
LEADTOOLS is committed to fully documenting its products. Please feel free to contact us with any errors or omissions.
Microsoft HTML Help 1.0
Microsoft HTML Help 1.0 (.chm) files for all ePrint components and platforms are installed with your product. Help files are found on the installation path in the Help subdirectory (for example, C:Program FilesLEAD Technologies, IncLEADTOOLS ePrint 5Help).
WebHelp
WebHelp that contain the most-current version of LEADTOOLS documentation is available online at:
https://www.eprintdriver.com/help-files.html
Printable reference manuals
Printable reference manuals that contain the same information as online help can be downloaded from our website at:
https://www.eprintdriver.com/help/v5.0/Printable_Documentation/.
For more information:
Specific help references for each ePrint component and platform are available as follows:
|
WebHelp (Online) |
|
|
ePrint 5 Activation |
|
|
ePrint 5 API SDK |
|
|
ePrint 5 COM SDK |
|
|
ePrint Terminal Server edition |
|
|
LEADTOOLS Screen Capture Application |
|
|
LEADTOOLS Screen Capture Toolbar |
|
See Also:
Technical Support
XE 'Worldwide Web ' * MERGEFORMAT XE 'Technical support ' * MERGEFORMAT XE 'Support ' * MERGEFORMAT XE 'Phone ' * MERGEFORMAT XE 'Internet ' * MERGEFORMAT XE 'Home page ' * MERGEFORMAT XE 'FTP ' * MERGEFORMAT XE 'FAX ' * MERGEFORMAT XE 'BBS ' * MERGEFORMAT Technical Support
As a registered user, free technical support is available. You must register your software to receive any technical support. You can contact us through the following methods:
|
E-mail: |
eprintsupport@leadtools.com |
|
FAX: |
(704) 372-8161 |
|
Home page: |
https://www.eprintdriver.com |
|
Forum: |
https://support.leadtools.com/SupportPortal/cs/forums/26/ShowForum.aspx |
|
FAQ: |
https://www.eprintdriver.com/faq.html |
|
FTP: |
ftp.leadtools.com |
You can also contact LEAD by mail at:
LEAD Technologies, Inc.
Attn: Technical Support
1201
Before contacting technical support, please look in the online documentation and the example programs for an answer to your question.
XE 'Shortcuts ' * MERGEFORMAT Copyright Notices
Copyright LEAD Technologies, Inc. 1991-2007. ALL RIGHTS RESERVED
Portions of the PCDLIB32.DLL, PCDLIB.DLL, LFFPX7.DLL, LFKODAK.DLL, EKFPIXJPEG140.DLL, PDC_SDK.DLL, PROFIRE.DLL and DC120V154_32.DLL files contain material that is Copyright Eastman Kodak Company, 1996.
Portions of the LFFPX7.DLL and LFKODAK.DLL files contain material that is Copyright Hewlett Packard, 1996.
The 'FlashPix' format uses Microsoft's OLE structured storage.
Use of the embedded font features for certain Licensed Fonts found in the PDF Properties portion of the software may require a license from the owner of the applicable Licensed Font. Please refer to the software Help file for more information.
Portions hereof licensed under US patent 5,327,254 and foreign counterparts.
Trademarks
LEAD, LEADTOOLS and ePrint are registered trademarks of LEAD Technologies, Inc.
Microsoft, Windows, Windows NT, Visual Basic, Visual FoxPro, and Microsoft Access are either trademarks or registered trademarks of the Microsoft Corporation.
FlashPix is a trademark of Eastman Kodak Company.
All other brand or product names used in this online help are trademarks of their respective holders.
Address and Contact Information
LEAD Technologies, Inc.
1201 Greenwood Cliff,
Charlotte, NC 28204
FAX: (704) 372-8161
Technical support: eprintsupport@leadtools.com
Home page: https://www.eprintdriver.com.
XE 'Windows XP ' * MERGEFORMAT XE 'Windows NT ' * MERGEFORMAT XE 'Windows ME ' * MERGEFORMAT XE 'Windows 98 ' * MERGEFORMAT XE 'Windows 95 ' * MERGEFORMAT XE 'Windows 2000 ' * MERGEFORMAT XE 'WIN32 ' * MERGEFORMAT XE 'System requirements ' * MERGEFORMAT XE 'SP3 ' * MERGEFORMAT XE 'Operating system requirements ' * MERGEFORMAT XE 'NTFS ' * MERGEFORMAT XE 'Memory ' * MERGEFORMAT XE 'LEADTOOLS ePrint 5 Professional Minimum System Requirements ' * MERGEFORMAT XE 'ePrint IV ' * MERGEFORMAT LEADTOOLS ePrint 5 Professional Minimum System Requirements
LEADTOOLS ePrint 5 Professional comes in WIN32 and x64 editions that can run under the following environments:
![]() Microsoft
Windows ME
Microsoft
Windows ME
![]() Microsoft
Windows 2000
Microsoft
Windows 2000
![]() Microsoft
Windows XP (32 and 64 bit)
Microsoft
Windows XP (32 and 64 bit)
![]() Microsoft
Windows 2003 (32 and 64 bit)
Microsoft
Windows 2003 (32 and 64 bit)
![]() Microsoft
Windows Vista (32 and 64 bit)
Microsoft
Windows Vista (32 and 64 bit)
Installation Notes:
![]() For
installation you will need either a CD-ROM drive (if you plan on installing the
program from a CD), or an Internet connection (if you intend to download the
program).
For
installation you will need either a CD-ROM drive (if you plan on installing the
program from a CD), or an Internet connection (if you intend to download the
program).
![]() ePrint
requires Administrator rights to install and Ordinary User rights or above to
use.
ePrint
requires Administrator rights to install and Ordinary User rights or above to
use.
![]() After
installation, the ePrint program takes up approximately 15 MB in the system
folder and 25 MB in the target directory for the installation.
After
installation, the ePrint program takes up approximately 15 MB in the system
folder and 25 MB in the target directory for the installation.
![]() Memory
and additional hard disk space requirements when ePrint is being used depend on
the printer settings used, the paper size used, and the number of pages
printed. More information is provided in the following sections.
Memory
and additional hard disk space requirements when ePrint is being used depend on
the printer settings used, the paper size used, and the number of pages
printed. More information is provided in the following sections.
Memory requirements:
System memory requirement for ePrint depends upon specified paper size and printed DPI. The larger the paper dimensions, and the greater the specified DPI, the more system memory required.
To calculate memory required in MB, multiply (paper width in inches) X (paper length in inches X specified DPI) X (6) X (.001).
For example, for Paper size=letter and DPI=300, memory required=(8.5) x (11) X (300) X 6 = approximately 50 MB. For Paper size=letter and DPI=600, memory required= approximately 200 MB.
Hard-Disk requirement:
ePrint needs space to store processed pages. ePrint stores its processed pages in the system Temp directory, and deletes them when it has finished processing them. Each page (depending on the paper dimension and the amount of information in the printed page) needs approximately 2MB on the hard disk. For example, 100 pages require approximately 200 MB of free space on the drive that contains the system Temp folder.
Miscellaneous:
For the Windows 2000 users, the Use Document Name option will not work properly unless you install SP3.
For the NTFS file system users, ePrint requires read access to the System Temp folder to work properly.
It is not necessary to uninstall ePrint IV before installing ePrint 5.
XE 'Task Printers Manager ' * MERGEFORMAT XE 'Task Printers ' * MERGEFORMAT XE 'Screen Capture Application ' * MERGEFORMAT XE 'Read Me First ' * MERGEFORMAT XE 'Printers Folder ' * MERGEFORMAT XE 'LEADTOOLS ePrint Workstation ' * MERGEFORMAT XE 'LEADTOOLS ePrint Printer Driver ' * MERGEFORMAT XE 'LEADTOOLS ePrint 5 Professional Components ' * MERGEFORMAT XE 'Installing the driver ' * MERGEFORMAT XE 'Installing for development ' * MERGEFORMAT XE 'ePrint IV ' * MERGEFORMAT Quick Look at LEADTOOLS ePrint 5 Professional Components
LEADTOOLS ePrint 5 Professional consists of the following components:
![]() LEADTOOLS
ePrint Printer Drivers
LEADTOOLS
ePrint Printer Drivers
![]() LEADTOOLS
ePrint Workstation
LEADTOOLS
ePrint Workstation
![]() Task
Printers Manager
Task
Printers Manager
![]() LEADTOOLS
Screen Capture Application
LEADTOOLS
Screen Capture Application
![]() LEADTOOLS
Screen Capture Toolbar
LEADTOOLS
Screen Capture Toolbar
When LEADTOOLS ePrint 5 Professional is installed, icons to launch LEADTOOLS ePrint Workstation, Task Printers Manager, LEADTOOLS Screen Capture, Read Me First, and Help are added to the Windows Start menu. At the same time, ePrint and ePrint Workstation are installed as virtual printers in your system Printers folder. They will appear in the list of optional printers in the Print dialog of any application on your computer that supports printing. Finally, the LEADTOOLS Screen Capture Toolbar is made available on your Windows taskbar.
It is not necessary to uninstall ePrint IV before installing ePrint 5.
File Conversion via Virtual Printing
When LEADTOOLS ePrint 5 Professional is installed, two virtual printers are installed to the Printers folder on your system:
![]() ePrint
5
ePrint
5
![]() ePrint
5 Workstation
ePrint
5 Workstation
Use the ePrint 5 printer to perform quick, simple printing and file conversion tasks. You can use this printer from within any application by using its print command. When the Print dialog appears, select the LEADTOOLS ePrint 5 printer as your printer and click OK (if the application prints directly to the printer with no Print dialog, be sure to set the ePrint 5 printer as your default printer before you print). The LEADTOOLS ePrint Save As dialog will appear to give you the ability to save, email, or route the document being printed.
Use the ePrint 5 WorkStation printer when you also want to perform advanced functions like add annotations to files, create stationery or forms, combine multiple files, or perform document management. Access the LEADTOOLS ePrint 5 Workstation directly from the Start menu. Then use the Workstations File -> Open command to load the file with which you want to work. You can also use the ePrint 5 Workstation from within any application by using its print command. When the Print dialog appears, select the LEADTOOLS ePrint 5 Workstation printer, then click OK (if the application prints directly to the printer, be sure to set the ePrint 5 Workstation printer to be the default printer beforehand). This loads the LEADTOOLS ePrint 5 Workstation application, with the item being printed loaded as a print job.
Batch Processing, eMailing, and Printing
The LEADTOOLS ePrint 5 Workstation lets you create a 'task printer' that can perform a series of defined actions, for example to convert, save, and send a series of images to specific printers or email addresses. Use the Task Printers Manager to manage the task printers that you create. Access the Task Printers Manager directly from the Start menu (LEADTOOLS ePrint 5 -> Tools-> Task Printers Manager), or from within LEADTOOLS ePrint 5 Workstation (Tools -> Task Printers Manager).
API help files, code examples, and binaries are also installed that enable developers to programmatically control printer settings from within their own applications. For more information, refer to the LEADTOOLS ePrint 5 API Help.
LEADTOOLS Screen Capture
LEADTOOLS ePrint 5 Professional also includes a powerful screen capture application, and a quick-use screen capture toolbar that you can add to your Windows taskbar. For more information on these components, refer to the LEADTOOLS Screen Capture Application and LEADTOOLS Screen Capture Toolbar help files.
See Also
How To: Use LEADTOOLS ePrint 5 Professional for the First Time
How To: Use LEADTOOLS ePrint 5 Workstation for the First Time
ePrint Task Printer Creation Wizard
Task Wizard
XE 'watermarks ' * MERGEFORMAT XE 'Serial Number ' * MERGEFORMAT XE 'Extension Code ' * MERGEFORMAT XE 'Extending ' * MERGEFORMAT XE 'Activation Wizard ' * MERGEFORMAT XE 'Activation Code ' * MERGEFORMAT XE 'Activating ' * MERGEFORMAT XE '30 days ' * MERGEFORMAT XE '15 days ' * MERGEFORMAT Activation Wizard
Use the Activation Wizard to activate the LEADTOOLS ePrint 5 Professional product or to extend the evaluation period from 15 days to 30 days.
To display the Activation Wizard, from the main menu, choose Help -> Activate Product.
XE 'Uninstalling LEADTOOLS ePrint 5 Professional ' * MERGEFORMAT Uninstalling LEADTOOLS ePrint 5 Professional
|
1. |
Click the Windows Start button. |
|
2. |
Choose Settings -> Control Panel. |
|
3. |
Double-click the Add/Remove Programs utility icon. |
|
4. |
Select the Change or Remove Programs tab. |
|
5. |
Find LEADTOOLS ePrint 5 Professional in the list of installed programs and click on it to select it. |
|
6. |
Click the Remove button. |
|
7. |
A message box will appear to verify removing LEADTOOLS ePrint 5 Professional from the system. |
|
8. |
Click the Yes button. |
|
9. |
Follow the on-screen prompts. |
XE 'How To:Use LEADTOOLS ePrint 5 Professional for the First Time ' * MERGEFORMAT XE 'How To ' * MERGEFORMAT How To: Use LEADTOOLS ePrint 5 Professional for the First Time
This topic briefly describes how to get started and use the basic features of LEADTOOLS ePrint 5 Professional. For more information, please refer to the relevant help sections.
The easiest way to access and change the settings for ePrint is to print from any application that supports printing:
|
1. |
Open a file in your preferred application, then select 'File' 'Print'. |
|
2. |
When the 'Print' dialog appears, select 'LEADTOOLS ePrint 5', then click the Print button. |
|
3. |
The LEADTOOLS ePrint Save As dialog will appear to allow you to save the printed document. |
|
4. |
Use the dialog to select the file type and format for the version you wish to save, along with any special options. |
See Also
How To: Save to a Document File (Searchable PDF, MS DOC, HTML, etc.)
How To: Save to an Image File (TIFF, JPEG, GIF, PNG, etc.)
How To: Save to a Vector File (CGM, DXF, SHP, etc.)
XE 'Word to .pdf conversion ' * MERGEFORMAT XE 'TIFF to PDF ' * MERGEFORMAT XE 'TIFF conversion ' * MERGEFORMAT XE 'Text to PDF ' * MERGEFORMAT XE 'Searchable PDF ' * MERGEFORMAT XE 'RTF to PDF ' * MERGEFORMAT XE 'RTF converter ' * MERGEFORMAT XE 'print to pdf ' * MERGEFORMAT XE 'print to file ' * MERGEFORMAT XE 'print to almost any file format ' * MERGEFORMAT XE 'PPT to PDF ' * MERGEFORMAT XE 'Powerpoint to PDF ' * MERGEFORMAT XE 'PDF to TIFF ' * MERGEFORMAT XE 'PDF to JPG ' * MERGEFORMAT XE 'PDF to JPEG ' * MERGEFORMAT XE 'pdf printer ' * MERGEFORMAT XE 'pdf creator ' * MERGEFORMAT XE 'PDF converter ' * MERGEFORMAT XE 'MS DOC file conversion ' * MERGEFORMAT XE 'image conversion ' * MERGEFORMAT XE 'html to Word ' * MERGEFORMAT XE 'HTML to DOC ' * MERGEFORMAT XE 'How To:Convert Files ' * MERGEFORMAT XE 'How To ' * MERGEFORMAT XE 'File conversion ' * MERGEFORMAT XE 'DRW conversion ' * MERGEFORMAT XE 'DOC to PDF ' * MERGEFORMAT XE 'DOC converter ' * MERGEFORMAT XE 'Converting files ' * MERGEFORMAT XE 'Adobe writer ' * MERGEFORMAT XE 'Adobe converter ' * MERGEFORMAT XE '.txt to .pdf ' * MERGEFORMAT XE '.tif to .pdf ' * MERGEFORMAT XE '.rtf to .pdf ' * MERGEFORMAT XE '.ppt to .pdf ' * MERGEFORMAT XE '.pdf converter ' * MERGEFORMAT XE '.html to Word ' * MERGEFORMAT XE '.html to .doc ' * MERGEFORMAT XE '.doc to .pdf ' * MERGEFORMAT XE '.doc converter ' * MERGEFORMAT How To: Quickly Convert Files Using the ePrint 5 Printer
Using any application that includes a print function, the ePrint 5 virtual printer can convert from one file format to any of the 140 file formats LEADTOOLS ePrint 5 Professional supports.
The following example will show you how to use LEADTOOLS ePrint 5 Professional to convert a document file from Microsoft Word (.doc) to searchable PDF (.PDF) format. Use this examples basic steps to convert file(s) from any format to any other format:
|
1. |
Open a .doc file in Microsoft Word and then select File -> Print. |
|
2. |
Select LEADTOOLS ePrint 5 from the printer Name list and click OK. |
|
3. |
The LEADTOOLS ePrint Save As dialog will appear to allow the user to save the printed document. |
|
5. |
Select the 'Document Formats' item from the File type list. |
|
6. |
Select the 'PDF' item from the Save as list. |
|
7. |
Click the Options button to show the PDF Save As Options dialog. |
|
8. |
In the General Tab, ensure 'Automatic' is selected in the Version list. Click the Options button to show the PDF Save As Options dialog. For more information on other PDF formatting options, visit the PDF Save As Options page of the help documentation. |
|
9. |
Now click the OK button to save the options. |
|
10. |
Now click the Save button to save searchable PDF file. |
|
11. |
After a few moments, you should find the saved PDF document on the path that you selected with the name you specified. |
For more information, please refer to:
Technical Support
XE 'How To:Use LEADTOOLS ePrint 5 Workstation for the First Time ' * MERGEFORMAT XE 'How To ' * MERGEFORMAT How To: Use LEADTOOLS ePrint 5 Workstation for the First Time
This topic briefly describes how to use the basic features of LEADTOOLS ePrint 5 Workstation and provides you with all you need to know in order to get started. For more information, please refer to the relevant help section.
Launching ePrint 5 Workstation
There are two ways to access and change the settings for the LEADTOOLS ePrint 5 Workstation:
![]() ePrint
5 Workstation is accessible when printing from any application with printer
support by selecting the printer Name: LEADTOOLS ePrint5 Workstation
from the Print dialog. Or,
ePrint
5 Workstation is accessible when printing from any application with printer
support by selecting the printer Name: LEADTOOLS ePrint5 Workstation
from the Print dialog. Or,
![]() open
ePrint 5 Workstation directly from the Windows Start menu: Start -> Programs
-> LEADTOOLS ePrint 5 Professional menu.
open
ePrint 5 Workstation directly from the Windows Start menu: Start -> Programs
-> LEADTOOLS ePrint 5 Professional menu.
Each of these methods is described in detail in the following sections.
When Printing from an Application
|
1. |
Open a file in your preferred application that supports printing and select 'File' 'Print'. |
|
2. |
When the 'Print' dialog appears, select 'LEADTOOLS ePrint 5 Workstation', then click the Print button. |
|
3. |
The LEADTOOLS ePrint 5 Workstation will open with the file loaded into the work area. |
|
4. |
Edit, annotate, or otherwise manipulate the file. |
|
5. |
From the menu, select 'File' 'Save As', select the desired file type and format, and then click Save. |
When Launching from the Start menu
You can also access the LEADTOOLS ePrint 5 Workstation application from the start menu:
The Workstation will open and documents can be imported manually.
|
1. |
From Start -> Programs -> LEADTOOLS ePrint 5 Professional menu, select LEADTOOLS ePrint Workstation. The LEADTOOLS ePrint 5 Workstation will open. |
|
2. |
From the menu, select File Open. The file selection dialog will open. |
|
3. |
Navigate to and select the file you want to work with, then click OK. |
|
4. |
Edit, annotate, or otherwise manipulate the file. |
|
5. |
From the menu, select File Save As, select the desired file type and format, and then click Save. |
See Also
How To: Use LEADTOOLS ePrint 5 Professional for the First Time
XE 'Word to .pdf conversion ' * MERGEFORMAT XE 'Word File Format ' * MERGEFORMAT XE 'TIFF to PDF ' * MERGEFORMAT XE 'TIFF conversion ' * MERGEFORMAT XE 'Text to PDF ' * MERGEFORMAT XE 'Searchable PDF ' * MERGEFORMAT XE 'Searchable files ' * MERGEFORMAT XE 'Saving searchable files ' * MERGEFORMAT XE 'Saving PDF files ' * MERGEFORMAT XE 'Saving DOC files ' * MERGEFORMAT XE 'RTF to PDF ' * MERGEFORMAT XE 'RTF converter ' * MERGEFORMAT XE 'PPT to PDF ' * MERGEFORMAT XE 'Powerpoint to PDF ' * MERGEFORMAT XE 'PDF to TIFF ' * MERGEFORMAT XE 'PDF to JPG ' * MERGEFORMAT XE 'PDF to JPEG ' * MERGEFORMAT XE 'pdf printer ' * MERGEFORMAT XE 'PDF File Format ' * MERGEFORMAT XE 'pdf creator ' * MERGEFORMAT XE 'PDF converter ' * MERGEFORMAT XE 'MS Word File Format ' * MERGEFORMAT XE 'MS DOC file conversion ' * MERGEFORMAT XE 'MS DOC ' * MERGEFORMAT XE 'image conversion ' * MERGEFORMAT XE 'html to Word ' * MERGEFORMAT XE 'HTML to DOC ' * MERGEFORMAT XE 'How To:Save to a Searchable PDF: MS DOC: HTML: etc. File ' * MERGEFORMAT XE 'How To ' * MERGEFORMAT XE 'File conversion ' * MERGEFORMAT XE 'DRW conversion ' * MERGEFORMAT XE 'DOC to PDF ' * MERGEFORMAT XE 'DOC File Format ' * MERGEFORMAT XE 'DOC converter ' * MERGEFORMAT XE 'Converting files ' * MERGEFORMAT XE 'Combine files ' * MERGEFORMAT XE 'Adobe writer ' * MERGEFORMAT XE 'Adobe converter ' * MERGEFORMAT XE '.txt to .pdf ' * MERGEFORMAT XE '.tif to .pdf ' * MERGEFORMAT XE '.rtf to .pdf ' * MERGEFORMAT XE '.ppt to .pdf ' * MERGEFORMAT XE '.pdf converter ' * MERGEFORMAT XE '.html to Word ' * MERGEFORMAT XE '.html to .doc ' * MERGEFORMAT XE '.doc to .pdf ' * MERGEFORMAT XE '.doc converter ' * MERGEFORMAT How To: Save to a Document File (Searchable PDF, MS DOC, HTML, etc.)
Files saved to Document file types retain searchable text. For example, when a file is saved as Document file type with PDF format, the resulting PDF file is automatically searchable. (For more information on the Find and Search commands available in Adobe Acrobat, third-party search engines, and the Adobe PDF Filter, refer to https://www.adobe.com/support/techdocs/321627.html.)
Perform the following steps in order to create a Document (in this case, Searchable PDF) file.
|
1. |
On the Save As dialog, select 'Document Formats' from the File type list. |
|
2. |
Select 'PDF' from the Save as list. |
|
Note: From the Save As dialog, if you select File Type: 'Image Formats,' then select PDF, you create a non-searchable PDF file. This will cause the content to fixed and un-editable. |
|
|
3. |
Click the Options button to show the PDF Save As Options dialog. |
|
4. |
In the General Tab, ensure 'Automatic' is selected in the Version list. Click the Options button to show the PDF Save As Options dialog. For more information on other PDF formatting options, visit the PDF Save As Options page of the help documentation. |
|
5. |
Click the OK button to save the options. The dialog will close. |
|
6. |
Click the Save button to save the searchable PDF file. |
XE 'Word to .pdf conversion ' * MERGEFORMAT XE 'TIFF to PDF ' * MERGEFORMAT XE 'TIFF saving options ' * MERGEFORMAT XE 'TIFF conversion ' * MERGEFORMAT XE 'Text to PDF ' * MERGEFORMAT XE 'Saving multi-page files to a single file ' * MERGEFORMAT XE 'Saving image files ' * MERGEFORMAT XE 'RTF to PDF ' * MERGEFORMAT XE 'RTF converter ' * MERGEFORMAT XE 'PPT to PDF ' * MERGEFORMAT XE 'Powerpoint to PDF ' * MERGEFORMAT XE 'PNG files ' * MERGEFORMAT XE 'PDF to TIFF ' * MERGEFORMAT XE 'PDF to JPG ' * MERGEFORMAT XE 'PDF to JPEG ' * MERGEFORMAT XE 'pdf printer ' * MERGEFORMAT XE 'pdf creator ' * MERGEFORMAT XE 'PDF converter ' * MERGEFORMAT XE 'Non-searchable PDF files ' * MERGEFORMAT XE 'Multi-page files ' * MERGEFORMAT XE 'MS DOC file conversion ' * MERGEFORMAT XE 'JPEG files ' * MERGEFORMAT XE 'Image files ' * MERGEFORMAT XE 'image conversion ' * MERGEFORMAT XE 'html to Word ' * MERGEFORMAT XE 'HTML to DOC ' * MERGEFORMAT XE 'How To:Save to an Image File ' * MERGEFORMAT XE 'How To ' * MERGEFORMAT XE 'GIF files ' * MERGEFORMAT XE 'File conversion ' * MERGEFORMAT XE 'DRW conversion ' * MERGEFORMAT XE 'DOC converter ' * MERGEFORMAT XE 'Converting files ' * MERGEFORMAT XE 'Combining multi-page files ' * MERGEFORMAT XE 'Combine PDF files ' * MERGEFORMAT XE 'Combine files ' * MERGEFORMAT XE 'BMP files ' * MERGEFORMAT XE 'Adobe writer ' * MERGEFORMAT XE 'Adobe converter ' * MERGEFORMAT XE '.txt to .pdf ' * MERGEFORMAT XE '.tif to .pdf ' * MERGEFORMAT XE '.rtf to .pdf ' * MERGEFORMAT XE '.ppt to .pdf ' * MERGEFORMAT XE '.pdf converter ' * MERGEFORMAT XE '.html to Word ' * MERGEFORMAT XE '.html to .doc ' * MERGEFORMAT XE '.doc converter ' * MERGEFORMAT How To: Save to an Image File (TIFF, JPEG, GIF, PNG, etc.)
LEADTOOLS ePrint 5 Professional lets you save raster images such as TIFF, JPEG, GIF, PNG, non-searchable PDF, BMP, etc.
The example below describes how to save an image file to a raster format (in this case, non-searchable PDF).
To save a file as a raster PDF file type:
|
1. |
Select the 'Image Formats' item from the File type list. |
|
2. |
Select the 'PDF (*.pdf)' item from the Save as list. |
|
3. |
Click the Options button to show the Raster Images Files Save As Options dialog. |
|
4. |
Select the desired Color Depth. If you are not certain which to use, select 'True Color (24 bit)'. |
|
Note: Color Depth represents the bits per pixel, which is the number of bits that will be used to store information about a particular pixel in the image. The bits per pixel correlates to how many unique values of color levels are available to describe the pixel. When using 24 bits per pixel, 16.7 million colors are available and this format is least likely to compromise the output quality. |
|
|
5. |
Now click the OK button to save the options. |
|
6. |
Now click the Save button to save raster PDF file. |
Note: Multi-page gif files are created as animated gifs and are not viewable in applications that only display static gifs.
XE 'Vector files ' * MERGEFORMAT XE 'How To:Save to a Vector File ' * MERGEFORMAT XE 'How To ' * MERGEFORMAT XE 'Combine files ' * MERGEFORMAT How To: Save to a Vector File (CGM, DXF, SHP, etc.)
The vector file format describes images in terms of mathematical formulas instead of a grid of bit data.
Perform the following steps to save a file in a vector file format.
|
1. |
Select the 'Vector Formats' item from the File type list. |
|
2. |
Select one of the vector formats listed in the Save as list (for example, Computer Graphics Metafile (*.cgm)). |
|
3. |
Click the Save button to save the printed document. |
For more information saving specific file formats, please refer to the relevant help section.
XE 'How To:Prepare Fail-Safe Paper Settings ' * MERGEFORMAT XE 'How To ' * MERGEFORMAT XE 'Changing paper or graphics settings ' * MERGEFORMAT How To: Prepare Fail-Safe Paper Settings
ePrint Paper settings only act as a 'fail-safe' in case the originating document does not contain paper information. Most file types have a predefined paper type, so this setting is rarely used. If the host application uses paper settings, the ePrint paper settings will be over-ridden by the application being used to print the file.
For example, if you print from Microsoft Word to either the ePrint or ePrint Workstation virtual printer, Microsoft Word sends paper size information along with the file. If you wish to select a different paper size, you should do so in Microsoft Words Page Setup or Print Properties dialog.
If you are not sure whether your application sends paper size with its print jobs, use the following steps to provide this information using ePrint:
|
1. |
Select Start -> Settings -> Printers, then right-click on the LEADTOOLS ePrint 5 Professional icon and select Properties. |
|
2. |
Click on the General tab of the LEADTOOLS ePrint 5 Professional Properties dialog and then click the Printing Preferences Button. |
|
3. |
Select the intended size from the Paper Size Option combo box. |
|
4. |
Click the Add button to open the Custom Paper dialog to create a new paper size. |
|
Type in the name of the new paper size in the Name edit box. |
|
|
Use the radio buttons in the 'Unit to use' section to select the unit of measure. Use 0.1 Inches to set the unit of measure to inches. Use 0.1 mm to set the unit of measure to millimeters. Select the 0.1 Inches radio button. |
|
|
Click the OK button to create the new custom paper size. |
|
|
5. |
Click the Edit button to bring up the Custom paper dialog to modify an existing custom paper size. |
|
6. |
Click the Delete button to delete a custom paper size. |
|
7. |
Note that only custom paper sizes can be modified or deleted. |
|
8. |
Select either the Portrait or the Landscape Option radio button from the Orientation Option group box. |
|
9. |
Click OK on the Paper tab of the LEADTOOLS ePrint 5 Professional Properties dialog. |
XE 'How To:Prepare Graphics Settings ' * MERGEFORMAT XE 'How To ' * MERGEFORMAT XE 'Changing paper or graphics settings ' * MERGEFORMAT How To: Prepare Graphics Resolution Settings
When you covert between file types, final file size depends on both paper size and desired resolution. In general, images that will only be displayed on-screen require lower resolution than images intended for use in print. Lower resolution images result in a smaller file size and therefore require less storage space.
|
1. |
From the Windows toolbar, select Start -> Settings -> Printers and Faxes, then right-click on the LEADTOOLS ePrint 5 icon and select Printing Preferences. |
|
2. |
Click on the Graphics tab of the LEADTOOLS ePrint 5 Professional Printing Preferences dialog. |
|
3. |
Select the desired resolution from the Resolution Option combo box. If you select 'Custom', the Custom Resolution group appears to let you type in specific X and Y DPI resolutions. Valid values range from 50 1600 for both the X and the Y resolution. |
|
4. |
Click OK on the Graphics tab of the LEADTOOLS ePrint 5 Professional Properties dialog. |
XE 'How Does ePrint Work? ' * MERGEFORMAT How Does ePrint Work?
LEADTOOLS ePrint 5 Professional behaves like a printer installed on your Windows operating system. However, unlike printer drivers, which simply pass information along to the printer for printing on paper, ePrint captures the data stream being 'printed' so that you can convert it to almost any document, image or vector format desired.
Once ePrint is installed, it is instantly available to any application that can send a print job, without any additional configuration. LEADTOOLS ePrint 5 Professional comes in two forms: the ePrint 5 printer and the ePrint Workstation printer. Which one you choose to use depends on how much control you want over the documents you produce.
ePrint 5 printer. The ePrint 5 printer takes you directly to format selection screen for quick, efficient, no-hassle document conversion.
ePrint Workstation printer. The ePrint Workstation printer is available for advanced document manipulation and even more control over the files you convert.
Either of these printers is accessible at any time in most applications by selecting it from the print dialog.
See Also
How To: Use LEADTOOLS ePrint 5 Workstation for the First Time
What LEADTOOLS ePrint 5 Professional Can Do
ePrint Toolbars
Using Keyboard Shortcuts
XE 'Word to .pdf conversion ' * MERGEFORMAT XE 'TIFF to PDF ' * MERGEFORMAT XE 'TIFF conversion ' * MERGEFORMAT XE 'Text to PDF ' * MERGEFORMAT XE 'RTF to PDF ' * MERGEFORMAT XE 'RTF converter ' * MERGEFORMAT XE 'print to pdf ' * MERGEFORMAT XE 'print to file ' * MERGEFORMAT XE 'print to almost any file format ' * MERGEFORMAT XE 'PPT to PDF ' * MERGEFORMAT XE 'Powerpoint to PDF ' * MERGEFORMAT XE 'PDF to TIFF ' * MERGEFORMAT XE 'PDF to JPG ' * MERGEFORMAT XE 'PDF to JPEG ' * MERGEFORMAT XE 'pdf printer ' * MERGEFORMAT XE 'pdf creator ' * MERGEFORMAT XE 'PDF converter ' * MERGEFORMAT XE 'MS DOC file conversion ' * MERGEFORMAT XE 'image conversion ' * MERGEFORMAT XE 'html to Word ' * MERGEFORMAT XE 'HTML to DOC ' * MERGEFORMAT XE 'File conversion ' * MERGEFORMAT XE 'DRW conversion ' * MERGEFORMAT XE 'DOC converter ' * MERGEFORMAT XE 'Creating a File Using ePrint ' * MERGEFORMAT XE 'create pdf ' * MERGEFORMAT XE 'Converting files ' * MERGEFORMAT XE 'Adobe writer ' * MERGEFORMAT XE 'Adobe converter ' * MERGEFORMAT XE '.txt to .pdf ' * MERGEFORMAT XE '.tif to .pdf ' * MERGEFORMAT XE '.rtf to .pdf ' * MERGEFORMAT XE '.ppt to .pdf ' * MERGEFORMAT XE '.pdf converter ' * MERGEFORMAT XE '.html to Word ' * MERGEFORMAT XE '.html to .doc ' * MERGEFORMAT XE '.doc converter ' * MERGEFORMAT Creating a File Using ePrint
Converting a file using ePrint is done through the print option of any application that can print documents or graphics.
To quickly convert a file using ePrint 5, perform the following steps:
|
1. |
Open a document in your preferred application that supports printing and select 'File' 'Print'. |
|
2. |
When the 'Print' dialog appears select 'LEADTOOLS ePrint 5' and click the Print button. |
|
3. |
The LEADTOOLS ePrint Save As dialog will appear to allow the user to save the printed document. |
|
4. |
Here, the user may select a file type and format for saving the printed document as well as customize the options available for the selected format. |
To create a file with annotations, stationery or any of the other more advanced features of the ePrint 5 Workstation, use the following steps:
|
1. |
Open a document in your preferred application that supports printing and select 'File' 'Print'. |
|
2. |
When the 'Print' dialog appears, select 'LEADTOOLS ePrint 5 Workstation' and click the Print button. |
|
3. |
The LEADTOOLS ePrint 5 Workstation will open with the printed document loaded into the work area as a print job for editing. |
|
4. |
Refer to the Documentation for the Main Menu of the ePrint Workstation to begin examining how to use this application. |
See Also
How To: Save to a Searchable PDF, MS DOC, HTML, etc. File
How To: Save to an Image File (TIFF, JPEG, GIF, PNG, etc.)
How To: Save to a Vector File
XE 'Using the Workspace and Adding Annotations ' * MERGEFORMAT Using the Workspace and Adding Annotations
The workspace is the opening screen in ePrint Workstation. This is the area that displays opened files as 'print jobs' that can be converted, annotated, or sent to printers or email. There are many options to customize the view of the workspace, including toolbars, a status bar and various windowpanes that can be hidden or displayed for navigating and editing the loaded document. For more information, refer to Customizing The Workspace.
Once a document has been imported as a print job, it can have annotations placed over the document including highlighting, images, shapes, lines, text notation and measurements of items placed in the document.
Annotations are only editable in the ePrint WorkStation at the time the document is created. Once a document has been converted into another format using ePrint, the changes are permanent in the resulting document. A saved file cannot be loaded later into the ePrint workstation for other annotations, nor can annotations be deleted.
See Also
Page Navigation Toolbar
Annotation Tools Toolbar
Annotation Properties Toolbar
Annotation Text Alignment Toolbar
XE 'Customizing the Workspace ' * MERGEFORMAT Customizing the Workspace
Customization of the workspace options is primarily accessible through the ePrint Workstation Main Menu under the View option. From this option set, you can access zooming, page view, toolbars and various windowpanes options.
The toolbars are collections of tools grouped by similarity. Toolbars can be turned on and off by checking or unchecking the toolbar options under View > Toolbars. By clicking and dragging the far left side of a toolbar, you can place the toolbar anywhere you like in the application window. When near the top of the workspace, the toolbar will dock itself to the toolbar area. The appearance and behavior of the toolbars may vary slightly depending on your version of windows.
Windowpanes are dialogs that do not interrupt the normal workflow, but allow you to make changes to your documents or view additional information by extending the visible interface of the workspace. Panes can be docked to the sides of the workspace by clicking and dragging the top left of the pane to the left, top or right edge of the workstation. Panes can also be combined by clicking and dragging one pane onto another. (Combined panes will have a tab menu at the bottom for switching views between the selected panes.)
See Also
View Menu
ePrint Toolbars
XE 'Using Forms and Stationery ' * MERGEFORMAT Using Forms and Stationery
Stationery and forms allow you to add a watermark to your documents using either text or images. These options can be placed on all, even, odd or only a custom range of pages within the document as specified by the user.
The stationery option lets you position and customize text that you specify in your document. Some simple applications of this feature include marking a document with the date, revision or department number to prevent confusion with other, similar documents. Stationery text includes options for header, footer and a watermark text.
The form option lets you use images as a watermark in your document. These files can be created from existing pages by selecting the add to forms option in the Thumbnail Context Menu found in the Thumbnail Pane. Examples of Form use would be to place a departmental or company image in the background of a document as well as using a referenced document to provide lines of separation and various other formatting accents.
See also
Form Selection Dialog
Stationery Selection Dialog
Apply To Custom Dialog
XE 'Using Tasks and Task Printers ' * MERGEFORMAT Using Tasks and Task Printers
Tasks and task printers enable batch processing for document conversion, emailing and printing to other windows printers. An ePrint task printer has the added bonus of being directly accessible from the Windows printer folder, thereby making it possible to convert a document to a predefined location and file type, email the file and print it to a physical printer all in one step. Because the task is created as a window printer, all of this is available from any application that supports printing. A task also provides the conversion, printing and email functionality, but tasks are only available from the ePrint Workstation.
Tasks are configured in the Task Wizard and Task Printers are created in the ePrint Task Printer Creation Wizard. You can view which tasks are available to you at any time in the Configure Tasks Dialog. The task printers can be viewed and edited from the ePrint Task Printers Manager.
XE 'Workspace ' * MERGEFORMAT XE 'Windows ' * MERGEFORMAT XE 'Status Bar ' * MERGEFORMAT XE 'Main Window ' * MERGEFORMAT XE 'ePrint Main Window ' * MERGEFORMAT ePrint Main Window
The main display window contains a standard horizontal Windows title bar across the top of the interface. The main window's title bar has a program icon at the far left, followed by: the application name and the name of the active document or image. On the far right there are the standard Windows Minimize, Maximize/Restore, and Close buttons.
The vertical and horizontal scroll bars will appear if the loaded document or image exceeds the viewable area of the workspace.
The items on the taskbar can be used for the following:
![]() Closing
ePrint: double-click on the application icon or click the Close
button to close the application.
Closing
ePrint: double-click on the application icon or click the Close
button to close the application.
![]() Minimizing:
click the Minimize button to make the application window reduce to a
button on the windows taskbar. Click ePrint's taskbar button to restore the
main display window and bring it to the front of any other running windows
programs.
Minimizing:
click the Minimize button to make the application window reduce to a
button on the windows taskbar. Click ePrint's taskbar button to restore the
main display window and bring it to the front of any other running windows
programs.
![]() Maximizing:
double-click on the title-bar or click the Maximize button.
Maximizing:
double-click on the title-bar or click the Maximize button.
![]() Restoring:
click the Restore button to go from overlapped-window to full-screen
(Maximize) and back (Restore).
Restoring:
click the Restore button to go from overlapped-window to full-screen
(Maximize) and back (Restore).
![]() System
Menu, click on the application icon to bring up a standard windows system
menu, which allows you to move, resize, and close the window.
System
Menu, click on the application icon to bring up a standard windows system
menu, which allows you to move, resize, and close the window.
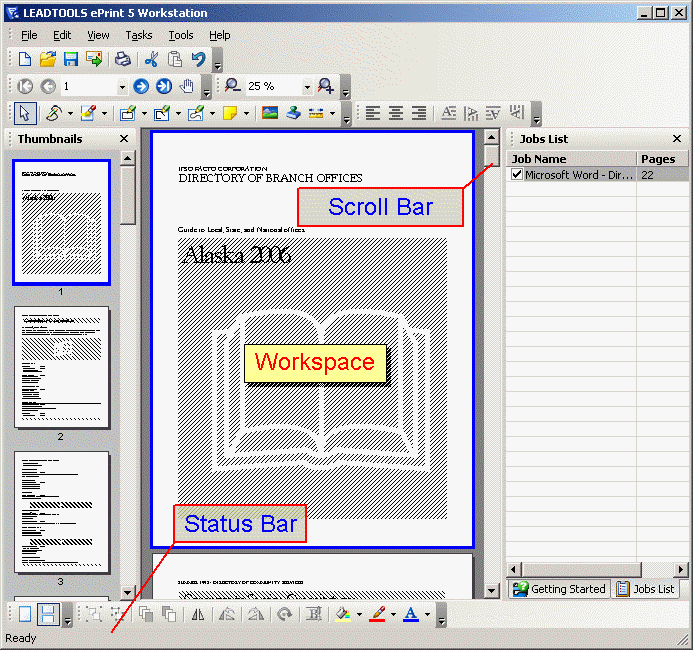
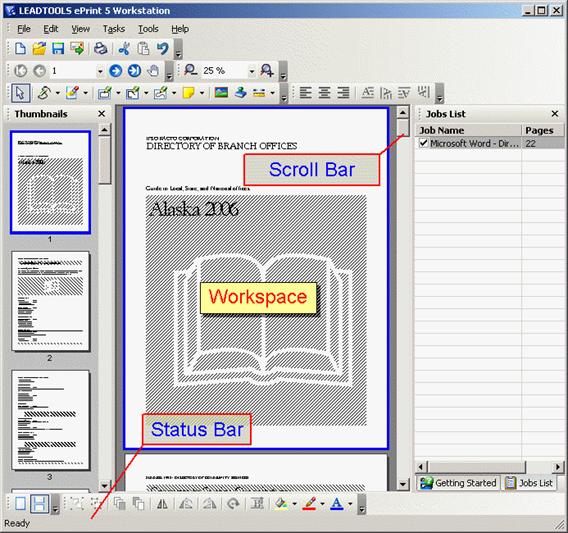
Workspace
The workspace is the display area for opened documents and occupies the largest percentage of the ePrint Workstation window. The workspace is in the center of the screen and will adjust its width to fit between any open toolbars or information panes that may be visible. The workspace will allow you to annotate your loaded documents, but it is not possible to edit the content of the document once it has been imported into ePrint.
Status Bar
The Status Bar is located along the bottom of the ePrint window. It has the following features:
![]() A
short description will appear here as your mouse passes over a button or menu
item that describes the items functionality. This provides a quick reference
when learning how to use the ePrint Workstation.
A
short description will appear here as your mouse passes over a button or menu
item that describes the items functionality. This provides a quick reference
when learning how to use the ePrint Workstation.
![]() Indicates
a service or a task is running. The name of the running task or service will be
listed along with an animation to indicate when the ePrint Workstation is
processing a request.
Indicates
a service or a task is running. The name of the running task or service will be
listed along with an animation to indicate when the ePrint Workstation is
processing a request.
See Also
Jobs List Pane
Thumbnail Pane
Getting Started Pane
How To: Use LEADTOOLS ePrint 5 Workstation for the First Time
XE 'Windows ' * MERGEFORMAT XE 'Pane Window ' * MERGEFORMAT XE 'Getting Started Pane Window ' * MERGEFORMAT Getting Started Pane
The Getting Started Pane is initially displayed on the right side of the ePrint Main Window workspace.
See Also
ePrint Main Window
Jobs List Pane
Thumbnail Pane
Clip Art Pane
XE 'Windows ' * MERGEFORMAT XE 'Pane Window ' * MERGEFORMAT XE 'Pages ' * MERGEFORMAT XE 'Jobs List Pane Window ' * MERGEFORMAT XE 'Jobs list ' * MERGEFORMAT XE 'Job Name ' * MERGEFORMAT Jobs List Pane
The Jobs List Pane displays all print jobs in the current session.
To display or hide this pane, select View -> Job List View from the Main Menu.
The Jobs List Pane uses rows and columns to display the print jobs to be executed. Each row is divided into two columns and will appear to the right of the ePrint Main Window workspace. The two columns are as follows:
![]() Job
Name: displays the job name. When selected, the ePrint Main Window
workspace shows the first page of the selected print job. This Job Name column
includes the name of the job beside a check box for indicating three possible
states for the printed job:
Job
Name: displays the job name. When selected, the ePrint Main Window
workspace shows the first page of the selected print job. This Job Name column
includes the name of the job beside a check box for indicating three possible
states for the printed job:

![]() All the pages of the print job will be processed.
All the pages of the print job will be processed.

![]() Some pages of the print job will not be
processed.
Some pages of the print job will not be
processed.

![]() None of the pages will be processed.
None of the pages will be processed.
![]() Pages:
displays the total number of pages in the print job.
Pages:
displays the total number of pages in the print job.
Only one print job can be selected--the one that is currently displayed. Multiple selections are not possible.
See Also
ePrint Main Window
Getting Started Pane
XE 'Windows ' * MERGEFORMAT XE 'Thumbnails Pane ' * MERGEFORMAT XE 'Thumbnails ' * MERGEFORMAT XE 'Pane Window ' * MERGEFORMAT Thumbnails Pane
The Thumbnails Pane displays all the printed pages (composed of multiple print jobs) and appears along the left side of the ePrint Main Window workspace.
Through this pane the user can select the active page in the ePrint Main Window workspace by clicking a thumbnail in the list. A blue border will appear around the active page as an indicator for which thumbnail is currently being viewed in the ePrint Main Window workspace.
The Thumbnails Pane has a context menu with many options that appears by right-clicking a thumbnail in this list. This list includes navigation, cutting, pasting and exclusion options as well as the ability to add form graphics to ePrint using the thumbnail of any page as a template. This list is covered in more detail in the Thumbnail Context Menu.
To display or hide this pane, select View -> Thumbnail View from the Main Menu.
See Also
ePrint Main Window
Clip Art Pane
Jobs List Pane
Getting Started Pane
XE 'Windows ' * MERGEFORMAT XE 'watermarks ' * MERGEFORMAT XE 'Stationery Editor Mode Pane Window ' * MERGEFORMAT XE 'Stationery ' * MERGEFORMAT XE 'headers ' * MERGEFORMAT XE 'footers ' * MERGEFORMAT Stationery Editor Mode Pane
Use the Stationery Editor Mode Pane to add new stationery, or modify or delete existing stationery. Stationery is a text-based watermark that will appear underneath the document contents: much like pre-printed stationery in traditional printing applications. Keep in mind that stationery appears underneath the text and images placed in the document. Content in the stationery may be covered by images with a similar background color to the background color of the document (e.g., images with a white background on a white piece of paper will hide stationery behind their white background), in ways that may appear counter-intuitive to the eye. The stationery will not, however, have a marginal overlap from text or the transparent area of an image placed in a document.
The Stationery Editor Mode pane appears along the right side of the ePrint Main Window workspace.
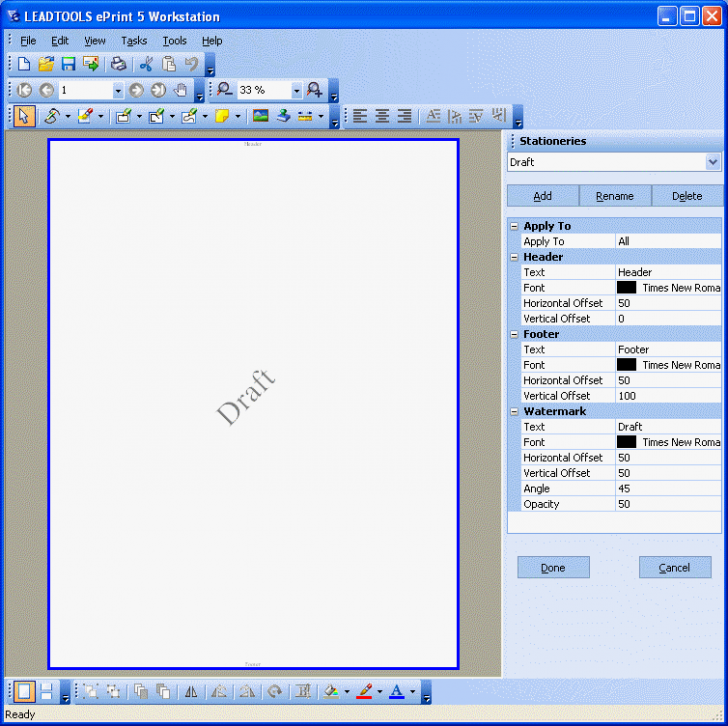
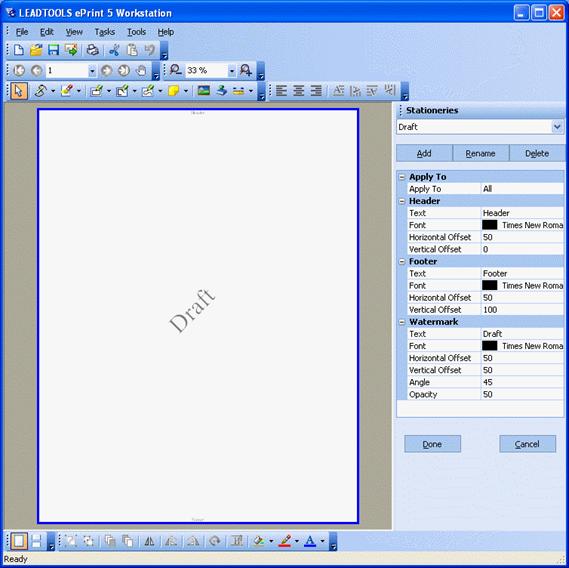
To display the Stationery Editor Mode Window, from the main menu choose Edit -> Select Stationery. Then select the stationery to be edited from the drop down list box and click Edit. The stationery pane should display.
The following fields are on the Stationery Editor Mode window:
Stationeries Drop-down list box:
Use this option to select stationery for editing and to display it in the document.
Add Button
Click the Add button to open the Add Stationery Dialog dialog to add a new stationery type.
Rename Button
Click the Rename button to open the Rename Stationery Dialog dialog to rename the stationery selected in the Stationeries drop-down list box.
This button is only available if a stationery type is selected in the Stationeries drop-down list box.
Delete Button
Click the Delete button to delete the stationery selected in the Stationeries drop-down list box.
This button is only available if a stationery type is selected in the Stationeries drop-down list box.
Apply To Drop-down list box
Use this option to specify which pages have the selected stationery applied to them. It contains the following options:
![]() All:
The stationery will be added to all included pages. The stationery will not be
added to the excluded pages.
All:
The stationery will be added to all included pages. The stationery will not be
added to the excluded pages.
![]() Odd:
The stationery will be added to the odd pages only. The stationery will not be
added to the excluded pages.
Odd:
The stationery will be added to the odd pages only. The stationery will not be
added to the excluded pages.
![]() Even:
The stationery will be added to the even pages only. This enumeration does not
count pages that have been excluded from the print job. The stationery will not
be added to the excluded pages.
Even:
The stationery will be added to the even pages only. This enumeration does not
count pages that have been excluded from the print job. The stationery will not
be added to the excluded pages.
![]() First:
The stationery will be added to the first included page only. If the first page
in the print job has been excluded from the print job, then the first included
page will be applicable to have stationery added.
First:
The stationery will be added to the first included page only. If the first page
in the print job has been excluded from the print job, then the first included
page will be applicable to have stationery added.
![]() Last:
The stationery will be added to the last included page only. If the last page
in the print job has been excluded from the print job, then the last included
page will be applicable to have stationery added.
Last:
The stationery will be added to the last included page only. If the last page
in the print job has been excluded from the print job, then the last included
page will be applicable to have stationery added.
![]() Custom:
Opens the Apply To Custom dialog box.
Custom:
Opens the Apply To Custom dialog box.
This is only available if a stationery type is selected in the Stationeries drop-down list box.
Header Text Edit box
Use this option to add or edit text for the stationery header. Text can be entered manually in the text box or auto text options can be accessed by clicking the Add Auto Text dialog button.
This option is only available if a stationery type is selected in the Stationeries drop-down list box.
Header Font Edit box
Use this option to view and edit the font properties for the
stationery header. Click the 
![]() expand
button to edit the font properties in the font editing dialog. The edit box
itself only displays the currently selected font, size and color.
expand
button to edit the font properties in the font editing dialog. The edit box
itself only displays the currently selected font, size and color.
This is only available if a stationery type is selected in the Stationeries drop-down list box.
Header Horizontal Offset Edit box
Use this option to set the horizontal offset value from the left of the page to place the stationery header text. The slider bar can be set from 0% to 100% where 0% is the left of the page and 100% is the right. The header is set to 50% by default to place the header at the center of the page.
This option is only available if a stationery type is selected in the Stationeries drop-down list box.
Header Vertical Offset Edit box
Use this option to set the vertical offset value from the top of the page to place the stationery header text. The slider bar can be set from 0% to 100% where 0% is the top of the page and 100% is the bottom. The header is set to 0% by default to place the header at the top of the page.
This option is only available if a stationery type is selected in the Stationeries drop-down list box.
Footer Text Edit box
Use this option to add or edit text for the stationery Footer. Text can be entered manually in the text box or auto text options can be accessed by clicking the Add Auto Text dialog button.
This option is only available if a stationery type is selected in the Stationeries drop-down list box.
Footer Font Edit box
Use this option to view and edit the font properties for the
stationery footer. Click the
![]() expand
button to edit the font properties in the font editing dialog. The edit box
itself only displays the currently selected font, size and color.
expand
button to edit the font properties in the font editing dialog. The edit box
itself only displays the currently selected font, size and color.
This is only available if a stationery type is selected in the Stationeries drop-down list box.
Footer Horizontal Offset Edit box
Use this option to set the horizontal offset value from the
left of the page to place the stationery footer text. The slider bar can be set
from 0% to 100% where 0% is the left of the page and 100% is the right. The
footer is set to 50% by default to place the footer at the center of the page.
This option is only available if a stationery type is selected in the
Stationeries drop-down list box.
Footer Vertical Offset Edit box
Use this option to set the vertical offset value from the top of the page to place the stationery footer text. The slider bar can be set from 0% to 100% where 0% is the top of the page and 100 is the bottom. The header is set to 100% by default to place the footer at the bottom of the page.
This option is only available if a stationery type is selected in the Stationeries drop-down list box.
Watermark Text Edit box
Use this option to add or edit text for the stationery Watermark. Watermarks are different from headers and footers in that they have increased control over positioning, angle, opacity, etc. Text can be entered manually in the text box or auto text options can be accessed by clicking the Add Auto Text dialog button.
This option is only available if a stationery type is selected in the Stationeries drop-down list box.
Watermark Font Edit box
Use this option to view and edit the font properties for the
stationery watermark. Click the
![]() expand
button to edit the font properties in the font editing dialog. The edit box
itself only displays the currently selected font, size and color.
expand
button to edit the font properties in the font editing dialog. The edit box
itself only displays the currently selected font, size and color.
This is only available if a stationery type is selected in the Stationeries drop-down list box.
Watermark Horizontal Offset Edit box
Use this option to set the horizontal offset value from the left of the page to place the stationery Watermark text. The slider bar can be set from 0% to 100% where 0% is the left of the page and 100% is the right. The watermark is set to 50% by default to place the watermark at the center of the page.
This option is only available if a stationery type is selected in the Stationeries drop-down list box.
Watermark Vertical Offset Edit box
Use this option to set the vertical offset value from the top of the page to place the stationery watermark text. The slider bar can be set from 0% to 100% where 0% is the top of the page and 100% is the bottom. The header is set to 50% by default to place the footer at the bottom of the page.
This option is only available if a stationery type is selected in the Stationeries drop-down list box.
Watermark Angle Edit box
Use this option to specify the angle of the watermark text.
This option is only available if a stationery type is selected in the Stationeries drop-down list box.
Watermark Opacity Edit box
Use this option to specify the opacity of the watermark text on the page. 0% will make the watermark text completely transparent and therefore not visible, while an opacity of 100% will display the watermark as solid text in the chosen color.
This option is only available if a stationery type is selected in the Stationeries drop-down list box.
Done Button
Click the Done button to close the stationery pane and save any changes made to the stationeries.
Cancel Button
Click the Cancel button to close the stationery pane and discard all changes.
See Also
Stationery Selection Dialog
XE 'Windows ' * MERGEFORMAT XE 'Pane Window ' * MERGEFORMAT XE 'Clip Art Window ' * MERGEFORMAT XE 'Clip Art ' * MERGEFORMAT Clip Art Pane
The Clip Art Pane displays stamps or clip art that can be inserted into the active page as an annotation stamp object. This pane appears at the right side of the ePrint Main Window workspace (but you can move it by dragging it to another part of the window.)
To show this pane, select Tools -> Annotation -> Clip Art menu item.
Use this pane to insert any stamp or clip art to the active page as an annotation stamp object. Stamps or clip art can be inserted four different ways:
![]() By
dragging and dropping an item from the pane to the active page.
By
dragging and dropping an item from the pane to the active page.
![]() By
double-clicking on any selected stamp or clip art.
By
double-clicking on any selected stamp or clip art.
![]() By
right-clicking on any selected stamp or clip art and choosing Insert from the
resulting context menu.
By
right-clicking on any selected stamp or clip art and choosing Insert from the
resulting context menu.
![]() By
selecting any stamp or clip art item and then pressing Enter.
By
selecting any stamp or clip art item and then pressing Enter.
See Also
ePrint Main Window
Getting Started Pane
Jobs List Pane
Thumbnails Pane
XE 'Menus ' * MERGEFORMAT XE 'ePrint Menus ' * MERGEFORMAT ePrint Menus
Menu commands can be displayed by either:
![]() Clicking
a menu item in the menu bar, or
Clicking
a menu item in the menu bar, or
![]() Holding
down the <Alt> key plus while pressing the underlined letter in the
menus title (e.g., to display the File menu, press <Alt> + <F>).
Holding
down the <Alt> key plus while pressing the underlined letter in the
menus title (e.g., to display the File menu, press <Alt> + <F>).
Menu commands can be selected or executed by:
![]() Clicking
the item in the menu, or
Clicking
the item in the menu, or
![]() Pressing
the <Alt> key plus the underlined letter in the menus title, then
pressing the letter underlined in the menu item (e.g., to select the menu item
File > Save, press <Alt> + <F> + <S>).
Pressing
the <Alt> key plus the underlined letter in the menus title, then
pressing the letter underlined in the menu item (e.g., to select the menu item
File > Save, press <Alt> + <F> + <S>).
![]() The
< >, and < > keys can be used to highlight a menu
command and pressing the Enter key will execute the command.
The
< >, and < > keys can be used to highlight a menu
command and pressing the Enter key will execute the command.
ePrint has two primary types of menus:
![]() Main Menu
Main Menu
![]() Context Menus
Context Menus
XE 'Menus ' * MERGEFORMAT XE 'Main Menu ' * MERGEFORMAT Main Menu
The commands ePrint uses can be grouped into several categories. The main headings for each of these categories appear in the menu bar just below the title bar at the top of the workspace. Click a menu heading to open the menu and choose a command. Frequently used commands are also displayed on the toolbar(s).

![]()
|
Note: |
Menu items that appear in gray either do not apply or are unavailable in the present context. If an item is not available, check the documentation for that particular item to find out why. |
The following menus are on the ePrint main menu:
File Menu
Edit Menu
View Menu
Tasks Menu
Tools Menu
Help Menu
XE 'Menus ' * MERGEFORMAT XE 'File Menu ' * MERGEFORMAT File Menu
Use the File menu to perform file commands. The File menu is shown in the following figure:
The following table lists the commands on the File menu and gives a brief description of each command:
|
Command |
Description |
|
New |
Opens the Empty Page dialog, which lets you insert an empty page at the end of the current job. |
|
Open |
Opens the Open dialog, to select the files to be added to the ePrint workstation. If the file is not an image, it will be printed in the background using the default-associated program and the document will be sent from that application to the Workstation. Keep in mind that ePrint will only receive the information that is delivered when a document is printed. Images are loaded directly into the workstation and do not require the printing method of acquiring the document. |
|
Close Job(s) |
Closes all the print jobs. |
|
Save As |
Opens the Save As dialog, which allows you to specify the desired file format you would like to create through ePrint. |
|
|
Saves the included print jobs to the hard disk and sends them to an email recipient. |
|
|
Opens the Print dialog where you can print the selected file to any printer on your system including LEADTOOLS ePrint. |
|
Batch Print |
Opens the Batch Print dialog, which redirects printing command of a specific material to one or more printer drivers installed on the system. |
|
Exit |
Ends your working session and exits ePrint. You may alternatively press <Alt>+<F4>. If there are any unsaved images, a dialog will appear asking if you want to save your work. If you choose cancel, the exiting process is aborted. |
XE 'Menus ' * MERGEFORMAT XE 'Edit Menu ' * MERGEFORMAT Edit Menu
Use the Edit menu to perform edit commands. The Edit menu is shown in the following figure:
The following table lists the commands on the Edit menu and gives a brief description of each command:
|
Command |
Description |
|
Cut Page |
Cuts the active page to ePrint clipboard. |
|
Paste Page |
Shows the Paste Page submenu. |
|
Go To |
Opens the Go To dialog, which moves to a specific page in the print job and makes it the active page. |
|
Rename Job |
Renames the selected print job in the Jobs List Pane. |
|
Insert Empty Page |
Shows the Insert Empty Page submenu. |
|
Delete Print Job |
Deletes the selected print job. |
|
Include Print Job |
Includes the selected print job. |
|
Exclude Print Job |
Excludes the selected print job. |
|
Delete Page |
Deletes the selected page from the print job. |
|
Include Page |
Includes the selected page from the print job. |
|
Exclude Page |
Excludes the selected page from the print job. |
|
Select Stationery |
Opens the Stationery Selection dialog. |
|
Select Form |
Opens the Form Selection dialog. |
XE 'Paste Page Sub Menu ' * MERGEFORMAT XE 'Menus ' * MERGEFORMAT Paste Page Sub Menu
Use the Paste Page sub menu to specify the position of a page being pasted into a print job. The Paste Page sub menu is shown in the following figure:
The following table lists the commands on the Paste Page sub menu and gives a brief description of each command:
|
Command |
Description |
|
Before Selected Page |
Pastes a copied page before the currently selected page. |
|
After Selected Page |
Pastes a copied page after the currently selected page. |
|
Beginning of Selected Job |
Pastes a copied page as the first page in the currently selected print job. |
|
End of Selected Job |
Pastes a copied page as the last page in the currently selected print job. |
XE 'Shortcuts ' * MERGEFORMAT Insert Empty Page Sub Menu
Use the Insert Empty Page sub menu to specify the position of a new, empty page to be added to the print job. The Insert Empty Page sub menu is shown in the following figure:
The following table lists the commands on the Insert Empty Page sub menu and gives a brief description of each command:
|
Command |
Description |
|
Before Selected Page |
Inserts an empty page before the currently selected page. |
|
After Selected Page |
Inserts an empty page after the currently selected page. |
|
Beginning of Selected Job |
Inserts an empty page to be the first page in the currently selected print job. |
|
End of Selected Job |
Inserts an empty page to be the last page in the currently selected print job. |
XE 'View Menu ' * MERGEFORMAT XE 'Menus ' * MERGEFORMAT View Menu
Use the View menu to change view settings. The View menu is shown in the following figure:
The following table lists the commands on the View menu and gives a brief description of each command:
|
Command |
Description |
|
Zoom |
Shows the Zoom submenu. |
|
Page Mode |
Shows the Page Mode submenu. |
|
Toolbars |
Shows the Toolbars submenu. |
|
Getting Started Pane |
Shows or hides the Getting Started Pane. |
|
Thumbnail Pane |
Shows or hides the Thumbnail Pane. |
|
Jobs List Pane |
Shows or hides the Jobs List Pane. |
XE 'Page Mode Sub Menu ' * MERGEFORMAT XE 'Menus ' * MERGEFORMAT Page Mode Sub Menu
Use the Page Mode sub menu to specify whether to view pages as single pages in the ePrint Main Window workspace or view them continuously.
![]()
The following table lists the commands on the Page Mode sub menu (View -> Page Mode) and gives a brief description of each command:
|
Command |
Description |
|
Single Page Mode |
Displays the pages with one page in the viewing area at a time in the ePrint Main Window workspace. |
|
Continuous Page Mode |
Views the pages continuously in the ePrint Main Window workspace. |
XE 'Toolbars Sub Menu ' * MERGEFORMAT XE 'Menus ' * MERGEFORMAT Toolbars Sub Menu
Use the Toolbars sub menu to show or hide the different toolbars. The Toolbars sub menu is shown in the following figure:
The following table lists the commands on the Toolbars sub menu (View -> Toolbars) and gives a brief description of each command:
|
Command |
Description |
|
Standard Toolbar |
Shows or hides the Standard Toolbar. |
|
Page Mode Toolbar |
Shows or hides the Page Mode Toolbar. |
|
Page Navigation Toolbar |
Shows or hides the Page Navigation Toolbar. |
|
Zoom Toolbar |
Shows or hides the Zoom Toolbar. |
|
Annotation Tools Toolbar |
Shows or hides the Annotation Tools Toolbar. |
|
Annotation Properties Toolbar |
Shows or hides the Annotation Properties Toolbar. |
|
Annotation Text Alignment Toolbar |
Shows or hides the Annotation Text Alignment Toolbar. |
XE 'Zoom Sub Menu ' * MERGEFORMAT XE 'Menus ' * MERGEFORMAT Zoom Sub Menu
Use the Zoom sub menu to control the magnification level of the page being viewed. The Zoom sub menu is shown in the following figure:
The following table lists the commands on the Zoom sub menu (View -> Zoom) and gives a brief description of each command:
|
Command |
Description |
|
Normal |
Switches the magnification to the normal level (100%). |
|
Fit Page |
Switches the magnification level to fit the whole page to the ePrint Main Window workspace client area. |
|
Fit Width |
Switches the magnification level to fit the page width to the ePrint Main Window workspace client area. |
|
200 % |
Sets the magnification level to (200%). |
|
150 % |
Sets the magnification level to (150%). |
|
100 % |
Sets the magnification level to (100%). |
|
75 % |
Sets the magnification level to (75%). |
|
50 % |
Sets the magnification level to (50%). |
|
Custom Zoom |
Opens the Custom Zoom dialog, which customizes the magnification level. |
|
Zoom In |
Increases the magnification level. |
|
Zoom Out |
Decreases the magnification level. |
XE 'Tasks Menu ' * MERGEFORMAT XE 'Menus ' * MERGEFORMAT Tasks Menu
Use the Tasks menu to open dialogs to add or configure tasks. The Tasks menu is shown in the following figure:
![]()
The following table lists the commands on the Tasks menu and gives a brief description of each command:
|
Command |
Description |
|
Add New Task |
Opens the Task Wizard, which lets you add a new task to a list of saving, emailing and printing operations stored in the wizard. |
|
Configure Tasks |
Opens the Configure Tasks dialog, which reconfigures existing tasks. |
XE 'Tools Menu ' * MERGEFORMAT XE 'Menus ' * MERGEFORMAT Tools Menu
Use the Tools menu to change general settings and options. The Tools menu is shown in the following figure:
The following table lists the commands on the Tools menu and gives a brief description of each command:
|
Command |
Description |
|
Task Printers Manager |
Opens the Task Printers Manager dialog to add or modify task printers. A task printer is an ePrint printer that is configured to perform specific tasks. |
|
Conflict Resolving Options |
Opens the Conflict Removal dialog. |
|
Email Options |
Opens the Email Options dialog to configure the email settings. |
|
Annotation |
Shows the Annotation submenu. |
|
Options |
Opens the Annotation Options dialog. |
XE 'Annotation Sub Menu ' * MERGEFORMAT Annotation Sub Menu
Use the Annotation sub menu to perform annotation-related commands. The Annotation sub menu is shown in the following figure:
The following table lists the commands on the Annotation sub menu (Tools -> Annotation) and gives a brief description of each command:
|
Command |
Description |
|
Select Annotation Tools |
Displays the Select Annotation Tools submenu. |
|
Format Annotation Objects |
Opens the Annotation Options dialog to modify the properties of the selected annotation object(s). Any new annotation objects will also have these property settings. |
|
Clip Art |
Opens the Clip Art Pane to insert clip art into the page. |
|
Select All |
Selects all annotation objects in the current active page. |
|
Clear |
Deletes the selected annotation object(s). |
|
Cut |
Cuts the currently selected annotation object(s). |
|
Copy |
Copies the currently selected annotation object(s) to the clipboard. |
|
Paste |
Pastes the annotation object(s) from the clipboard to the active page. |
|
Undo |
Undoes the last action performed on annotation object(s) on the current active page. |
|
Group |
Groups the selected annotation objects. This command will be enabled if at least two annotation objects are selected. |
|
Ungroup |
Ungroups the selected annotation object(s). |
|
Bring to Front |
Brings the selected annotation object(s) to the front of the display order. |
|
Send to Back |
Sends the selected annotation object(s) to the back of the display order. |
|
Politica de confidentialitate | Termeni si conditii de utilizare |

Vizualizari: 2021
Importanta: ![]()
Termeni si conditii de utilizare | Contact
© SCRIGROUP 2025 . All rights reserved