Scrigroup - Documente si articole


HomeDocumenteUploadResurseAlte limbi doc
BulgaraCeha slovacaCroataEnglezaEstonaFinlandezaFranceza
GermanaItalianaLetonaLituanianaMaghiaraOlandezaPoloneza
SarbaSlovenaSpaniolaSuedezaTurcaUcraineana

AdministrationAnimalsArtBiologyBooksBotanicsBusinessCars
ChemistryComputersComunicationsConstructionEcologyEconomyEducationElectronics
EngineeringEntertainmentFinancialFishingGamesGeographyGrammarHealth
HistoryHuman-resourcesLegislationLiteratureManagementsManualsMarketingMathematic
MedicinesMovieMusicNutritionPersonalitiesPhysicPoliticalPsychology
RecipesSociologySoftwareSportsTechnicalTourismVarious

Burner fuel oil pump and motor

technical


+ Font mai mare | - Font mai mic


Burner fuel oil pump and motor

Fuel oil pump

The fuel oil pump is a gear-wheel pump which provides an operating pressure up to 30 bar. The fuel oil pump is equipped with a built-in pressure regulator with a fast working valve to keep a constant pressure. An illustration of the burner fuel oil pump is shown in Figure 1.


Attention:   Please note that the pump is not of the self-priming type. During commissioning the fuel oil pump and oil lines must be filled with oil and properly vented before the burner motor is started. Failure to comply may cause cavitation damage to the fuel oil pump.
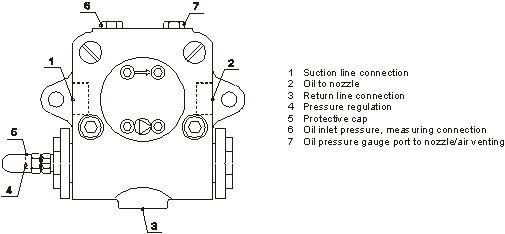

Illustration of the burner fuel oil pump

Figure 1 oilburn-m7.cdr

Commissioning of the fuel oil pump

The oil line on the suction side of the pump must be primed and the pump vented before commissioning, otherwise the pump will be damaged due to cavitation. For oil pump venting, loosen the gauge connection/venting plug (7) after which the burner should operate for a while. Air comes out of the hole in bubbles. Retighten the plug carefully when there are no more bubbles (do not remove the plug from the hole).

The viscosity of the oil to the pump should be between 4 70 cSt. The diagram in Figure 2 shows the required oil inlet pressure and temperature to the pump.

Diagram for oil inlet pressure and temperature


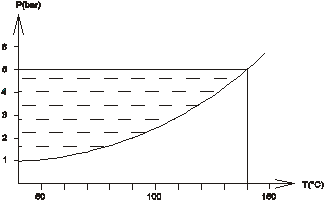
Figure 2 oilburn-hm9.cdr

Testing the suction pressure

Step A: Insert a pressure gauge into the suction gauge connection (6) to measure the supply pressure.

Adjust the fuel oil pump pressure

In order to make the final adjustment of the oil pressure the burner must be running in normal operation.

Step A: Remove the protective cap (5) and set the required oil pressure on the pressure regulating screw (4).
Step B: Adjust the oil pressure by turning the pressure regulating screw. The pressure increases by turning the screw clockwise and decreases counter-clockwise.
Step C: When firing diesel oil (DO) the oil must be atomised at a pressure of 20 25 bar and on heavy fuel oil (HFO) at a pressure of 25 30 bar.
Step D: The final pressure setting can be seen in the Technical data section.

Restart after prolonged burner stop

If the boiler plant has been shut down for a period of time and the plant is started from cold conditions the following procedures must be taken into consideration:

Step A: The fuel oil transfer pump should be started in order to circulate oil in the ring-line system.
Step B: Remove the pressure gauge connection (6) and add some oil to protect the fuel oil pump from cavitating.
Step C: Start the burner and wait until air-free oil appears. Remount the pressure gauge connection again.

Oil pump coupling

The coupling is mounted between motor and oil pump so that by moving the coupling head on the oil pump shaft there should be an axial play of 1 2 mm. Before adjusting the coupling remove the air dampers. Loosen four fixing screws and let the dampers come out of the burner housing. Figure 3 illustrates the pump coupling
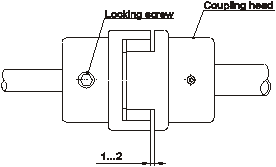

Illustration of the oil pump coupling

Figure 3 oilburn-hm10.cdr

Exchange of the fuel oil pump

If the fuel oil pump breaks down, it should be exchanged with a new fuel oil pump alternatively with an overhauled spare pump. Aalborg Industries cannot recommend that the user repairs it. The defective pump should be sent for repair.

Burner motor

Figure 4 illustrates the interior parts of the burner motor, fan, shaft, and oil pump. In case the burner motor must be exchanged the following work procedures should be carried out:
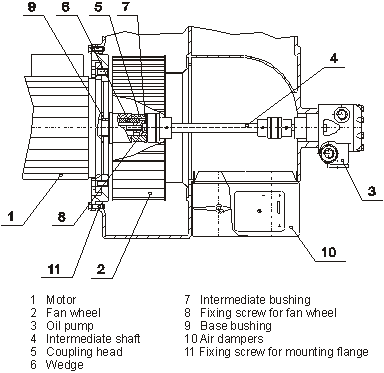
Dismounting the fan wheel

Step A: Disconnect the burner from the mains and remove the electric cables for the motor.
Step B: Remove the oil pipes from the oil pump. Disconnect the air dampers. Do not let the air dampers hang on the servomotor cable.
Step C: Unscrew the fixing screws for the oil pump. Support with hand the intermediate shaft and withdraw the oil pump.
Step D: Unscrew the screws in the mounting flange of the motor and remove the motor (note the weight of the motor).
Step E: Unscrew the fixing screw for the fan wheel. Remove the intermediate bushing and coupling head.
Step F: Withdraw the fan wheel from the motor shaft using an extractor. Loosen the wedge and the bushing.

Mounting the fan wheel

Step A: Place the base bushing and set the wedge into the shaft slot.
Step B: Pull the fan wheel to its place using a binder plug. The fan wheel lies against the base bushing.
Step C: Place the coupling head and intermediate bushing. Fasten the fan wheel with screw to the motor shaft.
Step D: Place the motor and fasten the screws.
Step E: Support with hand the intermediate shaft and install the oil pump. Fix the pump with locking screws. Check the axial play of the coupling. Adjust, if necessary.
Step F: Place the air dampers and fix the oil pipes for the oil pump. Remember to vent the oil pump.
Step G: Connect the electric cables to the motor and connect the burner to the mains. Check the direction of rotation in the motor.


Illustration of interior parts for the burner motor, fan, shaft, and oil pump

Figure 4 oilburn-hm11.cdr


Politica de confidentialitate | Termeni si conditii de utilizare


DISTRIBUIE DOCUMENTUL

Comentarii


Vizualizari: 1657
Importanta: rank

Comenteaza documentul:

Te rugam sa te autentifici sau sa iti faci cont pentru a putea comenta

Creaza cont nou

Termeni si conditii de utilizare | Contact
© SCRIGROUP 2024 . All rights reserved